What is enabling adb on Android. Basic ADB and fastboot commands. Using a PC and special programs
Majority Android users don't know anything about A.D.B.. Full title - Android Debug Bridge, stands for Android Debug Bridge. ADB is part of the Android SDK . Using ADB, you can perform various actions on your Android tablet or smartphone, such as flashing, copying files from your computer to Android and vice versa, system recovery and others.
ADB for Android - what is it?
You probably know that the Android operating system is based on a modified Linux kernel. Therefore, there is a need to use the command line with it. It is the program adb helps establish communication between computer and Android. It is part of the Android SDK development environment, so to install the Android Debug Bridge, you need to download the Android SDK from the official website. There are versions for all popular operating systems: Windows, Mac OS and Linux. That is, to put it simply, adb allows control your phone or tablet using a computer.
I also recommend the following instructions:
Basic adb commands Android
Connect your device to your PC via USB. Make sure all drivers are installed and USB debugging is enabled.
To Work with Android Debug Bridge The best way is through the Windows command line. To do this, in Windows XP, click “Start” and in the “Search programs and files” input field, enter “cmd”, then press “Enter”. If you have Windows 7 or higher, click "Start" and in the "Run" field type "cmd" and press "Enter" again.
adb devices
The most common adb command. Using it, you can determine whether your PC sees the connected device. If you did everything correctly, the following line will appear: “List of devices attached.” After it you will see the serial number of your smartphone or tablet and its status: “online” or “offline”.
If it says “offline”, this means that the device is in sleep mode, if “online”, then the device is ready to execute your commands.

Thanks to this command you can install applications on your smartphone or tablet. To do this, you need to specify the path where the APK file is located:
adb intsall D:\papka_s_faylom\nazvanie_prilogeniya.apk
To avoid writing long paths, copy the file to the android-tools directory. Then the path will be like this:
adb intsall nazvanie_prilogeniya.apk
adb uninstall
You need to enter it in the same way as the previous command. This will remove the application.
This team has an interesting feature. If you add the key -k, then when you delete a game or program, its data and cache will not be deleted, but will remain on the Android device.

Thanks to this command, you can transfer files from your computer to Android. To do this, you need to know the full path where the file is stored and where to move it.
adb push D:\papka_s_faylom\nazvanie_fayla/sdcard/Android
To avoid writing long paths, copy the file to the android-tools directory. Then you need to enter:
adb push nazvanie_fayla/sdcard/Android

This command copies files from Android to computer. You need to know the path where the file is located on your smartphone or tablet and indicate the location where you want to save the file. If you do not specify the latter, the file will be saved in the android-tools directory.
adb pull /sdcard/nazvanie_fayla\D:\papka_gde_sohranity

This command will reboot your Android phone or tablet.

With this command you can directly boot into bootloader mode.
adb reboot recovery
Not all devices support this command. Using it you can get into recovery mode.
adb connect
Using this command you can connect the device to Wi-Fi networks. To do this, you need to know the IP address and port of the device.
adb connect ip:port
With this command you get full access to all files on your device.

The second way to use adb shell is to execute a single Android shell command using this construct:
adb shell<команда>
If you put your Android phone or tablet into bootloader mode, then the commands adb will not work anymore. Here you need to use fastboot commands.

To check whether PC and Android can see each other, use the command:
After entering it, the serial number of your device should appear.
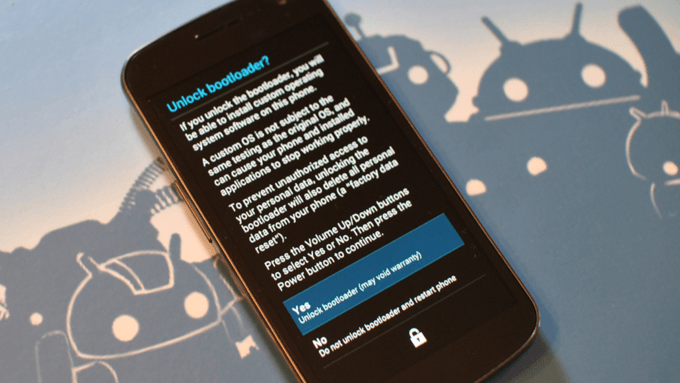
By entering this command, you can unlock the bootloader of Asus and HTC phones and tablets. When your device is in bootloader mode, enter:
Also all yours installed programs and personal data will be lost.

Using this command you can display the contents of a log file: changes, errors, etc. The data will scroll too quickly, so the right solution would be to save it in one TXT file. To do this, enter:
adb logcat > filename.txt
adb sideload
The command will be useful for owners of Google Nexus devices. Using it you can update the firmware of the device. Download it to your computer, connect your Nexus to it, go into Recovery mode, select “Apply update from ADB” and then enter the command.
If you want to learn how to use Adb Run, then most likely you are already familiar with the main program - Adb. If not, then consider these two tools for Android users. What are utilities needed for, how to configure and use them?
Program
So what is Adb? This is a program that gets its name from its acronym. ADB is an Android debug bridge. A tool for debugging, troubleshooting utilities, and unlocking gadgets on this operating system. These are the main features of the program, but if you are well versed in this topic, you will learn about a dozen more hidden options.
Installation
To understand how to use Adb Run, you need to install ADB on your PC. To do this, you need to download it from the official website of the developer. In principle, many sites make it possible to download this utility to your computer, so there will be no problems with the search.
Connection
To understand why ADB, and therefore Adb Run, is needed, let’s look at the basic commands. For example, if you are not sure that the computer sees the phone correctly and will work with it correctly, you can enter the adb devices command. This way you can make sure that the connection is stable.
After you use the command, the program will display a message stating that List of devices attached. If you don’t see a similar phrase, then most likely the problem is either with the cable or with the drivers. You will have to double-check the functionality of the device and find out the reasons why the PC does not see the smartphone.
If you find out that the cable is not working, you can try connecting the gadget via wireless network. Wi-Fi connection is made using ADB Wireless. In addition, the device must have Root permissions.

Then enter the adb connect ip:port command. Instead of ip:port, enter the value that is set for your network address.
Possibilities
Since the question of how to use Adb Run is related to the use of ADB, it is worth understanding what capabilities the main utility hides. For example, thanks to the code, you can install an application that is located on your PC. To do this, you need to write adb install, and then specify the path where it is
In the same way, you can transfer a regular document from a computer to a phone. The algorithm is the same, only the command has changed. We enter adb push, and then indicate the address of the location of the file that should be transferred to the gadget. If you need to do the opposite operation, enter adb pull. Only the first address indicates the folder on the phone, and the second is the place where you want to save the transferred document on your PC.
Adb Run
This is a tool that makes your work easier. It is especially convenient for those who understand how to use the Adb Run program. The utility is designed to simplify working with ADB and makes the functionality of the latter program clearer. The essence of the additional tool is that it automates common user commands and greatly simplifies actions with the console. Adb Run can also reset the pattern.

The program looks like a console. It consists of 14 items, and navigation through menus and sections occurs by selecting the desired number and the Enter confirmation button.
Preparation
Before learning how to use Adb Run this program, it is important to remember about USB debugging. This step is often forgotten, after which the program simply does not see the phone. To do this, you need to go to settings, find the “About phone” option there.
IN latest versions operating system you need to find the line with the serial number and click on it several times. A notification appears at the bottom, first that you are on the right track, then that you have become a developer. When you see such a message, you can return to the settings, the “Developer Options” item should appear there. You can enable deferring there.
Review
A short overview of the utility and how to use Adb Run for Android. The first point right away is to check that the gadget is connected correctly. If you forgot about deferring, the program will immediately detect this. The first item is called Device attached. By selecting it, you will find out whether the phone is connected to the system.

Next - point Move. Instead of entering the commands that were described earlier, it will be enough to choose between two items. The first one is responsible for transferring files from the computer to the phone, the second one is responsible for the reverse process.
Third point Install is responsible for downloading applications to the gadget. There are five options available here. Among them are copying the program, installing it normally or on a memory card. It is possible to remove utilities from your phone via a PC or move them.
Paragraph Reboot reboots the device. It does this in three options, including a normal reboot, switching to bootloader mode or going to the Recovery menu. The next line under the fifth number is responsible for the firmware of the device. Fastboot is a menu that has 10 items. Moreover, they are all highly specialized; if you do not know what to choose, you will have to consider each sub-item.
In the next paragraph - Unlock Gesture Key- you can learn how to use Adb Run with Windows 10 if you need to unlock the pattern. Often users, using this protection method, forget it, but when failures occur, this utility comes to the rescue. The sixth menu contains items with different graphic key options. You need to choose the one you forgot.

Point seven - Manual- needed by those who want to enter commands themselves. There may be directives that are not in the list presented. This is what this menu item is for. There is also a special menu for owners of HTC smartphones. In it you can unlock Bootloader, change CID and get S-OFF.
The eighth item checks for utility updates. The ninth is a creative option for those who are tired of the animation when turning on the device. If you want to replace it or disable it, then you need to go to the Intsall Bootanimation menu.
The tenth paragraph provides information about all existing blocks of the device. There are sections here, perhaps hidden, or those that are difficult to reach. Run Script is the eleventh menu for using scripts. Backup is the twelfth point, which creates a backup copy of the entire gadget. Convenient if you need to do a Reboot.
The next menu is responsible for odexing the firmware. If you are unfamiliar with this process, it is better not to experiment on your own. The fourteenth point is working on screenshots. The last menu is needed to exit the utility.

conclusions
How to use Adb Run on Windows XP is clear. There is no difference at all with how this program works on Windows 7 or 10. Therefore, no problems should arise. The above instructions are suitable for all occasions.
For Linux owners there is also an option that is easy to use. You just need to install a special version.
The ADB and Fastboot utilities are included in the Android SDK development kit (do not confuse it with Android Studio, much less download its cumbersome installation file, unless, of course, you intend to develop for Android). ADB is a debugging tool that allows you to access the Android console from a computer (by connecting the gadget to a PC via USB. At the same time there should be . Fastboot is designed to work with the device when it is loaded in the mode of the same name (if your device has one).
Using ADB, you can manage your smartphone/tablet from your computer: make a backup of applications, record a screencast, put your smartphone in Recovery mode, and much more. In addition, you can work with ADB via Wi-Fi. To do this, your device must have root rights, and you will also need a special application that connects to your computer over the network. For example, ADB Wireless or WiFi ADB. But this is material for a separate article.
Using Fastboot, you can, custom Recovery (or), unlock Bootloader (on HTC, Motorola, Sony, Nexus, Huawei, the latest LG devices it is blocked), clean system partitions.
How to install ADB and Fastboot: instructions
1. Go to the official website where you can download the Android SDK: https://developer.android.com/studio/index.html. Scroll down to the “Command line tools only” section and select the archive for Windows.

2. Check the “I have read and agree with the above terms and conditions” checkbox and click the “Download Android Command Line Tools for Windows” button. The archive will begin downloading.

3. Download it and unzip it to the root of Drive “C:”.
4. You also need to download the Java Development Kit from the official page. Go to the website, agree to the terms of the license agreement by checking the “Accept License Agreement” box, and download the JDK version that matches the bit size of your system.

First way
Go back to the Android SDK folder, open “tools” and run “android”.

Check "Android SDK Platform-tools" (and also "Google USB driver" if you have a Nexus device) and click "Install Packages".

Read below about installing drivers for other devices.
Select "Accept License" and click "Install".

My log showed that an error occurred. But in the end everything ended successfully.
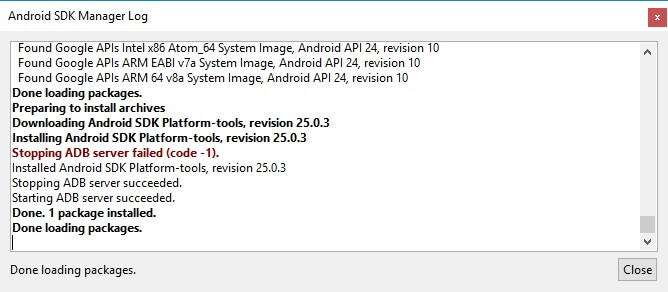
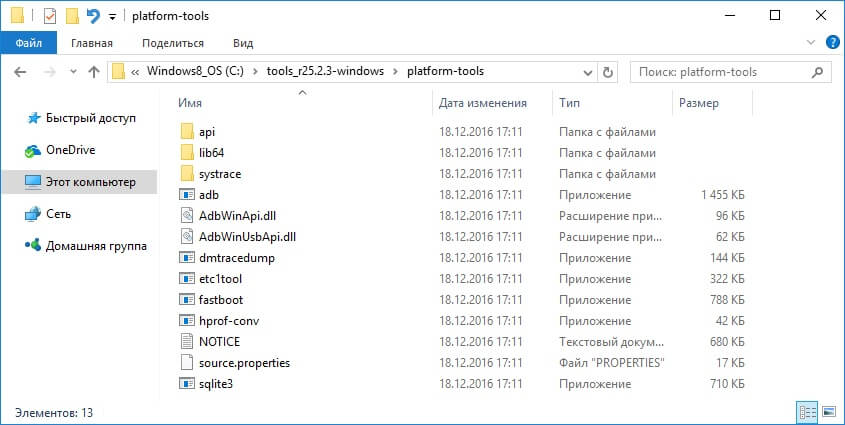
After completing the above steps, in the “sdk-tools-windows-” folder version“platform-tools” will appear, and it will contain the “ADB” and “Fastboot” that we are interested in.

Second way
Go to the folder "sdk-tools-windows- version» → “tools” → “bin” and, holding down the “Shift” key, right-click on an empty area. Select "Open a command window" or "Open a PowerShell window here" if you have one of the latest builds of Windows 10 installed on your PC or laptop.

Paste the command into PowerShell or Command Prompt (in PowerShell add ./ at the beginning):

Click "Enter" to execute the command. The files will download and you will be asked to install:

To enable, type y, that is, “yes”, and press “Enter”, after which the installation of “platform-tools” will begin.

At the end, a message will be displayed on the command line that the procedure completed successfully. And the “platform-tools” folder with ADB and Fastboot inside will appear in “sdk-tools-windows- version».
(!) If for some reason you cannot install ADB and Fastboot using the previous methods, use the third option - simply download the “platform-tools” archive and unzip it to the “C:” drive.
Installing ADB and Fastboot drivers for Windows
For a computer, smartphone or tablet, you need to download the USB driver:
- Samsung - the driver is included in the Kies utility: http://www.samsung.com/ru/support/usefulsoftware/KIES/ or you can download it separately by selecting the desired model: http://www.samsung.com/us/ support/downloads
- HTC – as part of HTC Sync Manager: http://www.htc.com/ru/software/htc-sync-manager/
- Nexus - Android driver is installed along with the Android SDK, as described above.
- Huawei - together with the HiSuite utility: http://consumer.huawei.com/minisite/HiSuite_en/index.html
- LG – install LG PC Suite: http://www.lg.com/ru/support/software-firmware
- Motorola - see this page: https://motorola-global-portal.custhelp.com/app/answers/detail/a_id/88481
- Sony Xperia - FastBoot drivers for all models are here: http://developer.sonymobile.com/downloads/drivers/
- Xiaomi – Mi PC Suite: http://pcsuite.mi.com
- MTK – for Chinese devices on MediaTek chips: http://online.mediatek.com/Public%20Documents/MTK_Android_USB_Driver.zip
- Lenovo - select your smartphone or tablet model and download the ADB driver: http://support.lenovo.com/us/en/GlobalProductSelector
- Look for solutions for devices from other manufacturers on their official websites.
There are various universal ADB driver installers (for example, this one: http://adbdriver.com/downloads/) - they can also be used, for example, when for some reason it was not possible to install the official solution.
If your model comes with a driver without an installer, you will have to do the following:
1. Go to “Control Panel” → “Device Manager”. In Windows 10, just right-click on the Start menu and select Device Manager.

2. Find in the list the device for which you need to install drivers. Right-click and click Update Drivers.

As you can see, the computer correctly recognizes my Nexus 7 tablet. If your PC detects the smartphone incorrectly or there is a yellow triangle with an exclamation mark inside next to the device, “manual” installation of Android drivers is required for you.
3. Select “Browse this computer for driver software.”

4. Specify the path to the driver folder on your PC.

Wait until the installation is complete and then reconnect the gadget to your computer via USB.
How to get started with Fastboot and ADB
Working with ADB or Fastboot is done from the command line; the utilities are launched in two ways:
1: Right-click on “Start” and select “Command Prompt (Admin)” or “Windows PowerShell (Admin)”. Next, using the commands, specify the path to the folder with ADB and Fastboot (after entering each, press “Enter”).
To return to the root of the "C:\" drive, use:
Thanks to this command we open the desired folder:
In my case it turned out like this:
cd\tools_ version-windows\platform-tools

You will get (Google developers changed the name of the archive after writing the original version of this instruction):
cd\sdk-tools-windows- version\platform-tools
The path to Fastboot and ADB is indicated, now we work with them from the console.
To avoid having to do this every time, add the path to "platform-tools" to the "Path" variable. First, go to the folder, in the navigation bar, right-click on “platform-tools” and select “Copy Address”.

Go to "Control Panel". To do this, press “Win” + “R” and in the “Open:” field, paste control . Click OK.

Select "System" → " Extra options systems" → "Environment variables...".


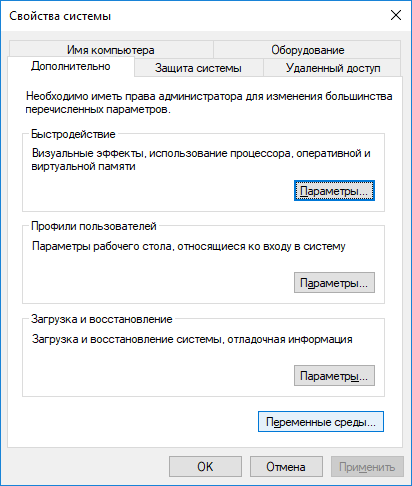
Find the "Path" variable, highlight it and select "Edit...".

Click New, paste the path to the "platform-tools" folder and click OK.

c:\android\adb- Let's go to Start → Execute(or press on the keyboard Win+R, as convenient for you) and type the following:
cmd - The command line opened. We write in it:
cd c:\android\adb
Where c:\android\adb
*Helpful advice: TAB
- Install ADB and fastboot on PC (see above)
- We go to the folder where we installed our adb and fastboot. I have this
/home/myuser/nexus/adb/ - We go to the terminal and write there:
cd /home/myuser/nexus/adb/
Where /home/myuser/nexus/adb/- path to the folder with adb and fastboot. It may be different for you
*Helpful advice: to avoid typing everything manually, you can type part of the folder name and click on TAB - Connecting our nexus device to the PC
- Execute the necessary commands (see below)
ADB - Android Development Bridge. Simply put, this is a thing for developing and debugging applications for our beloved Android. But we are not programmers (for the most part), but ordinary users! Why do we need it? Let's figure it out.
adb, from the point of view of a simple user, includes the following features:
-Editing files on the device itself via PC
-Ability to install applications, firmware, kernels, radios, bootloaders and recovery
-Ability to “Download” the files we need from the phone
To work with adb, you must first install them on your computer (as - see above)
ADB commands:
ADB push (writes a file to your device) -- adb push c:\example.apk /sdcard/example.apk
ADB pull (extracts a file from the device to the computer) -- adb pull /system/app/example.apk c:\example.apk
ADB install (installation of the program on the device) -- adb install c:\example.apk
adb reboot (device reboot)
adb reboot recovery (reboot the device and then boot into recovery)
adb reboot bootloader (reboot the device and then load it into the bootloader)
adb remount (unmount and mount the /system partition)
ADB-Shell commands:
adb shell (launches a Linux shell to run on the device)
cd (navigation through device directories) -- cd /system/app
ls (analogous to the "dir" command in DOS, shows the contents of the directory) -- ls /system/app
rm (deleting a file from the directory) -- rm /system/app/example.apk
cp (copies the file from the directory to the directory on the device) -- cp /system/app/example.apk /sdcard/example.apk
exit (exit ADB-Shell) -- exit
Fastboot utility commands:
fastboot devices - list of devices connected to the computer (used to check the connection)
fastboot reboot - reboot the device
fastboot reboot-recovery - reboot the device into recovery
fastboot reboot-bootloader - reboot the device into the bootloader
fastboot flash boot filename.img - kernel firmware
flashboot flash radio filename.img - radio firmware
fastboot oem lock - close the bootloader.
fastboot oem unlock - open the bootloader (erases all user data)
This is far from full list teams!
Android firmware, i.e. writing certain file images to the corresponding sections of the device’s memory using special Windows software that almost completely automates the process is today not the most difficult procedure from the user’s point of view. If using such tools is impossible or does not give the desired result, Fastboot saves the situation.
In order to flash an Android device via Fastboot, you will need knowledge of the console commands of the same mode of operation of the device, as well as certain preparation of the smartphone or tablet and the PC used for operations.
Due to the fact that in fastboot mode, manipulations with the device’s memory sections are performed virtually directly, when using the firmware method described below, some caution and attentiveness are required. Additionally, the following steps should probably only be recommended if you are unable to flash the firmware using other methods.
The user carries out every action with his own Android devices at his own peril and risk. For possible Negative consequences The site administration is not responsible for using the methods described on this resource!Preparation
Strict implementation of the preparatory procedures determines the success of the entire process of flashing the device, so the implementation of the steps described below can be considered a prerequisite before carrying out operations.
Installing drivers
System backup
If there is the slightest possibility, before flashing the firmware, a full backup copy of the existing partitions of the device’s memory must be created. The steps required to create a backup are described in the article: How to backup an Android device before flashing it
Downloading and preparing the necessary files

This add-on allows you to perform all the operations from the examples described below in a semi-automatic mode and without having to resort to manually entering commands into the console.

Rebooting the device into bootloader mode
1. In order for the device to accept commands sent by the user via Fastboot, it must be rebooted into the appropriate mode. In most cases, it is enough to send a special command via adb to the device with USB debugging enabled:
adb reboot bootloader
2. The device will reboot into the mode required for firmware. Then we check that the connection is correct using the command:
fastboot devices
3. Rebooting into fastboot mode can also be done using the corresponding item in (“ Reboot»).

4. If the above methods for switching the device to fastboot mode do not work or are not applicable (the device does not boot into Android and does not enter recovery), you must use a combination of hardware keys on the device itself. For each model range These combinations and the order of pressing the buttons are different; unfortunately, there is no universal way to enter.
Just for example, you can consider the products of Xiaomi. In these devices, loading into fastboot mode is carried out by pressing the button “ Volume-" and, while holding it, the keys " Nutrition».

Let us note once again that other manufacturers have different methodology for entering fastboot mode using hardware buttons and their combinations.
Unlocking the bootloader
Manufacturers of a certain number of Android devices block the ability to manage device memory sections by locking the bootloader. If a device has a locked bootloader, in most cases flashing its firmware via fastboot is not possible.
To check the status of the bootloader, you can send the following command to the device, which is in fastboot mode and connected to the PC:
fastboot oem device-info
But again we have to admit that this method Finding out the locking status is not universal and differs for devices from different manufacturers. This statement also applies to unlocking the bootloader - the methodology for carrying out the procedure differs for different devices and even for different models of the same brand.
How to unlock Bootloader
- How to unlock the bootloader - HTC
- How to unlock the bootloader - Nexus
- How to unlock the bootloader - Sony
- How to unlock the bootloader - Xiaomi
- How to unlock the bootloader - Huawei
- How to unlock the bootloader - LG
Writing files to device memory sections
Having completed the preparatory procedures, you can proceed to the procedure for writing data to the device’s memory sections. Once again, we double-check the correctness of downloading image files and/or zip packages and their compliance with the device being flashed.
Attention! Flashing incorrect and damaged file images, as well as images from another device into the device leads in most cases to the inability to load Android and/or other negative consequences for the device!Installing zip packages
To write to the device, for example, OTA updates, or a complete set of software components distributed in the format *.zip, the fastboot command is used:
update1. Make sure that the device is in fastboot mode and is correctly detected by the system, and then clean up the partitions " cache" And " data" This will delete all user data from the device, but is in most cases a necessary step, as it avoids many errors when flashing and further work software. We execute the command:
fastboot –w
2. Write down the zip package with the firmware. If this is an official update from the manufacturer, the command is used:
fastboot update update.zip
In other cases we use the command
fastboot flash update.zip3. After the inscription “ finished. total time…."The firmware is considered complete.
Writing img images to memory partitions
In many cases, searching for firmware in the format *.zip may be difficult to download. Device manufacturers are reluctant to post their solutions on the Internet. In addition, zip files can be flashed through recovery, so the advisability of using the method of writing zip files through fastboot is questionable.
But the ability to flash individual images into the appropriate sections, in particular “ boot», « system», « userdata», « recovery"etc. via Fastboot when restoring the device after serious software problems, can save the situation in many cases.
To flash a separate img image, use the command:
fastboot flash partition_name file_name.img1. As an example, let's write down the recovery section via fastboot. To flash the image recovery.img To the appropriate section we send the command in the console:
fastboot flash recovery recovery.img
2. Other sections are flashed in a similar way. Writing an image file to the section " Boot»:
fastboot flash boot boot.img
« System»:
fastboot flash system system.img
And in the same way all other sections.
3. For batch firmware of three main sections at once - “ boot», « recovery" And " system"you can use the command:

4. After completing all procedures, the device can be rebooted into Android directly from the console by sending the command:
fastboot reboot
In this way, the firmware is flashed using commands sent via the console. As we see, large quantity Preparatory procedures take time and effort, but if they are performed correctly, recording sections of the device’s memory occurs very quickly and almost always without problems.