How to restore a linux system. How to restore your Ubuntu system to its previous state. Recovering deleted Linux files
If you forgot your password, accidentally deleted important files, or decide to restore Ubuntu, then all these operations can be performed using the system's built-in tools or simple utilities.
Password reset
If you forgot your Ubuntu password, reset it and install a new security key to regain access.
If you have forgotten your username, you can look it up using the command “cat /etc/passwd”. As you can see, no additional tools are needed; Linux systems are quite easy to learn.
System rollback
On Ubuntu there is no “System Restore” button, clicking which will roll back to an earlier state, so each case must be considered separately. Let's look at the most common errors after which Ubuntu requires recovery: incorrect system update and damage to the GRUB bootloader. 
If the system does not start, try restoring the bootloader using the boot-repair utility. Connect the USB flash drive with Ubuntu to your computer, start the system and open a terminal. Run a few commands to install the boot-repair program:
- sudo add-apt-repository ppa:yannubuntu/boot-repair.
- sudo apt-get update.
- sudo apt-get install boot-repair.
After closing the console, run the boot-repair utility. Select the “Recommended recovery method” mode so that the program finds and fixes the error. 
If a failure occurred during a system update, you can fix it as follows:
- Launch root mode as you did when recovering your password.
- Enable recording with the command “sudo mount -rw -o remount”.
- Run the Package Manager with the command “sudo dpkg –configure –a” to update and rebuild the data packages,
You will have to wait a long time, 30-40 minutes. But after completing the procedure, the system will start without errors, already being updated.
File recovery
Another useful feature on Ubuntu is recovering deleted files. To recover lost data, use Photorec or TestDisk. They work approximately the same way, allowing you to restore most files deleted from the system.
- Open the console and install TestDisk with the command “sudo apt-get install testdisk”.
- Run the utility with the “sudo testdisk” program. The TestDisk package includes the Photorec utility, which you can run with the command “sudo photorec” if you wish.
- Avoid logging in the first TestDisk window.

- Select the disk partition on which you want to search for deleted files. Click "Proceed".

- Select the partition table type - usually Intel/PC Partition.

- Specify the “Analyse” operating mode.

- Run a quick search – the “Quick Search” item.

- Stop searching for partitions created by Windows Vista by entering "N". Once the analysis is complete, click “Continue.”

- Display a list of found files by pressing the “P” key (all actions in the Latin keyboard).
Unfortunately, a computer is a fragile and unreliable thing. Especially it concerns operating system, which is a very complex program, the slightest violation of which can lead to crash. Once upon a time, when I was still using Windows XP, I cleaned the registry CCleaner program, after which my computer stopped booting.
But that was a long time ago, today programs such as CCleaner for Windows 7 are no longer as crude as they used to be, but there is still a lot of stuff that can cause the operating system to crash and crash: viruses, crooked drivers and unfinished programs.
In my experience, killing Windows is MUCH easier than Linux, but it can also be killed... after a crash, if this suddenly happens? Here's what I can recommend in some cases.
I want to say right away that sometimes it is easier to reinstall the system than to dig around for hours and look for the reason. To make this procedure always easy and painless, ALWAYS make the /Home directory on a separate partition. In this case, all your data and program settings will be saved. You just need to reinstall necessary programs and updates.
Sudo dpkg --get-selections > software
After this, a small text file called software will appear in your home folder, which will contain a list of all the programs you have installed. After reinstalling the system, you will only need to run the command:
Sudo dpkg --get-selections< software
And all your programs will be downloaded and installed, no need to remember what you had installed before.
If your GRUB system boot loader has crashed, you can easily restore it, as described in the article "".
But there are situations when we ourselves start digging into system files and do something wrong, and then the system does not boot. This happened to me more than once, for example, when I tried to install ATI video card drivers, which destroyed xorg.conf and then I had to edit it manually.
So, if this happens, it will be much easier for you to restore files through the MC program, which you may be familiar with from Windows. This is a two-panel console file manager that looks like this:
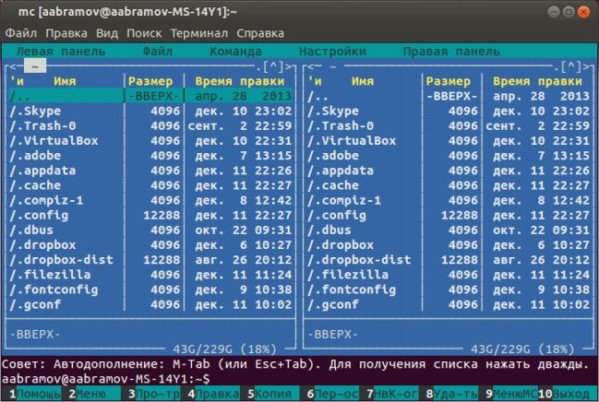
Sounds familiar, doesn't it? You can install this miracle with a simple command:
Sudo apt-get install mc
No, if you know how to work with NANO, then of course, but for a beginner it will be easier.
To be objective, if Linux crashed for me, it was only my fault. Therefore, recovery most often consisted of correcting those files in which a failure occurred. Therefore, before experiments, ALWAYS save copies of files so that later you can return them to their place using the same MC. If you haven’t saved the file, you can boot from the LIVE CD and pull the file out from there, I’ve done this more than once.
Did you have any problems and how did you solve them? It would be interesting to know :)
Did not find an answer to your question? Use the search...
9 comments
9 comments to the article “How to restore Linux?”
You can boot up and take it from there, but not the drivers, just the configuration files of the video card; the driver itself doesn’t go anywhere.
Hello! After an unsuccessful installation of gimp, the graphical shell stopped loading, I wouldn’t want to reinstall it, is there anything I can do and how can I get back to the desktop? before that, the same nonsense happened after installing libraries for installing Skype on 64-bit Kali
Try typing the startx command and you may be taken to your graphical environment. If not, then everything is much more complicated and you have removed some necessary packages. Try installing everything like this: sudo apt-get install gnome-session-fallback
prostolinux, thank you very much for your prompt response! Unfortunately, I can no longer check your recommendation, I decided to update the gnome and as a result I had to reinstall everything. One way or another, considering that the gnome crashes after one or another installation, I think your recommendation will still be useful to me and I will certainly write down whether it helped.
It’s very strange that everything crashes after installing programs. I highly recommend doing everything as I described in this one and installing it exactly, I myself am currently working exactly like this and everything is very stable.
prostolinux, I don’t have Ubuntu, I have kali linux... it is also based on Debian, but requires more skills than Ubuntu... In principle, I had no problems with Ubuntu - it is a good and stable operating system. Very good and detailed article about installation!
I also worked with #Debian before, but still #Ubuntu is more convenient for me, and these hacker things are not really needed yet. So here you need to choose, either Gimp or Hack;)
so that “take it out” crashes more often than “Linux”, this is the first time I’ve heard it, and considering your opinion, “it’s easier to reinstall than to dig around all day,” well, here you said. I myself have been working on Ubuntu for a very long time, but I always install Windows for my family because it’s worse with Linux in crooked hands than with Windows, and it’s much faster to uninstall and it’s more difficult to restore. Believe me, now it’s not as cool as it used to be to sit in the console and brag “look how I change the wallpaper in the configs”, proving that they are stupid Windows users. But in reality, what is in “Linux” and what is “out” is of no use. It is important to understand one thing here: if you have the opportunity to work in Windows and do your job perfectly, then there will be no show-off from Linux!!!
Hello. Recently I came across a situation several times where, for one reason or another, my Linux bootloader crashed. At the same time, it crashed 2 times due to Windows updates, it stupidly erased Grub. You may also need to restore it if you install Windows next to Linux.
Today I will show you a very simple way on how you can restore this system bootloader.
First, let's boot from the Ubuntu LiveCD.
We launch the terminal and type there:
Sudo su add-apt-repository ppa:yannubuntu/boot-repair apt update apt install boot-repair boot-repair
The program window will open. In most cases, to restore the bootloader it is enough to select Recommended repair. That's what we'll do. Click on this button.
If a window with instructions appears, read them carefully and do what is written. In my case, it required 2 steps that had to be done manually in the terminal (uninstalling and reinstalling Grub).


After completing them, click forward and wait for the process to complete. If no errors appear, the bootloader will have to recover. Reboot the system and check.
If you accidentally deleted all the kernels and now don't know how to restore your system? Do not worry. By following the instructions below, you can restore it.
The instructions apply to the following distributions Linux:
Ubuntu 12.10/12.04/11.10 and older
Linux Mint 13/12 and older
Requirement
Internet connection
Live CD/DVD/USB with Ubuntu/Linux Mint
1.
Paste Live CD/DVD/USB with the image and download it.
At the very beginning of loading, press any key to open a window with a choice of options. Select Launch Ubuntu without installation and press Enter:

IN Linux Mint:
2. Wait for the desktop to open with panels and icons, press (Ctrl+At+T) to open the terminal, copy and run the following command:
sudo fdisk -l
This command displays the partition table on your hard drive in the terminal:

It is necessary to determine the partition where all kernels were removed. In my case this is the section /dev/sda6. Naturally, it may be different for you.
3. Now you need to run a sequence of commands to gain superuser privileges to connect to your hard drive:
sudo mkdir -p /media/ubuntu
sudo mount /dev/sda6 /media/ubuntu
sudo mount --bind /dev /media/ubuntu/dev
sudo mount --bind /proc /media/ubuntu/proc
sudo mount --bind /sys /media/ubuntu/sys
sudo chroot /media/ubuntu
Note. Change in command /dev/sda6 to your section.
apt-get install linux-image-generic
5. And one last thing. Restart your computer by deleting CD/DVD/USB.
You should now be able to log into the restored system.
How to restore an Ubuntu system to its previous state It would be great to be able to try new version Ubuntu, knowing that you can always go back to a previous version if you don't like this one. We will show you a utility that allows you to take a snapshot of your system at any time. TimeShift is a free tool similar to the System Restore feature in Windows. It allows you to take a snapshot of your system and then record changes at intervals. TimeShift only protects system files and settings, not user files such as documents, pictures and music. You can use a utility such as Back In Time to back up your user files. Note - when in this article we ask you to enter something surrounded by quotes, do not enter quotes unless we tell you to do so separately. We told you once , how to backup your applications and PPAs using a tool called Aptik, included in the same PPA as TimeShift. First, use the keyboard shortcut Ctrl+Alt+T to open a terminal window. If you have not installed Aptik, enter the following two commands (separately), pressing Enter after each command, to add the PPA and update information about packages available on the system. These two commands are: sudo apt-add-repository -y ppa:teejee2008/ppa sudo apt-get update If you installed Aptik, then you are ready to install TimeShift on your system, and you do not need to enter the previous commands. Now run this command: sudo apt-get install timeshift Enter your password when prompted and press Enter. Once the installation is complete, close the terminal window by running the "exit" command in it or by clicking the X button in the upper left corner of the window. To open TimeShift, click on the search button at the top of the Unity launcher panel. Enter timeshift in the search field. Search results appear as you enter characters. When the TimeShift icon appears, click on it to open the application. A dialog box will open asking for your password. Enter your password in the appropriate field and click OK (the password is required to obtain administrative rights to access system files. The main TimeShift window will appear, in which the system size is assessed. The Backup Device drop-down list allows you to select the partition or device to back up ( if you have more than one)The amount of required space required for the snapshot is displayed in the bottom status bar.Snapshots are saved on the selected device, so make sure you have enough space to store the full system snapshot. To make a backup of the selected device, you need to click the Backup button on the toolbar. While the snapshot is being created, the message “Synching files...” is displayed in the bottom status line. When the snapshot is ready, it will be displayed with the date and time and system version. The status bar displays how much space is free in the system after taking a snapshot, as well as the date the last snapshot was taken. By hovering your mouse over the "Backup Device" drop-down list, you will see the path where snapshots are saved on your selected device. The timeshift directory contains various snapshots taken using TimeShift, including scheduled snapshots, which we'll talk about later in this article. The shapshots folder contains snapshots that you took manually. We recommend that you copy the folder to a USB flash drive, network device, cloud service (for example, Dropbox or Google Drive) in case something happens to the local copy. You can see the contents of the image by clicking the "Browse" button. The image folder is open in file manager window, and it lists directories and files from your system (without user files, remember). You can configure various application settings, such as automatic backups, or choose whether old snapshots will be automatically deleted. To open the settings, use the "Settings" button on the toolbar. The "Schedule" tab allows you to determine the time when snapshots will be taken. Click or drag the ON/OFF slider button to the on position for "Scheduled Snapshots". Click the checkboxes in the "Enable" column to define time intervals for taking snapshots. The "Auto-Remove" tab allows you to automatically delete old snapshots so you don't run out of hard drive space. There is a rule for every type of shot. For each type, you need to enter a limit after which TimeShift will delete old snapshots. For example, you can select a limit for the free disk space on the disk. The "Advanced" tab allows you to exclude specific files, directories and their contents from snapshots, as well as include additional files and folders. When you are finished configuring the application settings, click Save. If you If you want to restore a snapshot, open TimeShift, select the snapshot, and click Restore. Note - depending on the state of your system, you may need to reinstall TimeShift. The Target tab in the Restore dialog box allows you to specify the device to which you will restore the selected snapshot. Moving the mouse to a device in the list will display more information about that device to restore the snapshot. Select "Device for Restoring Snapshot" and "Device for Bootloader Installation." Use the "Exclude" tab to select applications for which you would like to keep the current settings and not restore from the previous ones. The Advanced tab allows you to exclude individual files and directories, as well as include them in the restored system. To close TimeShift, click on the X button in the upper left corner of the main window. TimeShift is a useful utility if you like to experiment with system updates or if something goes wrong with your system. Just like using System Restore in Windows, you can easily return your system to a previous working state instead of having to reinstall it.