DIY electric heated floor in the garage. We are making an electric heated floor in the garage. Do-it-yourself heated floor installation technology. Step-by-step installation instructions
The idea of a heated floor in a garage is not new. This option for making a floor is suitable for those who spend a lot of time in the garage, repairing their car, or for people who simply value comfort. For many people, a heated floor in a garage is an unattainable luxury, because they don’t even have a heated floor in their own apartment. However, those who love their car and worry about its safety know that such a floor is not a whim, but a necessity, thanks to which the car will function well and remain in excellent condition.
Many car owners will agree that the main reason for freezing of some mechanisms is a cold garage. It is because of this that many drivers have to spend quite a lot of time starting their car in the morning. Therefore, the option with heated floors is perfect for you because it will help you keep the room warm and also save money on heating.
Features of garage heating
In order for you to be comfortable in your garage, it does not need to be heated to room temperature. After all, to keep you warm and to keep your car safe, 15 degrees will be enough. At this temperature, you will feel comfortable even without a warm jacket, and you will not have to spend a lot of time warming up the engine. Of course, if the owners want to warm up the garage even more, then no one will stop them from doing this, but they will have to spend a lot more electricity, which is not economically feasible.
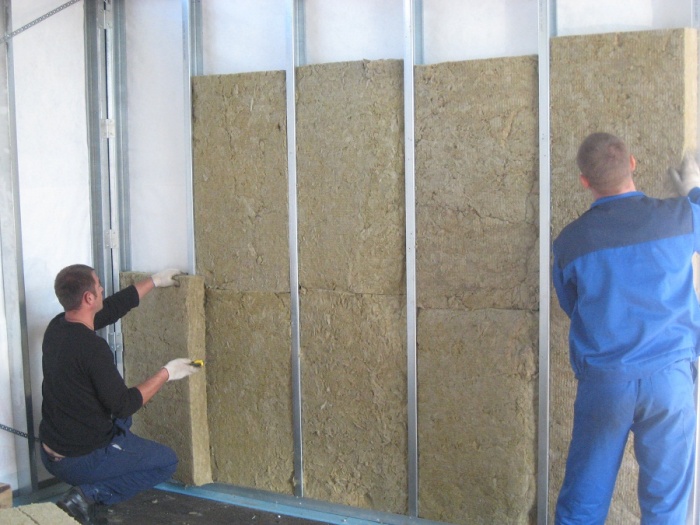
Before you insulate the floor in the garage, you should think about thermal insulation of the walls, because if the walls are thin or have many cracks, then it will be difficult to heat the garage even to 15 degrees. Nowadays, there are quite a lot of options for insulating materials, ranging from polystyrene foam to penofol. With these materials you can insulate not only the walls, but also the ceiling, this will contribute to better thermal insulation. If you are seriously thinking about making a heated floor, then you should not skimp on the procedure for insulating the walls. A warm floor with cold walls will not help save heat in the room; on the contrary, it can be harmful for the garage space, since you will constantly see condensation on the surface of the walls.
It is worth considering that the floor in the garage is constantly subject to heavy loads. Since it will contain a car whose weight can be more than 2 tons. But also, the floor in the garage constantly suffers from the fall of various objects, such as tools and heavy parts of the car itself. Therefore, you should take into account that the floor screed in the garage should be larger than the screed in a regular room; as a rule, this screed is made from 40 to 80 mm. For this reason, we do not advise you to use infrared film, since the thickness of the solution will not allow it to heat up the entire floor too much.

Often two types of heated floors are used in a garage:
- Water heated floor in the garage.
- Electric heated floor in the garage.
Both the first and second options have both advantages and disadvantages; let’s consider them in more detail.
Water heated floor
A warm water floor is an effective way to warm up the entire room; this heating option will be especially convenient for car service owners. However, before performing this work, the garage owner should resolve the following issues:

Stage-by-stage execution of work
Do-it-yourself warm floors in a garage are quite simple. The work is carried out as follows:

If we are making a heated floor in a garage with a pit, then you should make wooden formwork that will not allow concrete to flow inside. Also, when making such a floor, you should carefully consider the order of laying the contours. On the one hand, when making a heated floor with a pit, you can save on both pipes and the concrete itself, however, doing such work can be a little more difficult. It is also worth considering that the pit will constantly draw cold, so think carefully about whether this heating option will be used one hundred percent.
Electric heated floor in garage
First of all, you need to take care of high-quality thermal insulation of the floor; for this you need to make a rough screed that will cover the soil located under the garage. If this work is not done, heat loss can reach up to thirty percent. After the screed has completely dried, you can begin installing thermal insulation.
Installation of heated elements
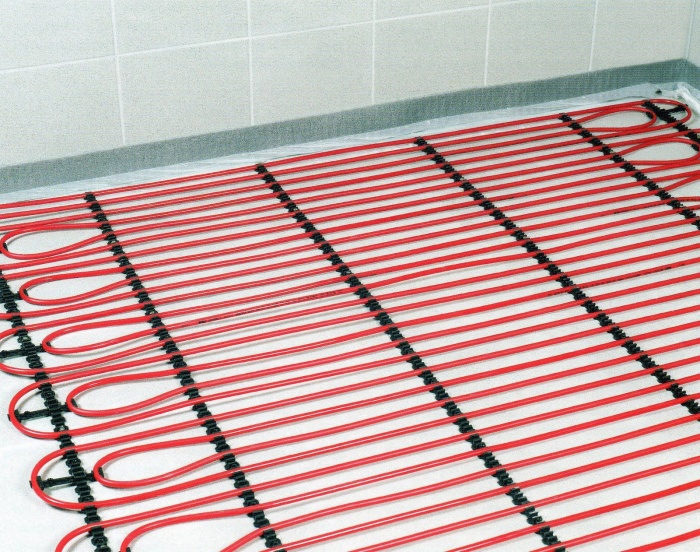
When installing a heated floor, you need to secure the heating wires, the distance between which must be strictly 30 cm. They are attached using special antennae to the mounting tape. Each wire should be attached parallel to each other, and strong tension and bending at an acute angle should be avoided. Garage owners need to decide in advance on the place where the tool storage rack will be located, since wires should not pass through that place.

During installation, try to treat the material with care, do not step on it or place heavy objects on it, since such actions could damage the insulation or even break the wire. If the wire is damaged during installation, you will have to replace the entire circuit.

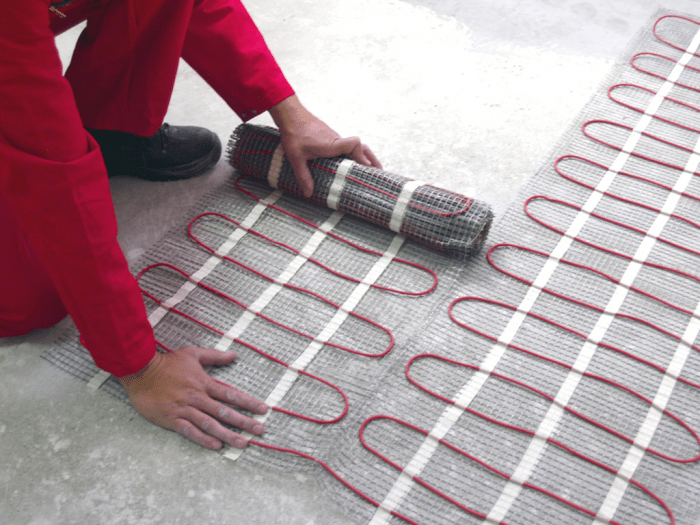
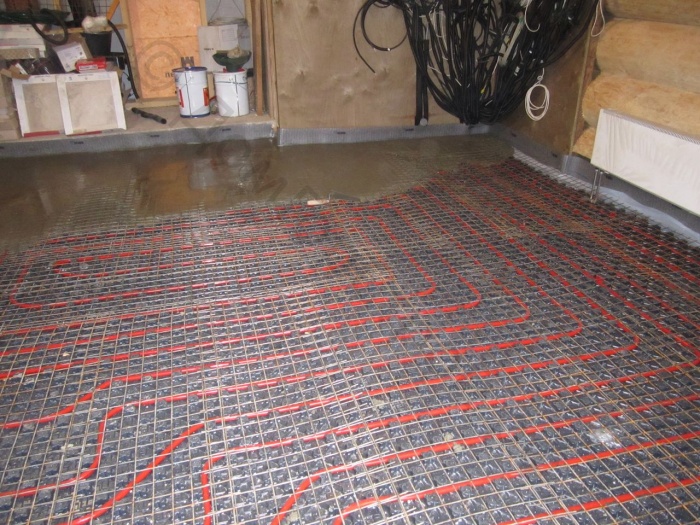
There is another option that is more convenient - the use of heating mats. Installation of such mats consists of the fact that you just need to spread them over the surface and start connecting. After installing the mats or wires, you must install a temperature sensor. To install it, you need to make a recess at a distance of 50 cm from the wall, into which you need to lay a corrugated pipe, the diameter of which should not exceed 20 mm. It is in this pipe that the temperature sensor must be installed, and due to the fact that it is located in the pipe, it can be easily changed.

To connect, you must use a copper wire of suitable cross-section. You need to install a thermostat on one of the walls, to which the heating elements will be connected. However, after completing all the electrical work, do not rush to turn on the floor heating, since you need to wait until the concrete solution has completely hardened.

This pouring is carried out almost according to the same scheme as pouring a water-heated floor. However, instead of using a solution with the addition of various additives, we would like to recommend that you use special screeds for heated floors. Such material will contribute to better heat conservation. Remember also that the thickness of the screed should not exceed 50 mm. Garage owners need to assess the possible impacts on the floor and choose the appropriate thickness of the mortar.
Conclusion
Now you know how to make a heated floor in a garage, you have also learned many tips that will help you do the job efficiently. Insulating a garage floor is not a particularly difficult job that can only be completed by a trained specialist. Even without construction experience, you can do this work yourself. Follow all the tips that you read in this article and then the floor you make will serve for many years.
An underfloor heating system is an excellent option for creating comfortable temperature conditions. Such blocks can be both an additional source of heating and an individual one, fully heating a room and even the whole house. Currently, floor heating units are used to insulate not only residential buildings, but also other premises where a lot of time is spent.
So, for example, why not organize a heated floor in the garage, because for many men this is almost a second home. In the off-season and winter, such a system will allow you to evenly warm the room and keep the car intact. You will learn how to make a heated floor in a garage with your own hands from our article.
Garage heating options
You may be asking, why do we even need heated floors in a garage? Perhaps a person who does not have a car will think so, but vehicle owners will certainly appreciate underfloor heating systems in the place where their four-wheeled “iron friend” is located.
.jpg)
Thus, a warm floor in a garage, reviews of which are quite different, helps prevent freezing of the car mechanism. But every driver probably gets tired of wasting time starting the car in the cold season. If the garage is used throughout the year for car repairs or other purposes, then equipping it with a hidden heating system is an extremely necessary measure, since with the help of such an installation you can significantly save on heating the room.
The heated floor in the garage can be equipped with one of the following heating units:
Water heating system
.jpg)
The simplest option for underfloor heating. The heating element itself is a closed pipeline circuit through which hot water circulates. In this case, a boiler is used to heat the room, and the pipeline through which hot water will circulate (heat source) is filled with cement screed. As a rule, metal-plastic pipes are chosen as the coolant, which ensure uniform heating and eliminate heat loss. You can, of course, install copper or aluminum pipes in the garage - they are durable and have high thermal conductivity. However, the cost of a pipeline made from such materials will not be cheap.
Electric floors
.jpg)
Such a heating unit is also closed with a clamping structure, which ensures uniform heating of the floor surface. The classic option is a cable circuit operating from the electrical network, through which electrical energy is converted into thermal energy. There are more innovative models - film, infrared and thermomats.
It is not enough to ensure uniform heating of the garage; you need to take care of its high-quality insulation. The “weakest link” is the garage door - the largest heat-transmitting surface in this room.
To make it easier to decide which type of heating to give your preference, you need to understand their advantages and disadvantages.
Advantages and disadvantages of a water system
These installations are a fairly popular type of underfloor heating, and in order not to be unfounded, let’s consider their advantages:
- the installation of such an installation will cost an order of magnitude cheaper than the installation of any other hidden heater;
- the unit operates by circulation hot water through pipelines, thereby minimizing energy costs;
- visual absence of a heating element;
- uniform, gradual heating of the entire floor surface.
The disadvantages of such nodes include:
- the likelihood of leaks and the difficulty of their localization;
- the need to use a circulation pump and boiler.
It would also be fair to note that such a heating unit causes difficulties in adjusting the temperature regime.
VIDEO: Installation of heated floors in the garage
Electric floors - operating features
The design and installation of this type is simpler than with the previous version of the heating unit. At the same time, energy consumption for floor heating increases significantly.

Advantages of electric floors:
- the ability to warm up areas of different configurations and purposes;
- no need to install a screed cement base;
- visual absence of a heat source;
- the possibility of arrangement in garage premises without the use of special equipment;
- small size of the overall design of thermal equipment;
- if problems occur, you can easily localize the location of the damage for further troubleshooting;
- possibility of adjusting and setting the temperature.
The issue with concrete screed is relevant for cable construction, when a single- or two-core cable is laid on a prepared base and filled with a cement composition with plasticizers.
For a garage, cable underfloor heating is the most rational option with high efficiency and maximum heat transfer. The power of film IR floors and thermomats may not be enough to heat such a room.
The only drawback of the electrical system is the increase in costs - on average, payment for electricity will increase by 30-70%, depending on the frequency of switching on. And once again we remind you of the need to insulate the garage from the inside in order to avoid colossal heat loss.
Procedure for surface preparation
Having decided to do warm garage do it yourself, you must adhere to the following recommendations:
- the thermal insulation sheet is laid over the entire area of the room, but it is worth remembering that such material must be laid overlapping the wall ceilings to the height of the heating block;
- It won’t be superfluous if you also lay a vapor barrier material in the garage, which will eliminate the possibility of heat loss;
- each element of the thermal system is laid in an even layer, without the formation of folds or gaps;
- insulation mats are mounted overlapping and secured with construction tape.
If your garage also has a basement, then you need to insulate it too. This is especially true for a garage with a cellar, where products are supposed to be stored in the winter.
Most often, basements are insulated with polystyrene foam, which has good performance characteristics, resistance to fungi and mold, and an affordable price compared to other materials with identical functionality.
Step-by-step instructions for laying heated floors
How to make a warm floor in the garage? To answer this question, we offer you step-by-step instructions:
- We form a soil cushion. To do this, you need to take any soil base suitable for these purposes, place it on the surface of the garage and compact it well so that the layer thickness is at least 30 cm.
- Next we lay a layer of sand and compact it in the same way. The thickness of this layer should be at least 10 cm.
- We fill the rough screed, which will require reinforced mesh and cement mortar.

- We wait until the screed is completely dry, and this can take about three weeks, it all depends on the weather conditions outside.
- We lay a waterproofing sheet on the dried screed, which can be polyethylene film.
- Next comes the laying of thermal insulation material, which is again covered with waterproofing.

- Now we need to make markings where the mounting tape will go in the future.

- Laying the mounting tape at a distance of 50-100 cm, depending on the length of the cable and the need for uniform heating.

The cable laying step should not exceed 30 cm, otherwise such a system will be of little use. It is forbidden to overlap the turns and allow the heating wire to bend.
To determine the exact distance between the turns, correctly calculate the pitch

Mounting tape allows you to attach wires parallel to each other quickly and easily. With high-quality fixation, they will not move when pouring the screed and will not come into contact with each other.

The heating cable is located only on open areas surfaces - not under workbenches, shelves or cabinets. Exclusively in an open place, free from any furniture and large objects.
Check the distance of the cable from the walls - at least 5 cm.

The distance between the turns varies between 8-10 cm. Can be increased. But only on the condition that foil thermal insulation is used, the task of which will be to distribute heat evenly over the surface.
- After the cable was laid, it was time to install the thermostat. To do this, a groove is made on the wall at a distance of 0.5 meters from the surface, into which a corrugated pipe Ø 20 mm is laid, where the temperature sensor will be placed. Subsequently, after installation is completed, the thermostat can be replaced.

- Connecting the floor using a copper wire of the appropriate cross-section. Install a thermostat on the wall at a distance of 30-50 cm, connect the floor and thermostat to it, and then follow the manufacturer’s instructions. If everything went correctly, it’s time to screed the floor.
- Prepare a cement mortar with the addition of plasticizers and apply it to the heating cable. The height of the screed is no more than 5 cm, otherwise the heat will not be enough to penetrate through it.

We hope our tips for organizing a garage will help make your wishes come true. If you understand that you cannot cope with this task on your own, then professional craftsmen will help you equip your garage space with an internal heating unit.
VIDEO: How to insulate a concrete floor in a garage
If you have an idea to make a heated water floor in the garage with your own hands, then to implement it you will need to take into account several subtleties. It will be necessary to calculate the maximum load on the flooring and heating circuit, and ensure safe and efficient operation of the heating system. Anticipate difficulties and problems that may arise during the use of heated floors.
Is it permissible to use water heated floors in a garage?
Laying a water heated floor in a car service garage is one of the most effective ways warming up the building. The principle of operation of the heating system is that warm air flows will rise from bottom to top. As a result, the most comfortable conditions for conducting repair work and vehicle maintenance.However, the owner of the car service center will need to resolve several important issues: 
You will also need to plan where exactly it would be most appropriate to draw the contour. This way there is no need for the heating system to be laid under furniture, tool cabinets, etc.
Step-by-step installation instructions
It’s quite easy to make water heated floors in your garage yourself. The construction of the pie is not complicated, but you will have to take certain points into account.The step-by-step installation plan looks approximately as follows: 


You must first draw up a scheme for heating the garage with a warm water floor, calculate the required amount of pipes and component materials. All this will allow you to complete all the work quickly and without additional material costs.
What kind of covering to lay for better heat transfer?
 Floors in a car service center or personal garage must not only withstand heavy weight, but also provide high heat transfer rates. Some types of flooring, although durable, cannot be used due to low thermal conductivity. So you should avoid porcelain tiles and natural stone products.
 The optimal solution when heating a garage floor with water heating would be to lay ordinary ceramic tiles or make a self-leveling coating. The layer thickness in self-leveling floors is about 3-5 mm. The top coating can be opened with protective water-based paint.
If you decide to tile the floors, you should use special adhesive and grout for installation. Seams can be grouted no earlier than 2-3 days after installation. Full load on the tile is allowed after 6-7 days.
Modern warm water floor heating systems can also be installed under porcelain stoneware. But for greater efficiency, it is best to opt for other types of coating.
Installation and operation problems
As already noted, there are several main problems associated with the installation and subsequent operation of heated floors. – when pouring a concrete base, it is necessary to use plasticizers and additives to increase strength. It is best to fill floors using ready-made mixtures. The thickness of the slab should not be less than 10 cm. To prevent the slab from cracking, it is necessary to prevent the solution from drying quickly. To do this, you will need to cover the concrete with a film and constantly water the base for 7 days.Men spend a significant part of their free time in the garage, including in the winter. Therefore, it is necessary to carry out work related to car repairs at sub-zero temperatures. To avoid additional costs for electricity and heating, you can ask yourself in advance how to install a heated floor in the garage.
What material is best for thermal insulation?

Today in stores there is a huge amount of various materials for insulation. Its choice depends on the characteristics, as well as on the structural features of the garage.
The most common materials can be classified into one of two types:
- Foamed polymer materials. These include polystyrene foam, polypropylene foam and polyurethane foam. They can be purchased in blocks, slabs or panels. Such materials are among the most affordable (especially foam plastic), they are easy to install, and they are airtight. The features of such materials include the need to equip a ventilation system, this will avoid the accumulation of condensate;
- Materials based on mineral fibers. This type includes glass wool and mineral wool. Typically they are sold in rolls, mats or slabs.
Less common is the insulation of garage floors with expanded clay, roofing felt and other materials.
The criteria for choosing a material as insulation include health safety, fire resistance, level of load resistance, sound insulation, etc. When choosing insulation, these features should be taken into account. You can learn more about the topic of thermal insulation in the garage in the video.
How can you insulate the floor yourself?
If the owner decides to insulate the floor in a garage with a basement with his own hands, some features should be taken into account:
- Thermal insulation material must be laid over the entire surface of the floor, and you should also not forget about the overlap on each wall. The surface of the heat-insulating layer must be smooth; the formation of folds on it is extremely undesirable;
- The insulation must be overlapped and secured with construction tape.
If there is a basement in the garage, it is also necessary to insulate this room. By insulating the basement, you can significantly reduce heat loss in the garage itself. This is especially true for a garage with a cellar, where products are supposed to be stored in the winter.

The most common type of floor for a garage with a basement is a concrete floor. Most often it is insulated with expanded polystyrene. It is practical and affordable, and has a long service life. The material resists mold well and is not susceptible to rotting. It is also used for thermal insulation in the basement.
Let's look at the order in which the installation and insulation of the floor should be carried out:
- Formation of a soil cushion. To do this, the soil layer must be compacted; its thickness should be approximately 30-40 cm;
- Laying a layer of sand about 10 cm thick. It also needs to be compacted;
- Make a subfloor. This requires concrete pouring and reinforcement. After this, you need to wait for the concrete to dry. As a rule, 2-3 weeks are enough for this, depending on the weather;
- A layer of waterproofing must be laid on the dried concrete. This may be plastic film;
- Laying thermal insulation, on top of which again make waterproofing;
- Pouring the final concrete screed. Its thickness should be about 5 cm.
More information can be obtained from the presented video.
The simplest and most modern way to insulate a garage floor is to insulate it using a special heat-insulating paint. This way you can insulate an existing concrete floor. Before carrying out work, it is necessary to clean the floor from dust and dirt.
To insulate a garage floor with your own hands, you do not need any special knowledge or skills. Right choice material and taking into account its basic properties, as well as installation features, will allow this work to be carried out. And in the absence of temporary resources, you can use the services of specialists, which will allow you to qualitatively equip the floor in your garage in a short time.
Types of heated floors for garages

To avoid freezing of car mechanisms, you can equip the floor in the garage with heating. This will allow you to forget about the problems of starting your car even in the most severe frosts. If the garage is in use all year round to repair a car or for other purposes, installing a heated floor is simply necessary, because with its help you can significantly save on space heating.
Warm floors for a garage with a basement can be of two types:
- Water. This is a closed system; metal-plastic pipes are most often used for its construction. Such a floor is walled up in a screed. In this case, a boiler is used to heat the room;
- Electric. The structure is also closed with a screed. According to the installation system, this type of floor can be cable or film. The heating principle can be infrared or convection.
In the case of installing a cable heated floor, it is assumed that heating sections, cables on a reel, and heating mats will be installed. The supply and regulation of electricity in this case is carried out by a thermostat. Film-type warm floors involve the use of film as a heating element.
When installing a heated floor with your own hands, you must strictly follow the manufacturer's instructions. Let's look at the advantages and disadvantages of water and electric heated floors. We invite you to watch a video on this topic.
Water floor
If you need to choose which type of heated floor is best for a garage with a basement, you need to consider the advantages and disadvantages of each of them.
The advantages of a water floor include:
- the opportunity to save on electricity;
- uniform heating of the entire floor surface.

The disadvantages of this floor are:
- Complexity of installation work;
- After installing the floor, pipes may leak, which is very difficult to detect. It will be necessary to dismantle the floor;
- If the room is separate, a communications supply is required.
To install communications and make a water-heated floor, you need to purchase a boiler and a circular pump. Also, for proper operation, the system must be regularly maintained. Thus, this type of garage floor heating is costly. By watching the video material, you can learn more about installing heated floors.
Electric heated floors
The design and installation of this type is simpler than when installing a water floor. At the same time, energy consumption for floor heating increases significantly. The advantages of such designs are:
- there is no need for communications (except for electricity);
- the entire system consists of a heating structure (for example, a cable) and a thermostat;
- there is no need to service the system.
Disadvantages include electricity costs, which can be reduced using a thermal insulation layer.
When installing an infrared floor, experts recommend placing it locally. It is impossible to equip the entire area of the room with an infrared film system, since some of its sections will bear a serious load. Therefore, you can make several areas heated, for example, under the car and on both sides of it. You can find out more about this in the video.

The entire process of laying an electric heated floor with your own hands is the following sequence of work:
- Insulation of garage and basement from penetration groundwater. This can be done using a concrete screed;
- Laying a layer of thermal insulation;
- Installation of electric heated floors, insulation of all contacts and installation of a temperature sensor;
- Laying waterproofing, testing the floor heating system;
- After successful testing, the screed is poured. Its thickness should be less than that of a conventional floor without an electrical system.
In general, installing an electric heated floor is quite simple; you can do all the work yourself. The presented video material clearly demonstrates how this can be done.
Every vehicle owner has experienced the loss of time to warm it up during the cold season. Repairing a car in winter also does not give motorists much pleasure. These problems can be solved much easier if you organize a competent heating system (HC) in the garage. Among the many options, most motorists consider the “warm floor” system to be the optimal way to heat a garage space, the creation of which will be discussed in this publication.
What you need to pay attention to
Before you start choosing a heating element and installing a heated floor yourself, you should think about good insulation of the room.
- Seal all cracks.
- Insulate the walls and ceiling of the garage with a sufficient layer of thermal insulation material, which can be used as stone or basalt wool, polyethylene foam, polystyrene foam, etc.
Pay attention to the floor in the garage. During operation of the vehicle, it will be subject to heavy mechanical loads and impacts. chemicals. The pressure of the car on the screed is distributed over 4 points, each of which, on average, accounts for 0.5 tons. If the floor in the garage is wooden, then it should be reinforced.
The period of operation of the garage heating should be determined. In other words, will you be able to organize continuous operation of the CO during the winter period? If yes, then you can pay attention to the water type of heated floor, which will require installing boiler equipment in the garage or connecting the circuit to an existing CO. If you do not guarantee uninterrupted operation of the heating system, or are not ready for a large initial investment, then it is better to create an electric heated floor in the garage with your own hands based on a heating cable. Each option has its own advantages and disadvantages, design features, which will be discussed further.
Important! Since there is high pressure on the floor in the garage, which can lead to mechanical damage to the protective polymer layer, the option with IR film warm floors will not be considered.
Water circuit for heating a garage space
The design of a warm water floor consists of a closed pipeline system laid in a screed, a source of thermal energy (coolant) that circulates through the water circuit, a heat generator, a circulation pump and control valves.
Main advantages:
- Reliability.
- Economical during operation.
- Uniform heating of the room over its entire area.
Flaws:
- The need to carry out complex calculations.
- Difficult installation.
- Large financial investments (at the initial stage).
- Poor maintainability.
By and large, water heated floors are rarely used by car enthusiasts due to the fact that this type of garage heating requires a lot of time and money. Such a system has the right to life if there are no other options.
Advice: Before creating a water heated floor in the garage, even at the design stage, you should consider a scheme for connecting the circuit to the CO of the house (or provide for the installation of boiler equipment), choose a place to place the distribution unit, circulation pump and other structural elements. In addition, it is necessary to calculate the diameter of the pipeline, pump performance, select the pipe material for the circuit, and select the necessary elements of the system. You can do this yourself, but we recommend entrusting this work to professionals. Proper calculation and selection of equipment will be the key to reliable and efficient operation of the heated floor.
The figure below shows a typical connection diagram for the water circuit of a heated floor in CO.
Important! If you plan to insert the circuit into the central heating system, then a mixing unit should be provided to lower the temperature of the coolant in the heated floor circuit.
The stages of installation work include:
Important! You should know that the time for complete hardening of the cement-sand mortar is 28-30 days, depending on the temperature and humidity in the room.
In order to understand how to lay heated floors in a garage, we recommend watching a video on the topic:
Cable underfloor heating elements
To create electric heated floors in a garage, no operating CO is required: only the presence of electricity. Heat generation occurs in an insulated flexible conductor with high resistance, through which flows electricity. The heating element (cable) is placed in the screed. Due to the tight contact, thermal energy is transferred between the heating cable and the floor screed, which, in turn, evenly heats the air in the garage along its entire perimeter.
Advantages:
- Easy to install.
- Relatively low cost of equipment.
- Does not require maintenance.
- Not afraid of defrosting.
Flaws:
- High operating costs.
- The need for good thermal insulation of all surfaces of the garage (floor, walls, ceiling, gate).
So, how to make an electric heated floor in a garage with your own hands? The system will require the purchase of the required quantity of heating cable, thermostat and temperature sensor. If you install heating mats (another type of cable heated floor, in which the cable is already laid out on a polymer substrate), then all the necessary elements are supplied complete.
Important! At the planning stage, you should find out whether the electrical wiring will withstand the load created by an electric heated floor. We should proceed from a power of 160 W/m2 of garage space.
Technology for creating an electric “warm floor” based on a heating cable.
- Preparing the base.
Advice! To insulate and level the floor surface for cable systems, experts recommend using special building mixtures with heat-insulating additives.
- Waterproofing. This stage ensures that there is no contact of groundwater with the heating element.
- Thermal insulation of the base with polystyrene or penoplex, at least 30 mm thick.
- Laying the mounting tape, which is necessary for fastening the cable to the heat-insulating layer. (if heating mats are used, this step is not required).
- Laying the heating conductor with a pitch between turns of 30 cm. The figure below shows the moment of fastening the cable to the mounting tape.
Important! To prevent overheating of the cable, it is not recommended to lay it under cabinets, shelving or a workbench.
- To lay the cable, use a “snail” or “snake” pattern.
Important! Please note that the distance from the wall to the heating element should not be less than 50 mm; between turns - less than 80 mm; between the heating element and the power supply wire - 500 mm.
- Mounting the thermostat on the wall and laying the temperature sensor between the turns of the heating cable.
- Connecting the system to control equipment and the garage electrical network.
- Functionality check.
The last stage is pouring the screed with a self-leveling or sand-cement mixture. The thickness of the screed varies from 30 to 50 mm.
Important! Do not turn on the heated floor until the solution has completely hardened (28-30 days).
As a conclusion: now that the design and installation principles of various heating systems are more clear, you can choose the best heated floor for your garage based on your capabilities, financial condition and operating conditions.