Letter l exercises for preschoolers. Literacy and reading activities for preschoolers in pictures. Child's individual work sheet
Interestingly, Disney initially planned to name his hero Mortimer. However, the animator's wife insisted that such a complex name was not at all suitable for a cute children's character. So in 1928, Mickey appeared - a cute mouse who is still adored by the world.
How to draw Mickey Mouse with a simple pencil?
Optimism and a cheerful disposition have kept Mickey at the top of the ratings for almost a century. And his kindness, modesty and sensual heart make the mouse good friend for everyone who knows him. Let's try to draw Mickey Mouse? It is very easy.
1. Draw a circle at the top of the sheet. This is the outline of Mickey's head.
2. Now you need to mark the head with two perpendicular lines. The vertical line will indicate the symmetry of the face, and the horizontal line will indicate the line of the eyes. Please note that the horizontal line is located just below the conditional center of the head.
Draw the mouse's ears. The result is a familiar eared silhouette!

3. Now draw the body - an elongated droplet, slightly smaller than the head.
In the upper part of the body on both sides, draw two elongated sticks - arms. To give the design a natural look, make them slightly curved. Draw large palms on top.
At the bottom of the body, draw two parallel sticks (legs) and add the outlines of the shoes.

4. Great! It's time to draw Mickey Mouse's face. Symmetrically to the vertical line on the head, draw two elongated ovals - the eyes of a mouse, an oval nose, and a mouth with folds in the corners. At this stage, use smooth lines to mark the part of the face that will remain white.

5. Erase the extra lines on the head. Draw the tongue and the fold above the nose.

6. Pay special attention to the image of the palms: outline the outlines of the fingers, do not forget about the protrusion on the inside of the palm. Draw the tail and shorts.

7. Use an eraser to erase unnecessary lines and clearly outline the contours of the hero. You're doing well! Go ahead.
Paint the mouse with black paints, as shown in the picture. Add shadows on the palms, feet and shorts. Be sure to add highlights to your eyes and nose. Details that are so invisible at first glance will significantly improve the overall impression of the picture.

This video will help you draw Mickey Mouse quickly and easily:
Baby Mickey Mouse. Drawing scheme
It’s hard to believe, but the good-natured and sweet character Mickey, it turns out, helped the Americans identify German spies during World War II. "Who is Mickey Mouse?" - they asked the suspect. How could a German know about the cheerful mouse, adored in distant America?
Today, Mickey Mouse is known and loved in all corners of the Earth. Ukrainian kids are no exception. So, are you ready to decorate the pages of your album with it?
1. Draw a round head, eyes and nose for the mouse.

2. A smiling mouth is an integral part of the image of Mickey Mouse.

3. Add round ears to the image and select a part of the head that will need to be painted black.
4. Now draw handsome Mickey a nice overall.

5. See how to draw Mickey Mouse's hands. Notice: he has four fingers on his hands instead of five. The author of the character, Walt Disney, decided that it would be easier and cheaper to portray the hero this way.

6. Almost ready! All that remains is to finish drawing the slippers and painting part of the head with a dark color.


Voila! Children's little favorite Mickey Mouse is ready.

Learn to draw Mickey Mouse and his girlfriend Minnie Mouse
Perhaps only the lazy don’t know about the loving couple Mickey and Minnie. But did you know that actor Wayne Allwine, who voiced Mickey Mouse for 32 years, married Russi Taylor, whose voice was the sweet voice of Minnie Mouse? The couple lived as a couple until the end of their lives.
Let's draw a gentleman Mickey Mouse and his girlfriend Minnie - the romantic owner of many dresses and bows.
1. Use circles and lines to sketch the characters.

2. Next in line are the eyes, noses and mouths of mice.

3. Clearly draw the contours of the heads and ears.

4. Detail the face of cartoon characters. A bow will suit Minnie - add it.
Great! You can move on to the torsos.

5. Everything is simple here: we draw shorts for the boy, and a skirt for the girl.

6. Add finishing touches and details to the faces and draw in the limbs.

7. And finally, draw the characters’ feet.


The sweet couple will certainly delight the heart of a fan of Disney cartoons. So if one of your friends loves “The Mickey Mouse Club,” feel free to give him a picture with your favorite characters. Forbes magazine estimated the value of Mickey's character at $5.8 billion. I hope your work will be just as valuable to the new owner!

How to draw other cartoon characters, see here:
Hello! Today we have prepared for you a new step-by-step drawing lesson, in which we will talk about how to draw Mickey Mouse. This one is probably known to every person on the planet. Although it was invented quite a long time ago - back in 1928, appearance Mickey hasn't changed much.
Of course, now it has become more drawn and detailed, shadows and highlights have been added, animation has improved and movements have become smoother and more natural. Our hero also looked and moved cool. Let's start the lesson and learn how to draw Mickey Mouse step by step!
Step 1
Let's start by drawing a regular circle, it should be located at the top of the page 
Step 2
Now we have to mark the heads of our mouse with a pair of lines; they should intersect at right angles. The vertical will indicate facial symmetry, and the horizontal will indicate the eye line. Please note that the eye line is slightly below the conditional center of the head. Let's draw a couple more small circles located on the sides of the circle from the previous step, in the end we should get a very recognizable eared silhouette.

Step 3
It seems that this stage is very difficult, but this is not at all true if you maintain consistency. So, first we draw the body - it looks like a thin (much thinner than the head) raindrop, slightly expanding downwards.
Then we draw a pair of elongated sticks that extend from the highest points of the body on the sides; these sticks should also bend slightly. So we drew the outlines of the hands without palms, then we draw the palms themselves - they are very large, about the size of a head in width. We position the opposite thumb correctly.
Then we draw a pair of narrow, even sticks in the lower part of the body, they should be parallel to each other, and at the lower ends of these sticks we place rounded figures - feet. The feet are very large, even in height they are not inferior to the top of the legs.

Step 4
Using the markings from the second step, draw Mickey's face. We denote the eyes as small vertically elongated ovals, the nose as a flat oval, and the mouth as a smiley face, not forgetting the folds in the corners. Don't forget to outline the white area.

Step 5
Erase all the extra lines from the face, draw a tongue and a fold above the nose (this line should be parallel to the line of the nose). Then we outline all the outer contours

Step 6
We draw the palms, more precisely, we outline the fingers and the protrusion on the inside. We outline the contours of the tail - it consists of two lines, which, gradually narrowing, turn into one. We outline the contours of the shorts and outline a pair of buckles in the form of elongated ovals.

Step 7
We erase unnecessary strokes from the entire figure, edging it with clear, confident lines. Also in this final stage, we paint over the dark areas with a soft simple pencil and apply shadows. The light falls from the front and to the right, which means we place the shadow (a strip of neat horizontal shading) on the side to our right. In terms of shading, pay special attention to the palms.
A couple more important points. Don't forget about the glare on the nose, it is located on the left side of us, as well as the glare on the pupils. Such details may seem inconspicuous, but their absence will negatively affect the impression of the drawing as a whole.
This is how we got Mickey Mouse. We hope that yours turned out just like this or even better. See you again!
And a well-known character like Mickey Mouse will now appear on our blank album sheet. And to make it look as good and believable as possible, we’ll use this drawing lesson.
How to draw Mickey Mouse with a pencil step by step
Necessary materials:
- a simple pencil;
- black and orange colored pencils;
- marker;
- ruler.
Stages of drawing Mickey Mouse
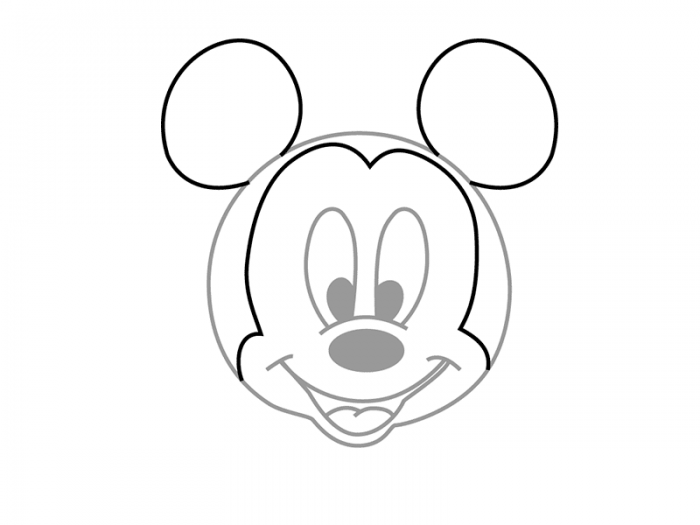
1. Draw the head of a cartoon character in the form of a circle. 
2. Draw a vertical line in the middle of the head. 
3. At the top we draw small lines inclined to the side. At this point we will further draw Mickey's ears. 
4. At the end short lines draw small vertical lines that will mark the end point for the ears. 
5. Draw identical circles. These will be the ears. 
6. Draw an oval at the bottom of the head. 
7. Draw two eyes with a simple pencil. 
8. Let’s draw arcuate lines around the eyes. 
9. Draw a semicircle at the bottom of the head. We will also draw a nose in the form of a small oval. 
10. Draw the side lines. 
11. Works on all the elements of the face. We remove unnecessary lines. We finish drawing the mouth with a smile. 
12. We outline all the lines of the drawing with a black marker. 
13. We paint our Mickey Mouse with colored pencils. 
14. The step-by-step drawing of Mickey Mouse is completed. 
We deliberated for a long time and seriously thought about who to make the hero of the next lesson, and decided to turn to the classic characters of the Disney studio. The center of our attention is the creation of the hand of Disney himself, the symbol of the entire animation company, several amusement parks, and his image on many T-shirts, mugs and other items can be seen as often as the inscription “I love NY”. That’s right, we are talking about who we spent our childhood with and whom we are always happy to see. So, the topic of our lesson today will be “”.
May 15, 1928 became the birthday of his friend Minnie (short for Minerva) Mouse when they appeared on the screens in the black and white cartoon Plane Crazy. But Disney himself believed that this day was November 18, when the sound cartoon Steamboat Willie was released. Sound was just beginning its journey and was very important for the author.
“I love Mickey Mouse more than any woman I have ever known.” Walt Disney
We are confident that drawing a popular character and symbol of the studio will not cause any difficulties for any of our artists. Let's not delay and find out how to draw Mickey Mouse in minutes! Let's get started.
Step 1.
First, let's draw a circle for the head/face and draw facial lines in it. Everything is simple here, so just pay attention to the fact that Mickey is famous for his round head and we will have to try!

Step 2.
Now, starting from the top, we will mark the sides, and then we will draw two rounded ears. They may not be perfect in shape, so don't try too hard.

Step 3.
At the third stage, using the lines that we drew at the beginning, we will draw the shape of Mickey’s face. Let's very carefully draw out his chin and move on.

Step 4.
To indicate the eyes, we will draw two elongated ovals, as in the picture, and a small curved line for the nose.

Step 5.
We are already halfway there, so we are only moving forward. Here we will need to draw the nose itself for Mickey, his famous wide smile with small folds at the corners of his mouth. You also need to add pupils to the eyes.

Step 6.
Here are the finishing touches: draw Mickey's lower lip and tongue, then get rid of all the unnecessary and erroneous lines.

Step 7
Now we're done! It was very easy, wasn't it? Enjoy the resulting drawing and show it to us and your friends, you can even give it to someone, and our lesson “ how to draw Mickey Mouse step by step"has successfully come to an end.
Choose one character from today!

The mischievous mouse Mickey Mouse is the hero of the famous American cartoon, which was filmed a long time ago by Walt Disney. The cartoon is widely known all over the world and is very much loved by children, and adults too. After all, it is very interesting and exciting to follow the adventures of the mouse Mickey Mouse and his girlfriend Minnie. They always find themselves in funny situations and come out of them with honor.
The series began to appear in the late 20s of the last century. At first they were black and white. Then they began to be produced in color. The great Walt Disney himself voiced the mouse in the first cartoons. Mickey has a friend Donald and a puppy Pluto. He also has a whole family: mother, father, brothers, sisters, nephew. Comics and computer games have been created based on cartoon plots.
There is a whole amusement park in America - Disneyland, where children are greeted by this famous hero. Now Mickey Mouse is one of the symbols of the Walt Disney film company, its logo. Do you want to learn how to draw this heroic little mouse? Then get down to business with confidence!
Stage 1. The mouse will be located at the entire height of the landscape sheet. That is, we must draw it quite large in size. Calculate the correct proportions and how you will place it on paper. At the top we draw a circle and along it we draw the contours of the character’s head. These are two peculiar notches just above the supposed middle and two large ears located on the head. Below we already outline the lines of the front part of the muzzle. We draw two eyes, the pupils of the upper part of the eyes. Side line of the mouth. And in front we draw a hand clenched into a fist, slightly covering the mouth.

Stage 2. Add a second hand under the head. First we draw the line of the shoulder, then we take it to the elbow and bend it to the side. The hand lies under the other hand. Let's draw two parallel lines slightly diagonally from the hands and under them two large ovals.

Stage 3. Outline the lines of the ears with a double line, darkening some areas. On the front of the muzzle we will show a large nose pimple.

Stage 4. Below under the arms between two parallel straight lines we draw the bottom of the hero. These are shorts, and legs peek out from them.

Stage 5. Now we make large Mickey Mouse shoes in the ovals. First, let's draw an outline on top, this is like the top of the socks, and below them are the shoes themselves with wide front parts.

Stage 6. The result is a cheerful, cheerful mouse Mickey Mouse. While it is still black and white, like in the good old movie.

Stage 7. Color it properly so that it is even more beautiful and sparkles with all the colors of animation. It has a very contrasting color. This black body with a beige muzzle. The nose is black. Paws are white. Shoes of the Bright and Blinding yellow color and the shorts are red. This is how handsome we remember this famous cartoon character.