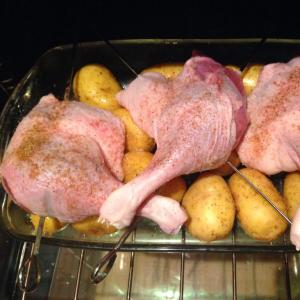
What section of profile pipe to use for the canopy. Metal poles for a canopy. Types of trusses and roof shapes
Covering a small space near the house allows you to protect places of rest or storage of some property from precipitation and bad weather. Often awnings are used for this purpose. This type of structure does not have stationary walls around the perimeter, although fabric or other lightweight cladding can be used to enhance protective functions.
Fig1.Canopy
A canopy is practically a light frame with a roof installed on it. Thus, it is most advantageous to make a canopy from materials that are sufficiently strong to withstand axial compression and bending, have minimal weight with maximum manufacturability. Experience shows that it is best to make a canopy from a profile pipe. You can do the work entirely or a significant part of it with your own hands.
Types of steel profile.
Modern industry produces a huge range of pipe products from steel profiles, usually having a rectangular or square cross-section. The width of the wall varies from ten millimeters to ten centimeters or more. The thickness of the metal used in the product can be from one millimeter to one and a half centimeters. Pipes also differ in the manufacturing method. They are:
- cold rolled;
- hot rolled;
- electric welded

Fig.2 Profile steel pipe
Each type of pipe has its own advantages and main scope of application. For the manufacture of simple building structures, which include canopies, cold-rolled and electric-welded pipes are best suited.
Canopy elements made from profile pipes
Like any spatial structure, the frame of a canopy made from a profile pipe will consist of racks, floor purlins and elements of horizontal and vertical connections. Racks or pillars for a canopy can be made from a profile pipe, although it is also possible to use an ordinary round pipe. Some disadvantage of round pipe pillars will be the more complex design of the support units and fastening elements.

Fig 3. Pipe section
It is better to make supports from square pipes. This shape is ideal for pairing elements located at right angles. Fastening elements can be easily installed on a flat and straight wall surface using welding, bolted or threaded connections. The cross-sectional shape, which is an equilateral square, ensures equal rigidity of the profile in the longitudinal and transverse directions.
For the manufacture of purlins or trusses, a rectangular pipe is best suited. Unlike racks, purlins experience significant force in the transverse direction, that is, from top to bottom. And virtually no loads along the axis. Therefore, using a square or round profile is completely inappropriate.
There is no need to use pipe section profiles for the manufacture of elements of vertical and horizontal connections. A steel corner of small width is best suited for this.
Canopy posts made of profile pipe
Depending on the length of the element, you should select the width and thickness of the wall. It is better to select these parameters based on load calculations, but at the same time, for the construction of a simple canopy such difficulties seem excessive. It is necessary to take into account that both the thickness of the wall and its width affect the rigidity of the rack. You can use a thicker pipe with a smaller cross-sectional width or a thin-walled pipe with a wide flange.
The vertical load from the roof of the canopy, taken by the stand, is not very large and even a thin-walled pipe can take it without deformation. The rigidity of the pipe directly depends on the height of the section. Therefore, using a rack with a wide shelf and a thin wall will be more appropriate and economical.

Fig 4. Drawing of the canopy
The size of a profile pipe for a medium-sized canopy, for example, a car, can be from fifty to one hundred millimeters. If the racks are located more often, then the cross-section of the pipe can be reduced. When supporting the roof of a canopy on four supports, it is better to make them from pipes of a larger cross-section.
Tie elements are attached to the canopy posts to prevent movement in the vertical plane under the influence of wind loads. They should be firmly fixed to the racks by welding or fastening at two points on each plane of the support. The connections are installed crosswise in the longitudinal and transverse planes.
The racks should be firmly fixed in the foundation, embedded in the concrete body or mounted using anchors installed in the upper section of the foundation. When installing poles for a canopy from a profile pipe, it is necessary to control their verticality using a water level or a laser plumb line. The stand, secured with anchors, can be leveled during installation. Once solidified during installation, it is almost impossible to level it later.
Almost all work related to the manufacture of load-bearing elements of a canopy frame from a profile pipe can be done with your own hands. Concreting foundations and installing racks does not require high qualifications and is available to any developer. At this stage, you can do without welding.
Canopy roof installation
The roofing of the canopy is the main purpose for which all other work is carried out. The complexity of its manufacture and installation directly depends on the length of the side to be covered and the pitch of the support posts. The longer the length of the purlin or canopy truss made from a profile pipe, the more complex and expensive the product will be. The optimal option can be considered a three-meter span, which allows you to get enough space at minimal cost.
More simple solution is a shed roof, based on simple purlins from a profile pipe. Elements with a rectangular profile are best suited for making purlins. In this case, the larger side of the beam section is installed vertically, and the smaller side is the base.
You can entrust the calculation of canopy beams from a profile pipe to a specialist or select the profile size yourself. To do this, you should calculate the expected load on the beam, which will depend on the climate zone, the pitch of the purlins and their length, and the weight of the roofing. For a beam three to four meters long, we can recommend a profile with a height of eighty to one hundred millimeters.

Figure 5. Types of farms
The height of the profile can be reduced by using a welded truss instead of a continuous girder. The easiest way to find drawings of trusses from a profile pipe for a canopy is to search on the Internet or make them based on drawings of metal trusses, reducing them in proportion to the length. The truss should not be complicated; in addition to the triangular structure of the lower and upper chords connected by a central post, it is enough to strengthen the upper beam with a brace. For such a design, a profile with a height of sixty millimeters on the larger side in the lower chord and a smaller size for the remaining elements of the truss may be sufficient.
Do not forget that the examples given correspond to minimum spans and a small load on the beam or truss. When increasing any parameter, calculations should be entrusted to specialists with the necessary qualifications.
The truss elements should be fastened by welding. If you do not know how to properly weld a canopy truss with your own hands, then you need to entrust this work to a knowledgeable welder. Welding tubular segments is not an easy task and requires learning. Welded seams should be cleaned and protected from corrosion with a special primer.
On the laid beams or trusses, a sheathing of timber fifty millimeters high, called sheathing, is installed. The sheathing is intended for fastening sheets of roofing. If you don’t chase the exotic, then the best option for this type of structure is metal profile roofing or polymer-based sheets. Almost any developer can install the sheathing and lay the roofing sheets of a canopy from a profile pipe with his own hands. The timber from which the sheathing is made must be pre-impregnated with an antiseptic composition or painted with a special paint that prevents wood rotting. After installing the beam in the design position, this will be more difficult to do, and the quality of the operations performed will be much worse.
The trusses or purlins of the canopy are fastened together on a horizontal plane with cross-shaped ties made of profile metal of small cross-section. Just like on racks, the connections must be firmly attached at the support points, preferably by welding.
All metal structures must be protected from corrosion with special paints for metal. It is better to do this operation before installing the elements in the design position. After installation, it is necessary to restore the protective coating in places where it was damaged. Where welding or other fastening work was carried out during the installation of elements, it is necessary to apply a coating to the bare areas.

Fig 6.Canopy
As can be seen from the description, despite the apparent simplicity of the design, it contains many elements of various sizes, installed at different elevations. To prevent defects in work and control the execution of tasks by invited specialists, before starting work, it is recommended to make the most detailed drawing of a canopy from a profile pipe. When making a floor truss, you also need to make a drawing for this structure with the dimensions of all elements. You can make a drawing of the canopy frame with your own hands on paper or using a computer if you have the appropriate skills.
Pipe and polycarbonate canopies are becoming increasingly popular architectural form on a personal plot. No wonder, because this building can perform many functions, ranging from an open garage for a car, a wood warehouse, an indoor playground and ending with a recreation area with a barbecue and soft chairs.
The key advantage is the ability to make such a design with your own hands. This article will provide recommendations on the choice of material, examples of calculations of supports and trusses, and how to weld a canopy from a profile pipe.


Calculation of the optimal canopy shape
The length of the rafter depends on the angle of inclination of the truss. For different angles, it is optimal to use different roofing materials:
- 22-30 is the optimal angle of inclination for buildings in areas with significant snow loads. The design of a canopy made from a profile pipe with such an angle provides a predominantly triangular shape. It is optimal for straight and corrugated asbestos sheets, various types metal profiles and ethernite roofing.
- 15-22 - are also gable with metal types of roofing. This angle of inclination is typical for regions with increased wind loads. The maximum span of a triangular truss with this angle is 20 m.
- 6-15 – predominantly single-pitched trapezoidal trusses covered with polycarbonate and corrugated sheets.

Single-pitch canopy made of profile pipe, photo of a structure with a roof made of corrugated sheets
Calculation of a canopy made of polycarbonate from a profile pipe is carried out in accordance with SNiP P-23-81 “Steel Structures” and SNiP 2.01.07-85 “Loads and Impacts”.
The technological requirements for the farm and the calculation sequence are as follows. In accordance with the technical specifications, the required span is determined. Using the presented diagram, we substitute the dimensions of the span and determine the height of the structure. The angle of inclination of the truss and the optimal shape of the canopy roof are set. The contours of the upper and lower chords of the truss, the general outlines and type of roofing are determined accordingly.
Important! Maximum distance, on which the trusses are placed when making a canopy from a profile pipe - 1.75 m.
Diagram of the dependence of the length of the rafters on the angle of the roof when calculating a truss from a profile pipe for a canopy
Profile selection
As a material for assembling a truss, you can use channels, tees, angles and other profiled products made from steel grade St3SP or 09G2S (in accordance with GOST). However, all these materials have a significant drawback compared to profiled pipes - they are much heavier and thicker with comparable strength characteristics.
The dimensions of the frame elements for a canopy made from a profile pipe depend on the dimensions of the building. In accordance with GOST 23119-78 and GOST 23118-99, the following materials are used to create a canopy from a square pipe with your own hands:
- For compact buildings with a span of up to 4.5 m – 40x20x2 mm;
- Medium-sized structures with a span of up to 5.5 m are made of corrugated pipe 40x40x2mm;
- Structures of significant size with spans of more than 5.5 m are assembled from profile pipes of various sections 40x40x3 mm or 60x30x2mm.
- The size of the canopy stand made from corrugated pipe is 80 80 by 3 mm.
Drawings, dimensions and main connections
Before you begin assembling a canopy from a profile pipe with your own hands, you need to draw a detailed plan of the entire structure indicating the exact dimensions of all elements. This will help calculate the exact amount of materials of each type and calculate the cost of construction.

Drawing of a canopy made from a profile pipe indicating the main overall dimensions
In addition, it is advisable to make an additional drawing of the most complex structures. In this case, it is a single-pitched truss and the fastening points of its main elements.

Scheme for making a truss from a profile pipe for a canopy with the main fastening units
One of the main advantages of a profile pipe is the possibility of a faceless connection. This is manifested in the simplicity of the design and low cost of the truss with a length of rafter spans of up to 30 m. In this case, the roofing material can rest directly on the upper chord of the truss, provided it is sufficiently rigid.

Fastening points for assembling a canopy from a profile pipe with your own hands, in the photo a - a triangular lattice, b - a support lattice, c - a diagonal lattice
The advantages of a bevelless welded connection are:
- Significant reduction in truss weight, compared to riveted or bolted structures, up to 20% and 25%, respectively.
- Reducing labor costs and manufacturing costs, both for single products and for small-scale production.
- Low cost of welding and the ability to automate the process by using devices with a device for continuous feeding of welded wire.
- Equal strength of the weld and the products being connected.
Disadvantages include:
- The need to have quite expensive equipment;
- Welding experience required.
Bolted connections in the production of products from profile pipes are quite common. They are usually used in collapsible canopies made of profile pipes or in products produced for mass consumption.

Bolted connections are the simplest for installing a canopy from a profile pipe with your own hands, photo of the attached frame element
The main advantages of such connections are:
- Easy to assemble;
- No additional equipment required;
- Possibility of complete dismantling of the structure.
Flaws:
- The weight of the structure increases;
- Additional fasteners required;
- The strength and reliability of bolted connections is somewhat lower than welded ones.
Summing up
The article examined the design and methods of making the simplest single-pitch canopy from a profile pipe with your own hands, however, profiled pipe is a rather “flexible” material from which complex and aesthetically attractive structures can be made.

A complex design for creating a canopy from a corrugated pipe with your own hands, photo of a lean-to, dome structure
If you live in a private house, sooner or later you will need to install a canopy near the house, which will serve as reliable protection for your car, as well as a cozy place to relax. A country canopy in the yard can be used to create a comfortable stay, because it provides good protection from the scorching rays of the sun and precipitation. In addition, depending on the type of structure, it can also be used for decorative purposes, for climbing flower gardening and planting vineyards.
Carport
Canopy in the form of a gazebo
Canopy over the pool
Today, there are a huge number of different models of country and yard canopies, which differ not only in appearance and characteristics, but also in material, as well as purpose. One of the simplest and most popular types of country house canopies today is a structure made from a profile pipe, which you can easily make with your own hands. As a rule, this type of metal canopy is highly durable, durable and stable. Visually, such buildings are quite light; they will not burden the appearance of the yard.
Canopy made of profile pipe
The most important feature of this type of design is the low cost of materials and ease of installation. You can easily install canopies made from profile pipes yourself, provided you have the necessary tools and patience.
Other advantages of structures made from profile pipes include:
- reliability of the material;
- flexibility - you can create both straight and arched structures from profile pipes;
- ease of assembly due to the correct shape of the material;
- minimum tools for installation;
- long service life;
- when created from a frame profile, it will be lightweight;
- quick connection of material using bolts or a soldering iron;
- frames made of similar material can be either collapsible or stationary;
- affordable price of material.
Country canopies made of profile pipes can be divided into two types depending on the type of structure: separate and stationary. Collapsible structures, as a rule, are created on the basis of an installation with a frame made of profile pipes, as well as using plastic or fabric with a waterproof coating.

This design is very convenient, and its installation will not take you much time. A collapsible garden canopy has the following benefits:
- fast assembly process;
- ease of installation;
- convenience and mobility;
- Possibility of use only in certain seasons;
- low price.
The stationary type building is a prefabricated structure, the main material for creating the frame of which is metal pipes. As a rule, such a design also has a more complex installation process, but if you have minimal construction skills and a set of necessary tools, installation can be done with your own hands.
Before you begin installing the structure, you need to decide on its type. When choosing the type and size of a country or yard canopy, especially if it is made by hand, it is best to give preference to rectilinear structures, the installation process of which is simple. The rectangular design with two ribs can also provide high stability and strength to the canopy.
Straight canopy diagram
In addition, the choice of material is also an important aspect in this process. It is best to give preference to the highest quality and durable materials so that there are no problems with the finished structure in the future. For this purpose, pipes made of high-carbon steel, which are protected from the effects of corrosion and rust, are better suited. When it comes to choosing the size of the structure and the thickness of the walls, this will depend entirely on the type of shed you have.
High carbon steel pipes
Before starting construction work, it is necessary to carry out preparatory work, which includes drawing up a project and design drawing, as well as calculating the dimensions and quantity of materials. All calculations are made strictly according to the developed drawing of the canopy. The project must indicate the dimensions of the structure, the relationship between the length of the building and the angle of the roof. In the work drawing it is also necessary to indicate the outlines of the support belts. In this case, the height of the building must be calculated based on weight, type, ability to move, type of floor and other features. If you have any difficulties at the stage of developing a project or design drawing, it is best to contact professionals who can draw up a competent project for you.
Work on installing the canopy must begin with marking and installing the frame. After you have made marks on the place where the canopy will be installed, you can proceed to installing the structure's supports.
Installing a canopy support
For light garden or yard structures, it is best to install supports in increments of up to 2 m. First, you need to dig holes 60 cm deep, compact them, cover them with a layer of gravel and proceed to creating a column from concrete mortar. Each column is installed using a plumb line.
Columns made of concrete mortar
It is worth noting that this type of work is best done not alone. In order to install the columns exactly at the level, you will need more than one pair of hands. The place under the suspension must be strengthened; for this purpose, they can be covered with tiles or simply create a concrete screed.
Concrete screed
Next, you need to proceed to the installation of a frame made of reinforcement, and also fill it with concrete to a depth of at least 50 mm. Such a base can withstand loads of no more than 3 kg. The next step will be to create a frame around the perimeter of the canopy, which will serve as a fastening for the roof truss.
Now you can move on to working with the pipes themselves. First, you need to weld cylinders with through holes to one end of the profile pipe, which will serve for fastening to the base of the structure. Holes must be drilled at the ends of the support to secure the frame and stand. You can then begin assembling the pipes using bolts.
Ready canopy
If you want to make the job faster and easier, you can use special metal plates instead of cylinders. However, in such a case, the reliability and strength of the structure is significantly reduced.
Arched canopies in front of a private house according to drawings and photos
Today, this type of canopy, the arched one, is very popular. A design of this type is not only highly durable and reliable, but also quite attractive. appearance, due to which the scope of its use is expanding. Arched canopies made of profile pipes are a fairly simple structure in type and construction, the installation of which can be done with your own hands. You can often find arched buildings in private houses and dachas, which perform both decorative and protective functions.
Arched canopy
Before you decide to build an arched structure at home, you need to worry about choosing high-quality material, preparing the necessary set of tools, and developing a construction project. At this stage, it is mandatory to create a project or detailed drawing, which will indicate the calculation of parameters and placement of the structure, as well as the amount of materials needed.
Arched canopy project
This stage of construction is very important, therefore, if it is difficult for you to develop a competent project yourself, you can use ready-made projects of canopies and profile pipes on the Internet. On the Internet you can find a wide variety of developed drawings of finished structures made from profile pipes. You can easily use a detailed drawing to build a canopy with your own hands, this will greatly simplify the work.
The process of installing an arched canopy made of profile pipes has the following features:
It is worth considering that materials for creating an arched canopy will have to be ordered or purchased in a specialized store. The store will also help you correctly calculate the radius of materials based on the desired width of the canopy.
Do-it-yourself awnings from a profile pipe - photos, drawings of arched awnings in front of a private house
Support posts are the basis of your canopy in the country. If they are installed correctly, this will ensure the durability of the entire building.
For the manufacture of supports, you can choose either wood, metal or brick. Each material is good in its own way, each has its own advantages and disadvantages.
Types of canopy support posts
There are several types of support posts:
- Wooden canopy poles are strong and durable. Installing them is quite simple; no additional devices are required, such as a welding machine for working with metal; No bricklaying experience is required, as in the case of brick supports. The only thing that must be done is to treat the timber racks with an antiseptic against fungus and mold, and with fire-retardant impregnation. Summer residents choose a wooden frame for sheds when the new structure should be in harmony with a residential building and other buildings.
- When constructing large objects - a residential building, for example, concrete pillars are used. They are durable and will last a long time. But when installing them, you need to use technology, so they are used for awnings only within the city.
- Brick supports look beautiful. Such racks will last a long time, but building them is a labor-intensive task and requires construction skills. It is difficult for an amateur summer resident to lay out perfect brickwork. It will look more bulky than wooden and metal structures.
- Metal poles for a canopy are the most reliable type of support. The material is publicly available - it can be round or profile pipes with a square cross-section. You also need to treat it with an anti-corrosion compound, especially the buried part of the support. The easiest way to paint is with primer and then paint.
- Combined prefabricated supports. Small column-sleeves with embedded parts on which the supports are attached are made from a cement-sand mixture with the addition of crushed stone. Before concreting them, it is necessary to bury the formwork in the holes. Metal poles are attached to them.
How to determine the number of support posts for a canopy
Capricious weather all year round will test the strength of the country canopy. The building must withstand gusty winds, a huge cap of snow, and heavy rain. In order to build a durable canopy on poles with your own hands, you need to correctly calculate the number of supports required. How to do it?
- First of all, decide on the size of the future canopy. The number of support posts directly depends on the size of the building.
- For a canopy whose dimensions are 6x3 meters, respectively width and height, on average you will need 8 metal posts with a diameter of 8-10 cm.
- Please note that a three-meter height is most optimal. The lower design is not convenient. A higher one will not serve as protection from bad weather, since snow and rain will fall under the canopy.
- The supports are installed 4 in each row of the canopy at an equal distance from each other, and the load will be evenly distributed. Since 2 support posts can withstand loads of up to 250 kg, we can say with confidence: the canopy will be reliable.

Installation methods for canopy posts
Installation of supporting structures can be carried out in one of the following ways:
- Driving the canopy supports into the ground. The method ensures reliable fastening of the support post, but the driving process itself is too difficult. In addition, not all soil is suitable for driving posts, only solid rocky soil.
- Screwing the posts into the soil. This method is used if the canopy needs to be placed in swampy areas or quick sand, close to a ditch. The support post is screwed into the soil until it reaches solid ground, at least 120 cm.
- Metal supports for a canopy are placed on an area that already has a concrete surface using reinforcing pins. In this case, the reinforcement is dug into the ground (depth 60-80 cm), and the racks are already welded to it.
- A method of concreting support pillars installed in pre-dug holes. The option will not require much time and effort. The resulting base firmly holds the stand.
Please note that simply digging a pole into the ground, whether made of metal or timber, is not enough when installing a canopy.

The procedure for installing metal supports for a canopy by creating a concrete base
- To install the support, we will take pipes 3.5 meters long. We weld metal bearings to the support pipes. They are necessary for performing bottom concrete pouring.
- We treat the part of the stand that will be filled with concrete with an anti-corrosion compound; you can wrap it in two layers of roofing material.
- We level and clear the area for the canopy.
- We mark the installation of pillars on the ground. We drive in the corner pegs first and connect them with rope. Then, along the line of the rope, we mark the places where the supports will be concreted.
- According to the markings, we drill or dig holes for support posts with a depth of at least 60 cm. It is clear that the dug hole will be wider and more concrete mortar will have to be used.
- Pour crushed stone into the bottom of the hole (a layer of 10-15 cm), compact it well. Please note when purchasing crushed stone that the granite version has frost-resistant properties.
- The walls of the hole should be shed with water so that when the concrete is poured further, the earth does not take moisture from it and reduce the quality of the solution.
- We install the pillars in the holes strictly perpendicularly. We check the correct installation with a plumb line and building level. Use wood or metal supports to keep the structure vertical. On the bottom of the support, mark the distance to which you will deepen it into the ground.
- After this, it is necessary to concrete the posts in the pits with a cement-sand mixture with the addition of gravel. Let the concrete base stand and strengthen for 2-3 days.
- We cut off the extra centimeters of the height of the racks and move on to the stage of installing the canopy roof - we connect the supports along the perimeter with horizontal jumpers, and fix the canopy roof frame to the jumpers.
![]()
Features of installing canopies and awnings on an asphalt surface
- Sometimes it is necessary, even in a summer cottage, to install support posts on a concrete or asphalt surface. In this case, we also weld the pennies onto a profile or round pipe, drive the reinforcement pins into the asphalt (to a depth of 20-40 cm), and finally, weld the bearing bearings of the supports to the pins.
- Canopy canopies of the attached type - adjacent to the building on one side - differ in the number of supports, their location, and installation method. As a rule, the vertical posts of such canopies are strengthened on embedded parts that are pre-concrete.
- If the canopy is planned to be lightweight, portable, with aluminum support tubes, then when installing the canopy it will be enough to stick the tubes into the ground.
 The process of installing support structures, as you can see, is simple and does not require special skills. All you need is desire, patience and the appropriate tools - and you can install the supports for the canopy yourself. As for the roof for the canopy, you can choose from the materials suggested below:
- polycarbonate (the lightest material);
- tiles;
- slate;
- corrugated sheeting;
- roofing felt;
- polycarbonate
In addition to basic construction tools, you will need a welding machine. It is advisable to invite an assistant, since it is more convenient for two people to fix the support posts in a vertical position.
Sheds and verandas can be of very different designs and built from a variety of materials, but they all have the following basic principle: support pillars, floor beams and roofing. You will find some nuances of their installation in this article. For example, consider simple design wall canopy for the terrace (Fig. 1). The basis for it is a support board attached with anchors to the base of the porch - in this case, a brick plinth on a concrete foundation strip. Between the support board and the base there is waterproofing, for example, several layers of roofing felt. Support pillars are installed on the support board and secured to it. A front horizontal beam is placed on top of the pillars, designed to support the rafters. The connections of the parts are tenon, reinforced with upper struts. Near the wall, the rafters with their notches rest on the rear support beam, which is supported on the wall by dowels and wall posts. Plywood sheets and a layer of waterproofing are laid on top of the rafters. The sheathing bars with a pitch corresponding to the size of the tiles are secured with screws. The side gables of the canopy are covered with clapboard, the lower ends of the sheathing are nailed to the transverse batten. To prevent moisture from leaking in, the junction of the roof to the wall is covered with a flashing - a profile bent from a strip of roofing iron. The canopy design is completed by fencing the terrace. For racks and fence posts you will need beams with a cross section of 100 x 100 mm. The remaining parts of the canopy can be cut out from boards 50-60 mm thick and 100 mm wide. When constructing such canopies, the presence of a foundation for supporting pillars is sometimes not necessary.
Individual pillars can be dug in or installed on anchor supports secured in one way or another (Fig. 2-5). The parts of the canopy frame can be spliced and connected not only with tenons, but also with the use of metal overlays and profiles, half-timber notches, and overlay (Fig. 6-7, 9). If the roof is made of ondulin, then a continuous sheathing is not necessary. The sheathing can be made of beams. However, the step between them should not exceed 15-20 cm (Fig. 8).
Rice. 2. When burying a post, keep it strictly vertical. Rice. 3. The pillars can be supported by tetrahedral steel tips driven into the ground. Rice. 4. Anchor supports various designs can be concreted into a column. Photo: Under the canopy formed by the slope of the roof, on a kind of open veranda, a table with chairs is comfortably located. A great place to relax and have tea.

Rice. 5. The formwork for the concrete column is made of four boards; pieces of reinforcement with threads at the ends are concreted as anchors. Rice. 6. Longitudinal and transverse connection of wooden parts by cutting into half a tree. Rice. 7. It is convenient to splice and connect wooden structural elements using metal perforated plates and profiles. Rice. 8. The ondulin roof is laid directly on the sheathing with a pitch between the beams of no more than 15-20 cm. Fig. 9. The connection to the wall can be made using steel corners.
DIY canopy - drawing

Do-it-yourself canopy - all photos for the article
Below are other entries on the topic “How to do it yourself - for a homeowner!”
A canopy at a dacha or at a private house can perform many functions: sheltering a recreation area, utility areas, or a summer garage from the sun and rain. Usually the shelter is equipped with polycarbonate sheets or wooden boards. And the flooring rests on pillars - supports that can be made of wood or metal.
What types of pillars are there?
Canopy supports are made from different materials:
- Tree;
- Metal pipes;
- Brick or concrete;
- Combined supports.
Wooden poles for canopy
This is the simplest and most affordable type of canopy supports, which you can install yourself even without special skills. Any wood will do, but it is durable and hard; it is optimal to give preference to deciduous trees.
The post can be solid wood, buried at the base in the ground, or combined - when the base of the post is stone, and only the top is wooden. In the first case, it is especially important that the material is well saturated with antiseptics that prevent rotting.
The installation of wooden poles for a canopy is suitable for a structure made of polycarbonate or boards.
Canopy poles made of profiled pipe

Metal is a strong and durable material that can serve as a support for maintaining a canopy for many decades. Metal poles for a canopy are the most reliable and strong supports that are not that expensive.
Ordinary metal pipes of different diameters are usually used as racks; before digging into the ground, their lower part must be coated with anti-corrosion enamel, which extends the service life of the support, and polymer for waterproofing.
Canopy posts made from profile pipes are used in many cases:
- To obtain a reliable and strong frame for canopies made of polycarbonate, boards, metal profiles;
- For wet and water-saturated soils;
- For installation of a base for trusses;
- For installing a frame “forever”.
Metal poles (pipes) are more expensive than wooden ones, but they last much longer without the need for repairs, and are also more aesthetically pleasing and can withstand unlimited amount staining.
Brick supports
Brick posts look beautiful and solid, but they are the most expensive type of support and labor-intensive to install. Brick supports look good against the background of a facade or fence made of the same material under any canopy. Polycarbonate plays interestingly on the brick, allowing the sun's rays to pass through.
Red, white and silicate bricks are suitable for construction; the choice should be made based on decorative features plot.
This group also includes supports made of decorative stone.
Calculation of pillars

Before purchasing material and starting work, it is necessary to calculate the number of supports and their depth, and select the type of device for the underground part of the rack.
Calculation of the number of supports for a canopy
When determining the number of supports, you need to calculate the load on 1 pillar and correlate it with the permissible pitch of the pillars. On average, one metal pipe with a diameter of 80...100 mm can withstand a load of up to 250 kg. It includes:
- Weight of the roofing section (canopy);
- Self-weight of the pipe;
- Snow mass.
Usually a canopy is equipped for 1 car or a small area. Using the example of a 6x3 meter perimeter, you will need 8 supports:
- 4 in the corners;
- 2 on each side between the corner posts.
The average distance between supports is 2.0 meters, but more can be taken - 2.5 meters.
The same goes for stone racks. In this matter, it is also important to take into account the flexibility of the roofing so that it does not sag under the weight of snow. More than 2-2.5 meters between supports should not be taken without an additional roof beam.
Support depth
Installation of poles for a canopy is carried out in the ground. In order for the stand to stand level, it is necessary to take the correct depth for burying its base and the method of immersion and fixation in the ground. The post can be inserted into the ground in the following ways:
- 1) Driving in is suitable for metal supports under small canopies with light covering materials. Driving in is possible only on dense soils; in no case should you resort to this method on loams and heaving soils;
- 2) Concreting can increase the bearing capacity of a pillar on any soil. Metal poles are subjected to concreting, less often - wood;
- 3) Butting. Essentially, this is digging a post, but using materials that compact the soil - crushed stone, gravel.
The depth is determined by the amount of soil freezing in the region. The pillar is placed at a depth below the table by 20-30 cm, do not forget about arranging a pillow of 10-15 cm.
How to install poles for a canopy
Canopy supports can be installed different ways. The choice depends on the material of the pillar, the type of soil and the expected load on the coating.
Installation of wooden poles

How to install wooden poles for a canopy:
- Bury the pillar. To do this, dig a hole, fill the bottom with a cushion of a mixture of sand and crushed stone. A prepared wooden stand, carefully treated to prevent rotting, is also lowered there. After this, the soil is backfilled and compacted. This method is suitable for organizing a temporary or light canopy.
- Attach the post to the existing columnar foundation. This is a gentle way to use wood studs. Plates are laid in advance into ready-made columnar foundations, to which wooden supports are subsequently attached.
Installation of metal poles
Pipe racks are made more often than others, which is why more installation methods have been invented for this material.
Clogging
You can drive metal poles into dense soils. This is a great way to save on installation work and get a reliable frame.
A pipe is installed in the marked place, a cap (a thick layer of cardboard) is put on and driving begins until dense soil is reached. Since there is no cushion of sand and crushed stone with this method, it is worth focusing on solid supporting layers. Excess length at the top can be trimmed. At the same time, the depth of the pillars for the canopy should not be less than 1.5 meters or ½ from the top of the pillar.
Butting poles for a canopy
This is a method similar to instillation. In the marked place, a hole is prepared with a depth below the freezing level of 0.3 meters. A sand-gravel mixture is poured onto the bottom and a post is installed. Next, the pit is filled layer by layer with a sand-gravel mixture, constantly adding water to compact it.
When there are 15-20 cm left to the top of the hole, pour concrete solution, which serves as reinforcement for support.
Advantages of the method:
- High efficiency with low financial and labor costs;
- Fast speed installations.
- The disadvantage is the small load-bearing capacity of the pillars.
Concreting pillars for a canopy

To get a reliable and universal support, take metal pipes and bury them in the ground, using concreting at the base of the pillar. The method is suitable for use on moving and heaving soils, where it is difficult to reach dense layers and it is necessary to protect the stand from being pushed out when heaving water-saturated soil.
How to concrete pillars for a canopy:
- 1) Dig a hole to the calculated depth;
- 2) The bottom is covered with crushed stone-sand mixture and compacted;
- 3) A metal frame is installed to strengthen the “glass”;
- 4) Install the formwork;
- 5) Insert the pipe and fix it to the frame with metal fittings;
- 6) Concrete is poured.
Installation of pillars
You cannot ignore the installation of brick pillars, which are also sometimes used to support awnings. To install such a support, a foundation is needed. More often it is a columnar structure.
- 1) Dig a hole measuring at least 50x50 centimeters;
- 2) A cushion of sand and crushed stone is placed at the bottom to compensate for loads from the soil;
- 3) Lay a thin layer of cement or masonry mortar to level the site. You can skip this step if you level the area well;
- 4) Now start laying the columns. To support a canopy, laying 1-1.5 bricks is enough.
When the underground part is ready, the side walls of the base are covered with roofing felt or coated with bitumen, then they are buried and the masonry is brought from above to the design mark.
When the racks are ready, installation work begins on installing the canopy ceiling.
A barbecue canopy is simply necessary for a long-awaited vacation fresh air was not spoiled by the surprises of nature. The roof over the barbecue must meet certain criteria for safety, comfort and aesthetics.
Next, we will review the most popular and affordable designs, tell you what materials are best to use, and how to make a canopy over the barbecue with your own hands; photos will help illustrate the most practical and original ideas.


Design features
Any barbecue shelter consists of supporting vertical posts and a roof. This can be a separate building, a structure on a separate site adjacent to a house, utility unit, bathhouse, garage, gazebo, or a single structure, usually mobile, where the roof and barbecue are connected by racks.
The size of the barbecue shelter is directly related to the size of the oven. This can be a small shelter just above the fireplace, or a full-fledged roof with a place to rest.

Barbecue canopies, photo of a mobile forged structure
Grill canopy frame - materials
The frame is the support of the barbecue canopy; it must be strong, fireproof, heat-resistant, easy to maintain, and not react to temperature deltas and humidity changes. But at the same time it is beautiful and fits harmoniously into the overall architectural ensemble of the site. Here we can distinguish 3 types of barbecue canopies:
- Wooden from timber, rounded logs, tree trunks. Such structures fit perfectly into any landscape design. Building a wooden barbecue canopy with your own hands is quite simple; no special skills or equipment are required, the material can be easily processed with household tools. Disadvantages include the fragility, fire hazard and rotting of wood, it is affected by fungi, and we especially emphasize vulnerability to rodents and insects. To extend its service life and maintain aesthetics, the wooden frame for a barbecue canopy must be carefully treated with fire-resistant and antiseptic agents, additionally primed and painted.

Grill canopy, photo of a wooden building in a rustic style
- Metal: forged, welded, prefabricated. This is the most popular type of canopy over the barbecue. The main advantage is the durability and fire safety of the material. If the farm has a welding machine, and you have the skills to work with it, in fact, a metal barbecue shed is an inexpensive, simple and very reliable structure that will last for decades. But a metal barbecue canopy is susceptible to corrosion and heats up from UV rays and fire. The frame must be treated with an anti-corrosion agent, coated with primer and paint; compounds with a hammer effect have proven themselves well here.

Canopy over the barbecue, photo of a portable welded structure made of round pipe and corrugated sheeting
- Stone, concrete, brick - these can conditionally be classified as permanent structures. To build a barbecue shed from brick or stone, you will need skills in laying vertical pillars, significant time and labor costs, as well as some inconvenience when working with mortar. But such a canopy over the barbecue is the most durable, it is not at all afraid of fire and does not heat up from the sun, does not require finishing, and does not require additional maintenance during operation.

Photo of a brick barbecue under a canopy; a strip or slab foundation is recommended for such a structure
How and what is best to make a roof for a canopy over a barbecue
The roof of a barbecue canopy can be single or gable, arched, hipped, domed, conical and even curvilinear. The choice of shape depends on the roofing material and your capabilities. The easiest way is to make a lean-to and arched barbecue canopy with your own hands.
Good to know: The pipe above the barbecue should be protected from the weather by a smoke collector and rise 1-1.5 m above the roof level, this will protect against fires and will not allow smoke to get inside the canopy.

A pitched roof is the easiest way to protect a barbecue from precipitation
Corrugated sheeting and roofing felt are most often used as roofing materials for barbecue canopies; for arched structures, colored polycarbonate is the ideal solution. For complex, large extensions - metal tiles, soft roofing.
Corrugated sheets are corrugated metal sheets coated with a durable polymer that protects the material from rust, fading, and harmful chemical and biological influences of the environment. It is not afraid of fire, which is important for building around a barbecue. A huge color palette allows you to select sheets to match almost any style of architectural ensemble on the site.

Advice: If the barbecue canopy is an extension to any structure, then choose a material for the roof that is identical to the main structure.
Polycarbonate is more versatile compared to corrugated sheeting. For the roof above the barbecue, cellular polycarbonate, with stiffening ribs inside, 6-12 mm thick, is better suited. The material is slightly flammable, melts, but almost does not support combustion, and monolithic-cast sheets do not burn at all. The material is lightweight and creates virtually no load on the supports.
The material bends, so you can easily use it with your own hands to make a roof over the barbecue not only with a straight slope, but also an arched, curvilinear, complex shape, with several bends, which opens up wide horizons for the design of an extension to the barbecue.

The polycarbonate barbecue canopy looks light and weightless due to the transparency of the material
A small canopy covering only the barbecue is not ergonomic; in case of precipitation, it will not protect the cook from the weather. It is better if the roof moves away from the stove by 1-2 m, as much as the size of your site allows.
The supports for the canopy over the barbecue should be concreted. It is recommended to do columnar foundation to a depth of 700 mm. The area should be paved with paving slabs, sprinkled with gravel or filled with concrete.
The average height of a barbecue canopy is 2.2-2.5 m, but not lower than 2.0, so that soot and fire do not spoil the roof, and the person does not hunch over at work. The most practical height of the canopy over the barbecue is 3 m; this is, firstly, safe, secondly, enough light penetrates inside, and thirdly, the risk from open fire is minimized.

The combination of different materials will help you decorate your barbecue beautifully.
How to make a canopy for a barbecue at your dacha with your own hands - step-by-step instructions
We will make a small wooden canopy over the barbecue with our own hands with a polycarbonate pitched roof. Before work, it is necessary to make a drawing, which will indicate the main components and dimensions of the structure.

Using the drawing, calculate how much and what material will be needed for the roof over the barbecue
We choose a place for the barbecue; it is advisable that it be more than 5 m from your residential building. We mark the area with posts and pull the rope. If you are planning a platform made of tiles or concrete, remove the top layer of soil. We dig holes in the corners for a columnar foundation, 700 mm deep. The distance between the posts for a barbecue shelter is no more than 2 m. If the soil is swampy or unstable, it is better to make a pile foundation.
Important: According to fire regulations, it is prohibited to place a barbecue, even with a canopy, closer than 8 m to a neighboring house.
We pour sandstone and crushed stone on the bottom, layers of 100-200 mm, and tamp it. We knit a reinforcing frame with a diameter of 300 mm from 3-4 corrugated rods. We pour up to 100 mm of concrete and insert the frame. We wrap it with roofing felt in 2 layers and glue the edge. We fill the improvised pillar with concrete; it is desirable that it be 100-200 mm above ground level.

How to concrete an anchor correctly
Good to know: To save money and time, the foundation for the barbecue canopy does not need to be poured. It is enough to coat the posts with bitumen twice, wrap them well with roofing felt and concrete the posts in the ground, but this solution for a barbecue is not durable, although it is very cheap.

One of the ways to attach vertical posts to the foundation
After 28 days, after the final formation of concrete, you can begin to erect a canopy over the barbecue. Attach vertical posts made of timber with a cross-section of 100*100 mm to metal, galvanized corners; check the geometry using a plumb line. We measure the height of the supports and cut them to the required level. To maintain the correct slope of the roof over the barbecue, the front pillars must be 300 mm higher than the rear ones for each m/p. So, if the depth of the building above the barbecue is 2 m, then the front pillars should be made 600 mm higher than the rear ones.
We tighten the structure over the barbecue along the perimeter of the upper heads of the pillars with a beam with a cross-section of 100 * 100 mm, at the corners; for strength, you can make cuts in half a beam. We check the verticals and horizontals of the structure.
Next, we make a rafter system from a 100*40 mm edged board and install it on a special mount - a slide. The distance between the rafters is 500-600 mm, but not more than 1 m. The edge of the rafter leg should extend 300 mm beyond the top trim so that water does not get inside the barbecue area.

Assembly diagram of a simple design over a barbecue
We treat all wooden parts around the barbecue with an antiseptic and fire-resistant impregnation, the product must meet the 1st degree of fire protection, usually Pink colour. After the impregnations have dried, the barbecue structure must be coated with paint, varnish, glaze or colored oil.
You can install a polycarbonate roof over the barbecue. We cut the sheet to size and attach it to special thermal washers; we cover the ends with a special aluminum profile so that precipitation and dust do not get inside the honeycomb.

Sheds on the site have long been part of our lives and the scope of their application is quite extensive. Carports, canopies over barbecues, canopies for sun protection and a dozen more items. All these buildings have a protective function for equipment, people, and garden tools. It’s easy and quick to build a canopy, but how to guarantee the strength and stability of the structure? The key to this type of building is properly installed support pillars.
Materials for the construction of supports
You can build a canopy from any materials, but supports for construction are made mainly from the following:
- Wooden beam. Very easy to install material. If you subject the wood to pre-treatment, which will protect the wood from rotting and damage by insects, then the canopy on wooden supports will last quite a long time. In addition, wooden supports can be decorated with hand-made carvings. When choosing wooden supports for a canopy, they are usually guided by the fact that the canopy should be in harmony with the general appearance of the outbuildings. Houses made of wooden beams and a canopy made of wood will form a harmonious duet. You can fasten wooden elements with ordinary self-tapping screws.
- Metal supports. The most versatile type. A metal frame can be used in combination with any roofing material and it will look quite appropriate. The metal undergoes preliminary anti-corrosion treatment, then painting, and then your canopy will acquire an aesthetic appearance. The metal must be fastened using a welding inverter.
- Brick pillars. They can be built using a metal profile, lined with facing bricks.
- Concrete supports. They also have a right to exist, but using them as supports for the construction of a light canopy is not a very rational solution.
- The supports can be made of decorative stone. It is very beautiful, and in combination with a fence or the base of a house, decorated with decorative stone, it looks simply gorgeous.
Number of supports and calculation of their strength
Each building must withstand a certain load; in order to build a canopy with your own hands, you need to calculate the number of supports. In total, the supports must withstand the weight of the frame, roofing material and the weight of the snow mass that can form on the canopy roof in winter.
In order for the canopy to withstand such loads, it is necessary to correctly calculate the number of supports. Also, their number will directly depend on the size of the canopy.
If we take a carport for one car as an example, the number of racks will be eight, which means it is necessary to build two rows of four racks each.
The minimum thickness of support pillars is from 80 mm, height from 2.5 to 3 meters. It is necessary to purchase profile pipes 3-3.5 m, taking into account the depth of the foundation.
Installation of metal and wooden supports
Installing the supports yourself will take you one day. In the prepared area, the places where the support posts will be installed are marked with pegs. Next, dig a hole 50 cm deep with a shovel or using a drill. The bottom of the hole is compacted and covered with fine crushed stone or sand.

If you have chosen metal pillars as racks, then metal bearings are welded to them for stability. The pillars are immersed in the pits and their position is checked by level, which must be strictly vertical. You can use supports to keep the posts upright. Next, the pillars need to be concreted.
Advice: so that all the pillars are immersed in the ground to the same depth, before starting work, you can make marks on the metal profile itself at a level of 50 cm. Metal supports are installed at this depth.
Wooden supports can be installed with your own hands in another way. You will need to lay a columnar foundation made of blocks or monolithic pillars, which subsequently needs to be concreted. Typically, the depth of laying such a foundation is about 50 cm. Fastening is done using metal plates or anchor bolts. The advantage of this method is the prevention of rotting of wooden poles. But, despite all precautions, wooden supports have to be replaced after 10-15 years.

If metal supports need to be treated with an anti-corrosion compound, then wood also needs pre-treatment. This will extend the life of wooden poles, and painting will add to their attractiveness.
Installation of brick supports
The brick pillars look solid, it seems that even such a simple structure as a canopy was created to last. But installing such supports with your own hands requires painstaking work.
The progress of work on installing brick pillars is as follows:
- In the cleared area, the boundaries of the planned structure are marked. In those places that are marked with pegs, holes are dug. Their depth should be 50 cm.
- Sand is placed at the bottom of the pit, moistened with water, compacted, reinforcement is laid, and wooden formwork is installed.
- After carrying out the necessary work, the pits can be concreted. After it has hardened, the formwork can be disassembled, waterproofing can be laid on top and you can start laying bricks with your own hands.
- The masonry is made of facing bricks, which are laid using a mortar of cement and sand.
Brickwork will be stronger if the joints are not stacked on top of each other. For a perfectly straight line of pillars, two ropes are pulled, indicating the boundaries of the pillars.
You can choose the roofing of the canopy from those materials that are more attractive to you or are suitable for the price. There is no shortage of materials to choose from, so it’s up to you to choose what your canopy will be like. You may want wooden poles to be decorated with metal tiles or corrugated sheets, metal racks - polycarbonate, slate, plexiglass or PVC plastic. There are many options, and there are plenty of ways to build a shed to suit your needs.
We looked at several ways to install canopy poles with your own hands. These are generally accepted rules that will help you build a strong and durable structure.