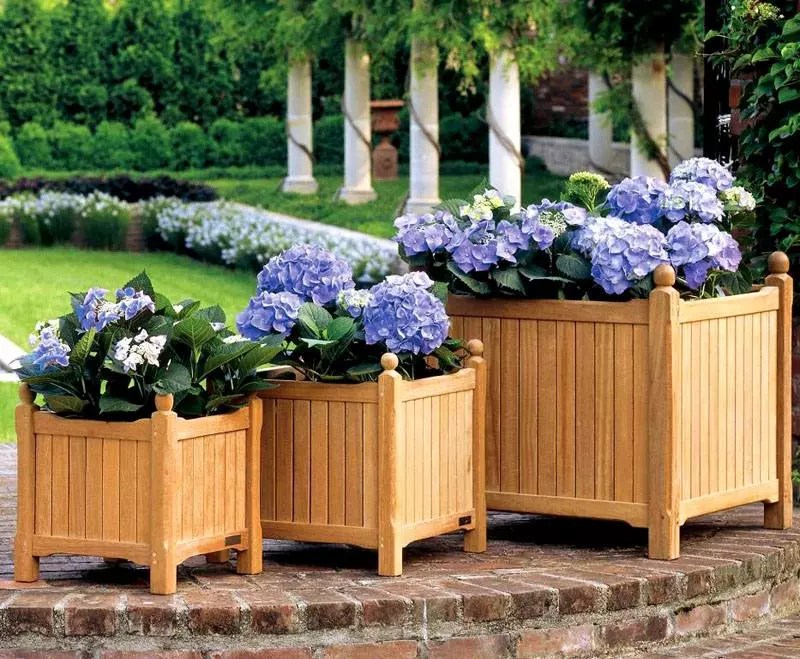
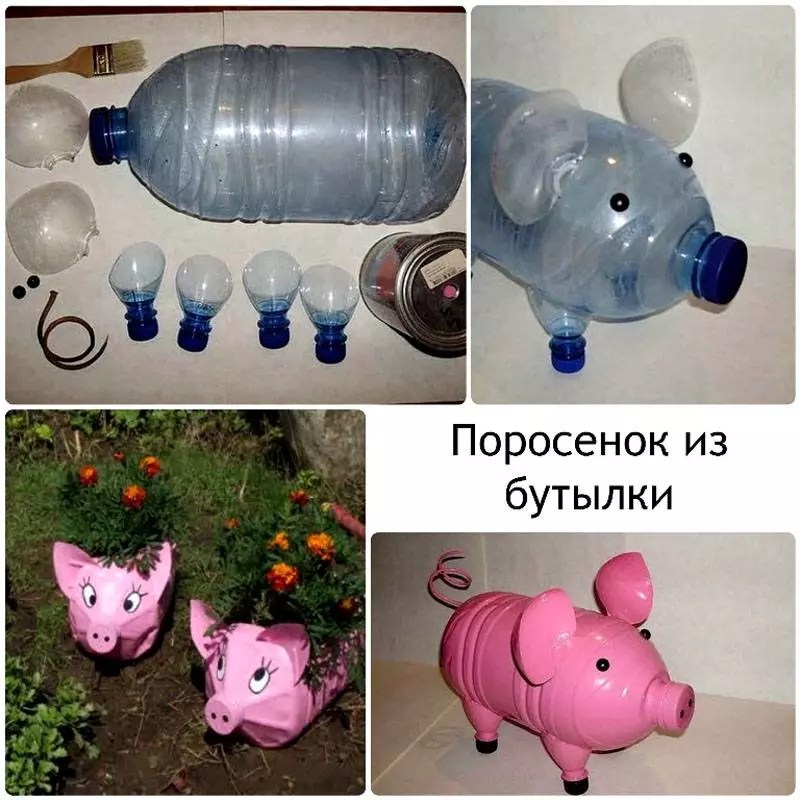
Decorating flower beds in the garden. How to choose and design flower beds in the courtyard of a private house: photos, useful tips and unique designs. Flowerbed accent with decorative wheelbarrow
Everyone knows that working with a good tool in any business makes the process faster and more efficient. This fully applies to radio electronics. Of course, if a person thoroughly understands a subject, for example, in repair, or in the production of something, he will be able to do the job with a minimum of tools. But if you plan to do something regularly, you think about how to make this process easier. Finally, it’s simply a pleasure to work with a quality tool.
Anyone who has ever used a soldering station, I think, can compare the process of soldering planar radio components, even the same transistors in an SOT-23 package, with a regular soldering iron, and a soldering iron from a soldering station with replaceable tips. Having realized the need to purchase a tool, even with some material costs, the radio amateur begins to gradually purchase everything he needs for his work.
In this article I will talk about some of the tools that I use when working on the manufacture of electronic devices, and when necessary, during repairs.
Side cutters
Of course, when working, you can’t do without side cutters made of good steel. Often when soldering you have to cut and shorten the leads of parts. Cut wires to the required length for jumpers and connecting individual blocks or boards with remote regulators located, for example, on the front panel of an amplifier or some other device.
Straight platypuses
Necessary for giving the desired shape to the terminals of radio components. Can be used as side cutters for cutting off single-core wires. It is inconvenient to bite multi-core wires with them. Also, when assembling the device in the housing, they are convenient to hold the nuts while tightening.
Hacksaw blade cutter
With its help, you can make a board without etching, separating the tracks that are not connected to each other by a groove cut in the PCB foil. This method is available, if, of course, the board is simple enough. Also, when repairing or making changes to the device circuit, sometimes it is necessary to cut the tracks on the printed circuit board. A cutter is also used for this purpose.
Household tweezers, small and large
When soldering, it is convenient to hold the lead of the part with tweezers. As everyone knows, the same resistors get very hot when soldered, and if you hold them with your hands, you can get burned. There are notches on the working part of the sponges of household tweezers, unlike Chinese tweezers, and they are much more convenient to use.
Hot glue gun
An indispensable thing when assembling a device in a case. For example, we need to display LED indications on the front panel. If switches and variable resistors are mounted on the case, and securing them is not difficult, with LEDs everything is more complicated.
It is necessary that during operation of the device, if we accidentally press on the LED, it does not recess into the housing, which will certainly happen even if we insert the LED into the hole “with tension”. And so we turn on the gun, wait 5 minutes, a drop of molten glue, which, when cooled, will firmly fix the LED, and we’re done. Is this gun available in retail stores? Chinese goods our city “Fix price” is only 40 rubles.
The only thing is that there is no power cord at all, and after 5-10 uses it had to be replaced, but this is not a problem for us? The glue sticks themselves cost only 6 rubles per piece, and they last a long time.
Set of needle files and files
When assembling a device in a case, we often have to expand the drilled holes and adjust them to the dimensions we need. To do this, I use different needle files and small files. The most popular are flat ones, used when you need to cut a hole for a switch or button, and round ones, when fitting holes, for example, for the shaft of a variable resistor, and for the same LEDs.
Needle nose pliers
Useful when soldering planar radio components to hold them in place during soldering. Otherwise, they are used similarly to tweezers, but can provide, if necessary, greater compressive force than tweezers. Can be used instead of platypuses, and perform most its functions.
Tapered Aluminum Bar
A useful thing when we need to clean the hole for the output of a radio component in a printed circuit board that is filled with solder. Due to the fact that the rod is made of aluminum, solder does not stick to it during soldering. Most people use toothpicks for such purposes, the advantage of this rod is that it is conical, it can be inserted into the hole, even from the back side of the board, and when heated, expand the hole and free it from solder. But be careful not to tear off the contacts from the printed circuit board.
Stationery knife
It is also very convenient for stripping wires of insulation. I’ll tell you from my own experience, more than once I’ve had to carry out minor repairs at a party or at a friend’s house, when there are no tools at all available, except for my grandfather’s 40 or even 60 watt soldering iron and a dull kitchen knife. Considering its cheap price, it is 100% worth it.
desoldering pump
Needed to remove solder from contacts when desoldering radio components from printed circuit boards. Allows you to dismantle multi-lead parts without the risk of tearing off the contact on the track. With its help, transformers, microcircuits in Dip cores and more, any connectors can be easily soldered.
They use it as follows: bring it to the soldering site, cock the spring, melt the solder with a soldering iron and press the release button on the desoldering pump. By creating a rarefied area of air near the contact, the solder is sucked into the desoldering pump. If it is not completely removed, cock the spring and repeat until the contact is completely clear of solder.
Periodically we disassemble and clean the rubber ring on the piston from grains of solder.
Shuttle
Used for winding transformers on a toroidal (ring) core. First, we calculate the total length of the winding wire and wind it onto the shuttle. Then we thread the shuttle into the core and begin winding. This method allows us to wind transformers much faster than if we threaded the wire into the core each time with our hands. The width of the shuttle should be less than the diameter of the core together with the wound winding.
Mini pliers
They are used in the same way as large pliers. That is, when we need to apply force to bend something, for example tin, or to give the desired shape, for example thick wires. In some cases, they can replace platypuses, and thanks to the cutting edge, they allow you to bite off wires.
Set of hollow needles for desoldering
I ordered this set of needles from Ali Express. The needles are made of stainless steel and the solder does not stick to them during soldering.
The diameter of the needles allows you to desolder pins, for example, from 0.8 mm, which is suitable for soldering microcircuits in a Dip package, to 2 mm, which will allow you to desolder even a transformer from the board if necessary.
The set also includes an awl, which is convenient for disconnecting the contacts of the microcircuit in the Dip package if they accidentally “stick together” during soldering. To do this, we warm up the stuck together contacts and pass an awl between them, thus separating them.
Small scissors
Sometimes they also turn out to be useful, for example, if you need to cut off electrical tape, or something wider that is not convenient to bite with side cutters. For example, if we insulate something with varnished cloth, or something similar, cut into strips.
Clock screwdriver set
Great for disassembling cameras, mp3 players, for repairs, and any other equipment with small screws. There are both Phillips and flathead screwdrivers of different sizes, for different screw heads.
Dismantling braid
Used to remove solder from the contacts of the part being soldered. It is used as follows: dip a piece of braid in alcohol-rosin flux, place it on top of the contact and heat it with a soldering iron tip so that all the solder from the contact is absorbed into the braid. After use, cut off a piece of braid. Also, the used piece can be used for tinning paths in the manner described below.
Flux brush
Used when tinning circuit boards with a soldering iron. Using a brush, liquid Alcohol-Rosin flux is applied to the tracks. Afterwards, we put a little solder on the braid, and while warming it up with a soldering iron, we move it along the paths along the braid. As a result, in this way it turns out to tin the tracks. Only a small amount of solder should be used on the braid.
Scalpels
I use two scalpels in my work, as in the photo above. In addition to the fact that they can cut through anything with force, I use them to clean up paper residues when transferring a design with LUT, from closely spaced paths, so that they do not merge during etching.
Awl and scribe from a needle file
In addition to the fact that they can mark the dimensions of the board, when sawing off a piece of PCB, I use an awl to lightly punch the holes before drilling in the board for the pins of the parts.
Chinese tweezers
The thing looks unreliable; they have no notches on the working part of the jaws. With the tweezers that are bent, it is convenient to hold the SMD parts while soldering on the board. Considering that they cost me only 1.2 dollars per pair, I ordered express from Ali, I think they are worth the money.
Of course, this is not a complete list of tools that radio amateurs use in their work, but only the main ones. But having such an arsenal, you can already collect anything you want. And if for occasional repairs at friends’ house you don’t need such a variety, then it’s better to have these things at home. I was with you AKV.
Technology Forum
Discuss the article Hand tools and accessories
Source: http://radioskot.ru/publ/konstruktiv/ruchnye_instrumenty_i_prisposoblenija/13-1-0-967
Microscope for soldering: what should you know about this useful device?
A microscope for soldering is a device that allows many people to carry out precision work, soldering and mounting electronic cards, microcircuits and much more. When you are engaged in repairs and restoration of all kinds of electronic devices, you are periodically faced with the need to work with small parts.
Thus, a USB microscope designed for soldering microcircuits, as well as other small parts. The modern variety of devices allows a person to choose an excellent microscope specifically for their needs.
Application area:
- Precision work;
- Inspection of surfaces, as well as quality control;
- Soldering and installation of electronic boards.
A USB microscope, designed for soldering small parts and microcircuits, is used in most cases to detect microcracks in motherboards. The mechanisms of most modern USB microscopes are equipped with manual focusing, continuously variable magnification, illumination and other useful functions. Also greatly simplifies the work is the USB cable, through which information is transferred to Personal Computer, and also the fact that it is equipped with backlight.
Using a special software With scale, the USB microscope can also be used to measure angles, distances, areas and radii of magnified objects down to the micrometer.
It is worth paying attention to the fact that most modern microscopes are equipped with illumination, the ability to transfer data to a computer, as well as many other useful features for soldering. They also have the ability to work as a webcam.
With the help of this device, it is quite possible to take digital photographs of microcircuits, subsequently enlarge them, shoot video and transmit all useful information to a computer for subsequent study of all the details of the work.
Technical data
A modern microscope is the latest device, equipped with illumination for soldering microcircuits and other small parts. In this regard, you need to know the technical data of the useful device.
Technical data:
- Camera: 2.0 MPixel (most microscopes are equipped with such a camera);
- Magnification: 20-200x;
- CMOS image sensor;
- Manual focusing within 10-500 millimeters;
- Photo format: BMP or JPEG;
- format: AVI with the possibility of 30 frames/second;
- Lighting: in most cases there are 8 LEDs with the ability to adjust brightness (using the backlight makes work much easier);
- Photo/video resolution: 2560 × 2048 (5M), 2000 × 1600, 1600 × 1280 (2M), 1280 × 1024, 1024 × 960, 1024 × 768, 800 × 600, 640 × 480, 352 × 288, 320 × 240 , 160×120;
- The power source allows you to use the USB port of a laptop computer, without the need for an additional battery;
- System requirements are mostly similar: Windows® in 2000 / XP/Windows Vista -/Windows 7.
What is included?
A modern soldering device includes the following components:
- Microscope;
- USB cable;
- Tripod;
- Guide to using the IC soldering tool;
- Software with all necessary drivers;
Features of the microscope
It is worth noting that today solders are not too eager to purchase these devices for soldering, believing that the usual magnifying glass, worn on the head, is much more convenient and simpler. Of course, a magnifying glass is much simpler, but in all other respects a magnifying glass is inferior to a microscope (it is not equipped with illumination or communication with a computer).
Like any modern device designed to make work simpler and less labor-intensive, a microscope has a number of significant advantages over such a device as a magnifying glass, thanks to which the shareholder can forget about how he previously used a magnifying glass attached to his head for these purposes.
Microscope Features:
- Compactness;
- Portability;
- Light weight;
- Adjustable zoom (magnification) of the lens;
- Possibility of illumination of the part being repaired;
- High sharpness;
- Equipped with high-quality lighting;
- Ease of replacing any elements of the device;
- Additional accessories for the safety of the device during transportation;
- Ease of use;
- Ability to work with photographs and videos.
DIY microscope
If you are tired of having a magnifying glass on your head, it will be interesting to know that you can make a homemade microscope for high-quality soldering. However, this will require a little skill and a minimum of old equipment. Of course, to make a microscope with your own hands you will need a children's equivalent - a toy microscope. You can use an old children's device, such as the Naturalist. In addition, you will have to use a webcam, which you are unlikely to use anymore.
Let's say right away that if you are not sure that you will finish the job, and a magnifying glass is a more familiar device for you, it is better not to start, because otherwise you risk wasting time, as well as using up materials that may still be useful. In this case, it will be better to purchase a new device for soldering microcircuits. But for those who are confident, the procedure is presented below.
Procedure:
- First, we will prepare materials for work, organize a workplace;
- After that, take the webcam, and then screw it into the eyepiece. You can use plastic glue to secure the camera;
- Next, we use a transistor in SOT-23 (actual size 3x3 millimeters) or a resistor 1206, the length of which is 3x2.6 millimeters;
- If desired, the microscope can be equipped with illumination.
With little effort and time, you can use a DIY USB microscope without straining your eyesight, and you won’t need a magnifying glass. Thus, a microscope successfully replaces a magnifying glass.
Source: http://GoodSvarka.ru/pajka/mikroskop/
What equipment is used for soldering
Soldering is considered one of the most effective and reliable methods of joining materials. Previously, it was used for metals and their alloys, but soldering is also suitable for joining pieces of glass, plastic, and ceramics.
There are many types of soldering, each of them uses special soldering equipment, tools and devices.
Soldering iron
The most commonly used tool for soldering work is a soldering iron. It’s hard to imagine workplace equipment without it. Soldering irons are used by amateurs and professionals. It all depends on the type of instrument.
Hammer
To connect large, massive parts, hammer soldering irons are used, so named because of their hammer-like shape. They are heated in ovens or braziers and, having great thermal inertia, remain heated for a long time.
Such equipment is used for soldering large parts.
Electric
Most traditional way soldering - using an electric soldering iron. It is designed very simply - a metal casing contains a heating element that heats the tip - a copper rod. The heating temperature of the soldering iron depends on the power of the heating element.
The process of soldering work consists in heating the parts to be connected using a contact method and holding them together with a special compound called solder. After cooling, a strong connection is obtained that can conduct electricity if the parts being connected are conductors.
A professional electric soldering iron can be equipped with a voltage regulator. In this case, it is possible to adjust the temperature of the tip, which is very important during assembly and installation electronic circuits.
Induction equipment is of particular interest. Induction soldering irons self-regulate heating and use electricity economically.
They produce ultrasonic soldering equipment. The ultrasonic soldering iron is equipped with a generator that produces a high-frequency signal.
In addition to a soldering iron operating from a household network, the soldering station equipment may include a soldering tool powered by 12 or 24 volts. It is suitable for debugging the operation of electronic circuits and for mounting parts and components that may fail due to overheating.
Electric soldering irons can also be cordless, powered by AA batteries.
Gas
Gas soldering irons are very convenient to use; they are heated by gas combustion. Gas equipment is represented by a huge number of models, differing in size, ignition system, and the presence of a temperature controller.
Using gas soldering equipment, you can melt high-temperature hard solders. They produce stations for gas soldering of copper pipes, which include cylinders, reducers, a platform and a burner.
The disadvantages of electric or gas soldering irons are the inability to simultaneously heat a large area at low power. In this case, other types of equipment are used.
Infrared stations and hair dryers
Models of hot-air soldering equipment (hair dryers) are used mainly for dismantling and volumetric mounting of microcircuits on electronic device boards. Very often, a hair dryer is included in the package of a soldering station, which also consists of an electric soldering iron and a control unit.
The soldering station allows you to install and control the parameters of the tools included in it, ensuring high quality seams.
Often, the equipment for a soldering station includes a table with the ability to heat parts or circuit boards from below.
This installation uses infrared heat sources - lamps, heating elements. Some designs of heating tables are equipped with brackets and stands, which allow you to secure the boards.
Infrared equipment has a similar effect to a soldering gun. It can also be used to provide heating of a large area without allowing contact with microcircuit elements.
Infrared soldering stations allow you to control soldering and ensure smooth cooling of the metal. This is expensive equipment, which consists of entire computing systems with sets of sensors, processors and a whole list of auxiliary tools.
Tools and accessories
When manual soldering, it is not enough to have only soldering equipment. Without the necessary additional devices, it is sometimes impossible to solder anything, not just efficiently, but at all. Such devices include:
- blowtorch;
- tweezers;
- set of files;
- wire cutters;
- magnifying glass and tripod;
- clamps;
- stands.
One of the necessary tools is tweezers. It serves to hold small parts in the position in which they need to be soldered.
In addition, often metal tweezers, clamping the leads, serve as a heat sink when soldering semiconductors or other temperature-sensitive objects.
Another tool often used when working is a needle file. Using a flat file, you can clean the soldering iron tip from carbon deposits before tinning it.
A round needle file with a sharp end can be used to carefully clean out the mounting holes on the board. Sometimes you have to strip the terminals of circuit components before mounting them in place.
To work with wires and cables you will need side cutters. With their help, wires are cut, the insulation is stripped, and sometimes excess solder is mechanically removed.
Screwdrivers may be needed to remove electronic components and circuit boards from electrical appliance housings. various types. And since some components can fail when exposed to even weak magnetic field, you will need a device for demagnetizing steel tools.
Very often you have to solder large parts. It is impossible to heat them with a soldering iron, even the most powerful one. In this case, the parts near the place of future soldering are heated with a blowtorch, and after that they are soldered with a soldering iron. Blowtorches can run on gasoline, kerosene, or gas. Some models run on alcohol.
To secure the parts together and on the table, it’s a good idea to have a set of metal clamps on hand. When using them, you can accurately orient the parts one relative to the other and maintain this position throughout the entire soldering and cooling time.
Useful soldering tool - supply. You can place a hot soldering iron on it without fear of fire. Such simple equipment is often made by hand.
To connect small parts, which very often happens when repairing jewelry, you will need a magnifying glass with large diameter glass mounted on a tripod.
For constant frequent soldering work, it’s a good idea to install dust removal equipment in the room.
Industrial soldering
Heavy industry enterprises use completely different types of soldering equipment. The joining of large parts and structures in industrial conditions occurs in furnaces.
In this case, the highest quality is achieved, since when using furnace equipment, you can constantly monitor the condition of the metal and maintain the required temperature and pressure. Metal is protected from oxidation by introducing fluxes into the furnace chamber.
Soldering ovens vary in heating principle. They are induction, gas, electric. Workpieces are fed and removed in various ways depending on the design of the furnace equipment. This can be manual feed, belt conveyor, mine and elevator feed.
In manually fed furnaces, heating and cooling of parts and the soldering chamber occurs within one soldering cycle. After cooling, new parts are loaded. In this furnace it is easiest to control the process and its duration.
In conveyor soldering equipment, heating occurs constantly, and parts cool down after removal from the chamber. Such furnaces are used to create a large number of identical, serial products.
Shaft and elevator furnaces are used for the manufacture of large-sized volumetric structures, which are assembled directly in the furnace and then carry out the soldering process under fully controlled parameters.
Vacuum soldering equipment is used to join products made from highly oxidizing materials. Brazed seams produced in such furnaces are clean and uniform, which ensures their strength.
Due to the lower temperature and completely different impact on the metal than during welding, solder joints are more resistant to corrosion and mechanical stress.
Despite the long-standing invention of soldering and the creation of new methods for joining metals and alloys, soldering work using special equipment remains in demand today.
Source: https://svaring.com/soldering/instrumenty/oborudovanie-dlja-pajki
Lesson 1 - Ham Radio Tool
— Tools — Materials
— Organization of the workplace
1. Soldering iron
The soldering iron, of course, is the main and most necessary tool radio amateur.
In essence, this is a very simple tool - an ordinary electric heater: the soldering iron is plugged into a socket, and after a while its tip heats up to the required temperature.
Let's see what kind of soldering irons there are in general. Let's start the review with unsuitable models for our purposes.
A powerful soldering iron for soldering pipes, metals, basins and pans - we don’t need one like this for delicate radio engineering work!
The gas soldering iron operates from a built-in gas cartridge and is therefore very convenient for working in the field. But we will be doing amateur radio at home, so we don’t need a gas soldering iron.
The optimal tool for beginner radio amateurs is an electric soldering iron with a power of 25-40 W. The soldering iron handle can be wooden or plastic – it doesn’t matter.
Perhaps the main parameter of a soldering iron for beginning radio amateurs is its power. A soldering iron that is too powerful (more than 60 W) will heat up excessively and may cause damage. printed circuit board and radio components. A low-power soldering iron (with a power of less than 25W) is designed for soldering very small radio components and is more suitable for experienced radio amateurs. For soldering standard parts from Master Kit kits, the power of such a soldering iron may not be enough.
The optimal power of a soldering iron suitable for beginner radio amateurs is 25...40W.
The soldering iron can be purchased in radio engineering and hardware stores in your city, at radio markets, in specialized stores, in large chain hypermarkets (Leroy Merlin, OBI, AUCHAN, etc.). If you live far from large cities, then you can order a soldering iron, soldering station and any other tool in online stores (“Elektronshchik”, “Dessie”, “Chip and Dip”, etc.). These stores deliver goods by mail to anywhere in Russia.
A regular soldering iron can cost 200-300 rubles.
The soldering iron is simple and inexpensive, and it is very natural to start taking your first steps in amateur radio with its help. But there are also certain inconveniences, the main one of which is the unstable temperature of the tip.
The melting point of solder is about 270C, and the optimal temperature of the soldering iron tip is about 290...320C.
But the tip of a regular soldering iron can heat up to a temperature above 400C a few minutes after plugging it into the socket. Soldering at this temperature turns out to be of poor quality, since its components “burn out” from the solder.
In addition, such heat may damage radio components and printed circuit boards.
There are many ways to solve the problem of tip overheating. The simplest of them is to periodically turn the soldering iron on and off in the network. Amateur radio literature presents many diagrams of homemade power regulators for a soldering iron, and you can use one of these recommendations.
But, if amateur radio really captivates you and becomes your hobby, it would be wiser to “fork out” for a so-called soldering station. The simplest soldering station is a block with a tip temperature control knob. The supplied soldering iron and network cable are connected to the unit.
It is enough to set the required temperature with the handle, and the soldering station will maintain the temperature of the soldering iron tip unchanged.
More expensive models of soldering stations may have a digital indicator that displays the set and current temperature of the tip. The soldering station kit may include a soldering iron holder and a set of replacement tips.
The simplest soldering station can cost from 1000 rubles, and for 3000 rubles you can buy a very decent semi-professional model with a temperature indicator and a set of replacement tips.
Using even the simplest soldering station is much more convenient to work with than using a regular soldering iron. But pleasure from work is the most important thing, right?
2. Radio engineering side cutters
The second most important tool after a soldering iron is radio engineering side cutters.
Let's start with a review of models unsuitable for amateur radio.
These are wire cutters for electricians. They can cut through thick wires, for example. Or even nails and piano strings (some professional instruments allow such “bullying”). But there is no such thing as a universal tool. And wire cutters that can cut through a thick nail are not suitable for delicate radio installation work. We will need radio engineering side cutters.
They look something like this:
You can buy such side cutters in the same place where you buy a soldering iron (see above).
The price can range from 50 rubles to several thousand rubles. Of course, side cutters in the upper price category are more appropriate for daily work in production, but I would not recommend purchasing cheap side cutters for 100 rubles, since they will most likely be “disposable” and inconvenient to use. Decent side cutters for amateur radio purposes can cost in the range of 300-500 rubles.
The simplest test for the suitability of side cutters: try cutting the most ordinary paper with them. If they can easily handle paper, most likely there will be no problems with cutting the leads of radio components. By the way, even brand new side cutters “for 100 rubles” may not cope with this “paper test”, so draw your own conclusions.
3. Tweezers
It can be used to bend leads, hold a radio component, etc. When cutting leads, you can hold them with tweezers - then the cut leads will not scatter throughout the room.
But, since all this can be done with your fingers, then, perhaps, tweezers are not the most necessary tool for a beginning radio amateur.
4. "Third hand"
When soldering, we hold a soldering iron in one hand and a solder rod in the other hand. But what should you use to hold the printed circuit board? The third hand is missing...
There are devices that are called “third hand” in amateur radio jargon. Design in basic version It’s outrageously simple: a base and metal clothespins that secure the printed circuit board. Often the “third hand” is supplemented with a magnifying glass and a soldering iron holder. Of course, you can make some kind of board clamp yourself. But, since commercially available models are inexpensive - about 200 rubles - it is easier to purchase a ready-made holder.
5. Solder
Solder is an absolutely necessary material for soldering. This is a fusible wire, which melts under the action of a hot soldering iron tip, and after a few seconds hardens, mechanically fixing the output of the radio component and the printed conductor. Since the solder is electrically conductive, electrical contact between the parts is also ensured.
Solder consists of lead (about 60%) and tin (40%). In addition, the solder may contain various additives that improve the quality of soldering: silver, various additives, and the like.
Depending on the composition of the solder (the ratio of lead and tin content), it melts at a temperature of about 270C. Therefore, the temperature of the soldering iron tip should be slightly higher than the melting temperature of the solder. Some types of solder contain flux, which serves to remove oxidation and improve solder flow.
It’s much more pleasant and faster to work with this type of solder; you don’t need to purchase flux and rosin separately, and this is the kind of solder I recommend buying.
We include small rods of solder in some beginner kits, but it should be considered more like free samples, and you need to buy solder separately to work. Solder is supplied in the form of spools of different weights.
The well-known domestic solder “POS61 with a rosin channel” or its imported analogs will be suitable.
Other important characteristic solder - rod diameter. It is most convenient for beginning radio amateurs to work with a rod diameter of 1...1.5 mm.
A spool of good solder with a rosin channel can cost about 300-500 rubles, and this amount will be enough for occasional use for at least a year. You can buy solder in the same place where you buy a soldering iron (see above).
Previously, rosin and flux (a solution of rosin in alcohol + additives) were used to remove oxides from printed circuit boards and radio components, as well as to improve the spreadability of solder, and it was recommended to purchase them separately.
But now, provided that you use modern solder with a rosin channel, as well as new tinned, that is, coated with a layer of tin radio components and printed circuit boards (Master Kit kits include only such high-quality components), you will not need to purchase anything additional - all the necessary additives are already contained in solder.
6. Alcohol
After soldering, traces of the flux contained in the solder remain on the board.
Strictly speaking, modern high-quality solders allow a no-clean process, that is, the board does not need to be cleaned after assembly, and nameless Chinese electronics manufacturers do just that. But a cleaned board looks much neater, and all reputable electronic equipment manufacturers clean their boards.
In amateur conditions, it is best to use alcohol, an old toothbrush and napkins. Wet the brush in alcohol, thoroughly rub the printed circuit board with it, and at the final stage of cleaning use ordinary napkins.
It is recommended to use non-alcohol-containing liquids (cologne, vodka), but technical alcohol as the most effective cleaner.
A liter bottle of isopropyl alcohol can cost 150-200 rubles, and it will be enough to clean circuit boards and other surfaces for several years.
Workplace
You will need a simple table and chair.
To avoid damaging the working surface of the table, it is better to cover it with a sheet of cardboard, plywood or glass. It’s more pleasant and safer to work on a clean, uncluttered table, so it’s better not to make a “mess” on it (in which the likelihood of losing some small radio component increases sharply).
Take care of good lighting table. The general overhead light in the room is not enough for delicate work, so be sure to include a desk lamp.
Ensure your work area is well ventilated. Solder vapors are unlikely to cause noticeable harm to health during occasional amateur creativity (here we are not talking about the professional daily long hours of work of radio assemblers in production). The use of special hoods for amateur conditions is unnecessary, but a regular fan that drives smoke away from the face is a good solution! It is also better to ventilate the room and wash your hands after soldering.
To consolidate the acquired knowledge in practice, you can use the beginner radio amateur kit NR01.
Download lesson in PDF format
A multi-level flower bed is a decoration for any garden plot. The design can consist of several boxes of arbitrary sizes, which contain soil for planting flower arrangements, strawberries and colorful plants.
Rules for creating a multi-level flower bed
It is a mistake to think that a multi-level building will take up too much usable space on the site. It all depends on the owner, who can allocate both a compact area and a place of considerable size. Since a large flower bed can look bulky, it is recommended to build several small frames.
Even the same flower bed can be transformed every year if you change varieties of flowers that differ in color, size and shape. Designers advise not to use flowers of different sizes on the same tier. Flowering plants should be arranged according to the following scheme:
- on the lower tier there are flowers with large inflorescences;
- on the upper tiers with smaller flowers;
- all tiers with flowers of the same size.
Since the structure of the flowerbed has the peculiarity of water flow from the upper tiers to the lower, when planting plants it is important to take into account their relationship to moisture. Drought-resistant species should be placed on top, and moisture-loving species below.

Stages of making a multi-tiered strawberry flowerbed with your own hands
Among the difficulties that gardeners encounter, saving space is often encountered. It is difficult to grow everything you would like on your plot. To avoid having to sacrifice some crops, vertical cultivation is practiced.
A pyramid bed can be created from boards, bricks, stones or other suitable material. The advantage of a raised structure is that the upper levels do not block the lower levels from sunlight. Beds for growing strawberries, arranged in the form of a pyramid, are called steps.
The first step when building multi-tiered beds is to design on paper, which will significantly reduce work time. As a result of obtaining an optimal system, it becomes possible to obtain a rich harvest.

An approximate list of steps in the process of creating a multi-tiered flower bed yourself:
- creating a design sketch;
- preparatory work;
- installation of a vertical device.
The visual image requires detailed elaboration. When choosing a material and design design, it is important to remember safety during its operation. All protruding and sharp parts must be removed to avoid injury.
- pencil;
- screwdriver;
- roulette;
- screwdriver;
- hacksaw.
Installation of the device consists of connecting all parts of the base material to each other. The result should be a stable and reliable structure. To increase the service life of the finished pyramid, it should be treated with some means, for example, varnish or paint. This solution will not only protect against negative impact environment, but will also give an aesthetic appearance.
How to make a multi-tiered flowerbed with your own hands (video)
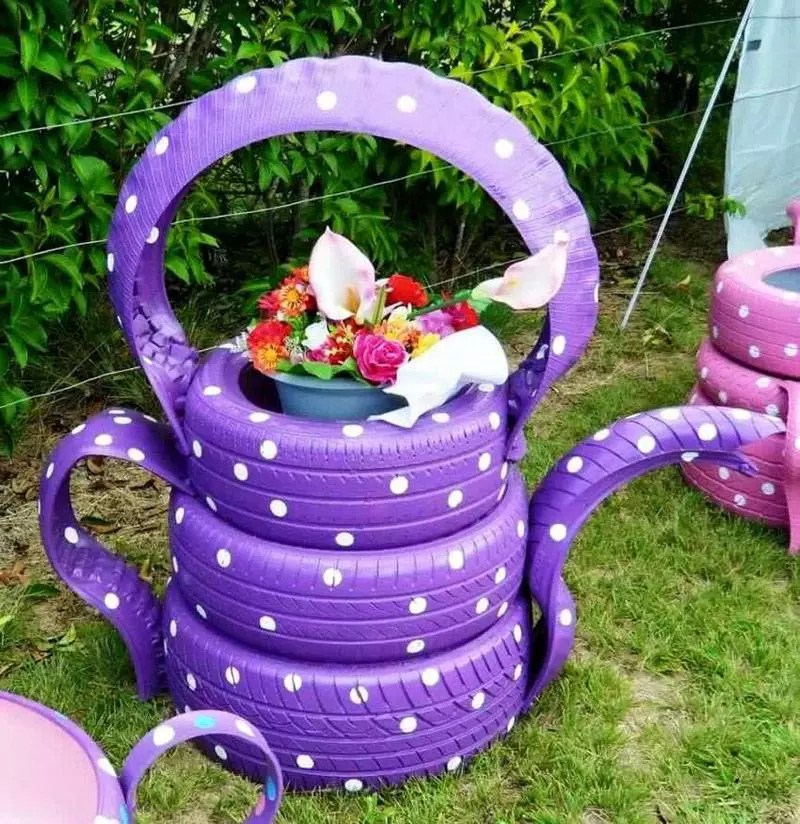
Making a multi-tiered flower garden from tires
In addition to their main function, tires can also be useful in a summer cottage. They are used to make decorations, garden furniture, children's attractions and flower beds.
To complete such a multi-level design does not require much effort. You need to find several tires of different sizes, paint them in bright colors and lay them on top of each other, connecting them with self-tapping screws. Then you need to fill the voids with soil. To prevent it from spilling out, it is advisable to put a piece of geotextile at the bottom that allows water to pass through.
For lovers of geometrically correct details, a structure in the shape of a daisy is offered. The first step is to fasten the parts from the tires of the lower tier, fill their middle and inner space with soil. Construction waste or broken bricks are placed at the bottom as drainage. Place the second row on top of the compacted surface. At the same time, maintaining a distance from the edge of at least half the diameter of the tire. Fasten the parts of the second tier, fill the middle and make a core.
A high flower bed gives an original look to the garden plot. Fastening the cut ones can be done in several ways:
- Using stumps to which flowerpots made from tires are attached using nails or self-tapping screws.
- Use of fittings. It is necessary to string rubber parts onto iron rods, placing them on the desired tier using special clamps.

You don't have to be a master at cutting to make a flowerpot. It is important to know the features of the step-by-step process:
- Choose soft rubber, clean and dry.
- Think over the future shape and draw the outline of the petals, notches or circles using chalk.
- Cut along the line, turn the tire over and, stepping on it, pull up so that the rubber turns out. Since this process is very labor-intensive, male strength will be required.
- Turn the tire upside down and bury it to create a glass shape.
- The decoration is left to the owner's discretion. You can paint the parts one color or different. Or you can decorate it the way your imagination dictates. You can attach pebbles or other decorative elements to the still wet paint, making a pattern out of them.
Men with great strength cut tires manually using a knife. To facilitate contact with rubber, it is recommended to lubricate the knife blade with grease. The easiest way to cut tires is with a grinder or jigsaw. The only drawback of using an angle grinder is the strong smell, so only the first cut is made with its help. Then a steel jigsaw blade is inserted.
DIY vertical flower bed from pots (video)
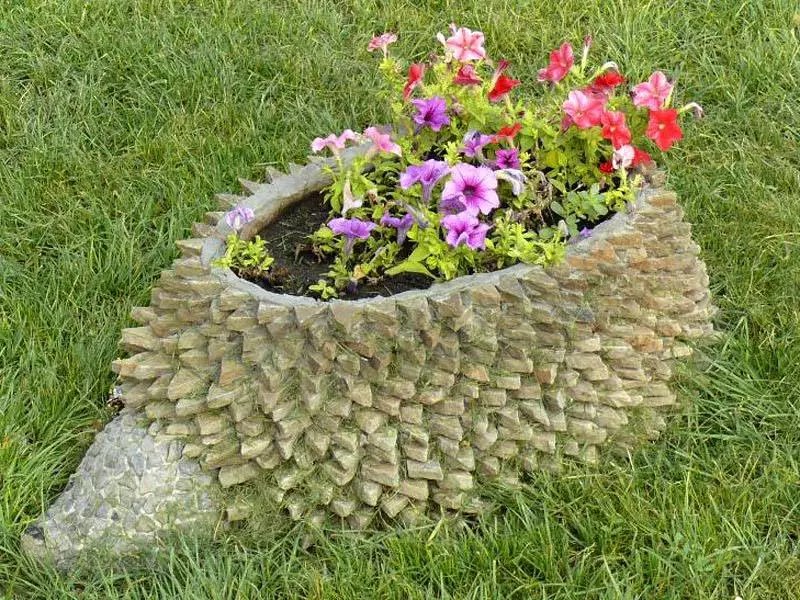
How to make a three-tier flower bed from natural stone
Stone, regardless of size, can be used to build a flower bed. The combination of green spaces with natural materials is appropriate for any landscape.
The flower garden can be made in the form of a staircase, attaching it to the wall of the building, or you can make a separate structure. The advantage of such a flower bed is its durability and lack of serious maintenance. Sand or crushed stone should be poured into the bottom of each compartment to serve as drainage. Place black soil on top and compact it.
The choice of stone is not limited by any limits. Limestone, sandstone, brick (regular or decorative) and expensive granite are suitable for building a flower bed. Color building material depends on what the owner wants to focus on: flowers or borders.
When choosing stones, it is important to take into account that some types (limestone, sandstone) absorb moisture, so they should first be treated with special impregnations that repel water. Large stones are recommended for raised structures. To prevent contamination of the stone, its absorbent capacity should be reduced by treating it with a hydrophobic protective agent specifically designed for garden structures. In addition, impregnation will not only strengthen the structure, but also make the color more saturated.
Many summer residents prefer to arrange flower beds using gabions made of building mesh filled with stone. The advantage of such a flower bed is that it can be given any shape, since the mesh is easily deformed.
After determining the design and choosing a stone, you should prepare the necessary tools:
- roulette;
- spatulas;
- shoulder blade;
- mallet.

To fix the stones you will need cement. If necessary, the masonry can be coated with water-repellent impregnation or varnish. The search for a place for a flower bed must be treated with special attention, taking into account the light-loving nature of the plants that are planned to be grown in it.
After choosing the location for the future structure, you need to dig a trench along its perimeter with a depth of 25-30 cm and the same width. For a multi-tiered building you will need support reinforcement. The trench is filled with concrete and after two days the stones are laid, which are first recommended to be sorted out, separating the smoother ones to form the upper tier.
Laying should begin with large stones. The resulting voids need to be filled with a mixture of cement and earth, but to improve drainage, it is better to leave a few gaps at the base of the flowerbed. To ensure higher strength, a slight slope should be made into the structure. To complete the design of the flower garden, you can pour decorative stone chips, which, in addition to an attractive appearance, will mulch the soil.

Ready-made solutions: prefabricated tiered flower bed for strawberries and flowers
Making multi-tiered flower beds from boards, stones or other materials is a labor-intensive task. Many gardeners prefer to purchase ready-made tiers quickly and without special effort build a flower garden. The shape of the flower beds are:
- geometrically correct;
- spiral;
- an accent in the center of which a country object is placed: a watering can, a bucket.
The most popular and beautiful flower beds made of metal include honeycombs, which look great in the form of an alpine slide. You can grow flowering plants and strawberries in them. Interesting compositions are made from several hundred.
Tiered flower beds can be made from architectural concrete, which are assembled from prefabricated elements on site. By experimenting with shades of tiers and colors, you can create a spectacular appearance of the finished structure.
The advantage of prefabricated flower beds is that, if necessary, they can be removed for the winter. They come in the form of baskets or vases. Depending on the available area, the number of tiers is determined. Niches located in a checkerboard pattern look very unusual. Some gardeners prefer not to cover the tiers with soil, but to place potted flowers in them.
The choice of a flower garden largely depends on the plants that are planned to be planted in it. Planted with flowering plants different varieties and shades it will look completely different than in the case of the same type of colors. The material from which the future flowerbed will be made depends on the characteristics of the area and its availability.
How to make a multi-tiered flower bed out of brick (video)
By following all the rules for designing a flowerbed, it will delight you with its appearance for many years. For the background it is better to choose a green shade (lawn, hedge). A combination of contrasting shades, for example, red and blue or yellow and purple, looks beautiful. In this case, the flowers should bloom at the same time.
Important to remember that perennials grow over time, so when planting it is advisable to leave free space between flowers. To prevent the multi-level flower bed from looking half-empty in the first year, it is recommended to plant the free areas with annual flowers.
Correct means creating an attractive appearance while providing comfortable conditions. For an attentive owner it is essential. To solve the above problems at a reasonable cost, you need to create flower beds and flower beds with your own hands from scrap materials. Photos and other materials from this article will make it easier to make the right decisions. They will help you accurately implement the most daring ideas, eliminate mistakes and not exceed the established budget.
Read in the article
A variety of ideas for a do-it-yourself flowerbed: photos and examples of using different materials
This section provides examples of ready-made solutions. With the help of these DIY garden flower bed ideas, it will be easier to formulate your own requirements. Based on this data, it is easier to take into account the terrain land plot, amount of financing, personal experience construction, other individual features.

This natural material has unique aesthetic characteristics that can be created without additional processing. If you use durable granite and high-quality building mixture, the structure will be strong and reliable. It will not have to be restored over decades of continuous use. Such a structure will withstand a lot of weight without damage, so you won’t have to be overly careful when renovating the flowerbed or caring for it.
In the previous version, the unusual nature of the raw materials creates certain inconveniences. If you use standard concrete ones, it will not be difficult to create a flower garden with certain dimensions. In this case, you can also count on solid durability.

The previous materials are difficult to process. Stone and brick components weigh a lot, so you will have to spend a lot of physical effort. It takes a certain time for the solution to harden. This may cause some difficulties.
If you use, many practical issues can be solved easier:
- It is a lightweight material that is not difficult to move.
- It lends itself well to processing. Cutting boards, drilling holes and connecting individual parts is not difficult using .
- Such products are not difficult to modify or repair.
- Structures similar to those in the photo can be moved after the end of the summer season to the utility room to ensure good preservation.
These products, unlike their wooden counterparts, do not need to be specially protected from rain and other atmospheric influences. If necessary, the paint coating can be renewed quickly. Impact marks do not remain on such elements. Tires with permanent defects and after several retreads are worth nothing. You just need to take into account the costs of transporting them from the nearest tire station.

Such material retains its integrity and appearance for many decades without changes. To make the design lighter, you can use plastic bottles.


The last three examples with photos of simple flower beds and DIY flower beds illustrate the potential appeal of various things. They are suitable for creating original compositions. This approach really opens up unlimited possibilities for the successful implementation of your own ideas inexpensively.
Related article:
An ideal solution for fencing an area, which will not only perform protective functions, but also delight the eye with its beauty and shape. How to choose plants, what are the nuances in planting and caring for them - read in our article.
How to make flower beds and flower beds with your own hands from scrap materials: photos and algorithm of actions
Experienced professionals begin work on such projects with careful planning.

It is necessary to ensure good review from different angles. To do this, you need to carefully study the specific one. You should check the view from the side of the house, pedestrian. Ideal aesthetic characteristics must be ensured from every “visible” direction.
A suitable microclimate is required for good growth. Delicate flowers can be destroyed by powerful gusts of wind and direct sunlight. It should be ensured that it is sufficiently intense. To simplify maintenance, it is necessary to lay a crane to the corresponding part of the site, or install an automatic irrigation system.
The next step is to explore various options. This article will help you determine the correct algorithm of action. Afterwards, you’ll have to look it up for yourself. thematic materials. Use the Internet and obtained information to refine search parameters suitable photos and video.
In addition to the installation location and the formulation of the main idea, the project must contain:
- list ;
- their distribution plan;
- scroll necessary materials and components.
For your information! To create high-quality flower beds and flower beds with your own hands from scrap materials, a photo and the formulation of general requirements will not be enough. It is necessary to study in advance the technologies that are needed to create the appropriate utility networks and building structures.
How to choose the right type of flower beds for flowers with your own hands: photos and professional recommendations

Similar drawings can be found on specialized websites and in magazines for. With their help, you can explore spectacular compositions from different plants. In such materials, you need to borrow the best ideas to reproduce them on your own. Below are some professional terms and techniques that relate to this field of activity:
- The simplest option is the Mono flowerbed. Here, plants of the same type are planted in one working cycle. The advantages include easy care. The disadvantage is the limited flowering period.
- To eliminate this “minus”, different plants are planted. They are selected so that they bloom consistently throughout the summer season.
- In the “traditional” version, a chaotic arrangement of plants is used. Harmonious and contrasting color schemes and bright accents are also used.

This modification is distinguished by clear boundaries. Plants of the same level are selected so that there are no differences in height. Simultaneous flowering is necessary to create the patterns established by the project.

The specific name in this case accurately determines the purpose. Such solutions are used to beautifully frame pedestrian and vehicular driveways.

This flower bed is also installed near the aisles. But they are made up of plants with different characteristics.


Using this technique, plants are planted on a slope to give the composition volume and better visibility. The photograph shows that this hill was created artificially. You can use gravel for backfilling. Next, they create a layer of fertile soil. A supporting wall made of artificial stone prevents landslides. Large boulders and pebbles are used for decoration.

This solution is suitable for decorating corresponding architectural structures. It looks unusual and bright. But you should understand that watering plants at high altitudes will be difficult. To avoid excessive loads on users, capillary irrigation tubes can be installed at appropriate points. An appropriate system will additionally help to use water economically.


Similar solutions are used in combination with. They look appropriate in large areas.

To create stable volumetric structures, built-in frames are used. Suitable plants for slopes, corners, and other difficult surface areas are carefully selected.
Instructions for constructing flower beds at the dacha with your own hands for beginners
Once studied theoretical basis, you can move on to practice. The characteristics of certain plants and selected materials should be taken into account. But the following tips will almost always come in handy:
- The option you like must be transferred to the drawing. It may be a freehand drawing created without strict adherence to architectural standards. It indicates the exact location, size and shape.
- The turf is removed from the selected area. To make a backfill of gravel and other granular materials.
- At the same stage, supporting elements and parts of the future structure are installed. If necessary, parts are protected with a thick film from mechanical damage.
- If the appropriate plan items are available, an irrigation system is installed and. Install a power supply network for decorative.
- Next, fill the soil and moisten it. To accelerate the growth of flowers and protect against pests, apply appropriate fertilizers and specialized products.
- Soil parameters are assessed by structure (loams, peat bogs, sand), acidity. Adjustments and selection of chemical components are made based on a comprehensive analysis.
- The soil layer for annual plants is made from 20 to 35 cm thick. For perennial plants - more than 45 cm. Planting begins 2-2.5 weeks after filling the soil.
The following sections contain photos of do-it-yourself flower beds and flower beds, and discuss in detail the application features various materials.
Making flower beds with your own hands from brick, photos, construction features

This design is suitable for expressive design of relief areas and rises. Notice how much simpler a regular lawn looks on the other side of the pedestrian street in the photo. Support walls are subject to significant loads, so they are made of stone, brick, and concrete blocks.
All of the materials listed weigh a lot. Therefore, the same technologies are used as in the construction of other standard architectural objects of small forms. Below are instructions on how to make a flowerbed out of brick with your own hands:
- A heavy structure will not be able to maintain stability for a long time on soft ground, so a reliable one is installed.
- According to the appropriate plan, they dig a trench, compact the bottom, and install it.
- For large structures, additional reinforcement in the form will be required.
- and wait for it to harden (about 2 weeks per summer season). Remove the formwork, protect the surfaces from moisture with a bitumen mixture and roofing felt.
- Next, a wall is erected from the selected materials. The photo shows that smooth stones can be laid without the use of cement-sand mortar.


However, in any case, it is necessary to check the soil composition and groundwater level. Only after this they do correct conclusion about the need to create a special solid foundation.

Working with this material is easier compared to previous options. It can be cut into plates of the required dimensions without much difficulty. It is installed vertically into the ground without a foundation or wet technological processes. Slate is resistant to external influences and is inexpensive.
But when using it, you should remember the following disadvantages:
- The material does not have high strength. It will not make high, reliable walls. When processing it is difficult to make smooth edges. Care must be taken during installation and during operation
- The joints of individual elements gradually diverge. As the soil subsides, the installed sheets deviate from the vertical. The appearance of this material does not meet modern aesthetic requirements.
- It will not be possible to make a high-quality wall of complex shape from it.
Important! Do-it-yourself flower beds made of brick, slate, and stones are among the most durable structures. The effort expended is compensated by a solid appearance. These structures are not difficult to repair.
How to extend the life of flowerbeds made from boards with your own hands, photos and important notes

How to make a flowerbed from to ensure its integrity and preservation of aesthetic characteristics for a long time? One of the answers is shown in this photo.
This one is assembled from boards with cut grooves. They are connected firmly without the use of nails, screws, or other fasteners. After the end of the season, the soil is removed and disassembled. It is not difficult to check individual boards carefully. They are impregnated with special compounds that prevent rotting and protect from ultraviolet rays. If necessary, replace failed elements.


Shown here is a wall with a pattern of a cut of natural wood. But it is really more durable compared to its natural counterpart. It uses a modern composite material made from polymers, sawdust, dyes and other components. Its only significant drawback is its relatively high cost.
Wide possibilities when choosing flower beds from tires with your own hands, photos and examples of completed projects


To create such a composition, no special fastening devices are needed. Reliable fixation when empty and when filled with soil is ensured by the high coefficient of friction of the surfaces.
For your information! The chemical neutrality of the material should be especially emphasized. Flower beds made from car tires are not destroyed by moisture. They are not damaged by microorganisms, insects and animals. Long-term preservation is ensured without the use of special impregnations and other protective agents.

When reproducing this technology, the following recommendations will be useful:
- For cutting, it is convenient to use it with an electric drive (1).
- With the help of such a tool, complex cutting lines are created accurately. A light force is enough to separate the excess parts (2, 3).
- Next, the tire is turned over to the other side (4) and turned inside out. This process (5-8) is carried out in stages. It is convenient to use rubber shoes. It provides reliable adhesion to the area where forces are applied and does not damage the surface.
- The upper part of the “flower” (9) is connected to the lower blank (3). For this unit, you can use an old steel or cast disk (10).
- The created flowerpot is installed on a flat area (11, 12) without additional supports.
Important! To reduce physical exercise- choose winter tire models. They are made of soft rubber that is easy to process. It is easier to give such products the required shape without extra effort.
The above photos of flower beds made from tires demonstrate a small part of the potential possibilities. This material is not difficult for even beginners to work with. Particularly attractive are the minimal financial costs.
A simple flowerbed made from plastic bottles with your own hands, photo and technology
In this case, as in the previous example, the availability of raw materials is attractive. It can be accumulated gradually, or purchased inexpensively from wholesalers.

They are dug into the ground without a layer of waterproofing or other protective equipment. They retain their original color for many years in direct sunlight.


 Large containers make original flowerpots. The car is well suited for creating a three-dimensional composition; vertical flower beds and flower beds will not be difficult to create with your own hands:
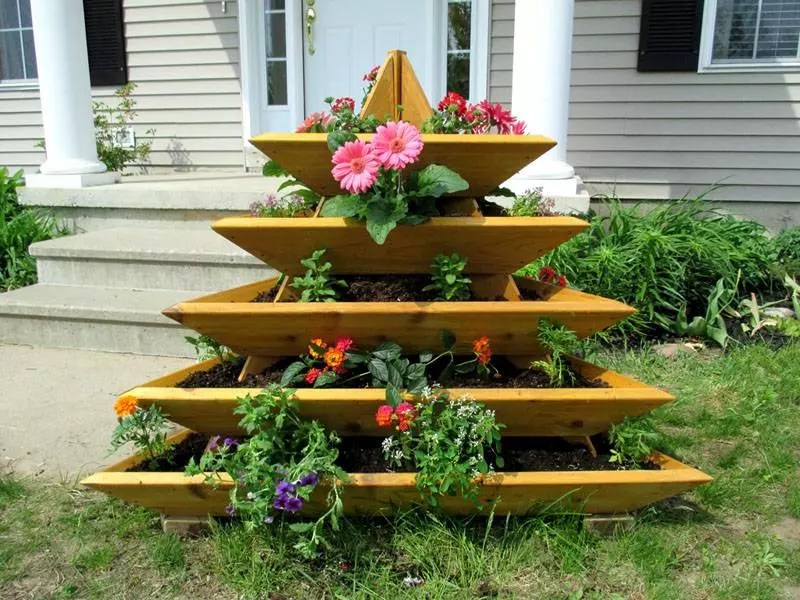


Article
A flowerbed is a universal decoration for any garden or summer cottage. The shapes, volumes, and filling of the flower garden can vary greatly. There are hundreds of options for creating flower beds with your own hands. Among them there are simple and complex, flat and embossed, ground and suspended, large and small. Making a flowerbed with your own hands is quite simple, the main thing is to carry out preliminary planning in order to understand exactly what result you want to achieve.
In addition to the aesthetic function, flower beds and flower beds perform another important job, combining the buildings on the site with the surrounding territory into a single ensemble. Form flower beds so that the flower beds do not look like oases, but look harmonious on your site and give it a special charm and comfort.


To create a flowerbed near your home with your own hands, which will become a decoration and will delight you with flowers all season long, you need a plan. Draw a flower garden: this will allow you to visualize the image and formulate the requirements for the flower arrangement. To visualize the color combination, use colored pencils.
Whatever flower garden you want to create, before you start decorating it, you also need to answer a few questions:
- what size flower bed is needed;
- what form is preferable;
- where to place a homemade flowerbed so that it pleases the eye, and the flowers are in a comfortable area for them;
- what is original on your site that can be used for a new flower garden.
To successfully create any flower bed you need to remember and simple rules, which every landscape designer uses. Remember the architecture of the finished flower garden and the final “picture” in the garden.

The finished flowerbed should fit into the space of your site, without being out of style. The task of a flower garden is only to complement the garden landscape without interfering with the perception of other objects. Homemade flower arrangements can be flat or three-dimensional, framed with or without decorative elements, clear-cut or without specific outlines.

Flowerbed sketch
If you don’t have the energy to plant the entire area at once, just master a small part of it first. It is better to master one small area and make the flower garden truly beautiful than to stretch it over half the area.

Place plants in the flower garden based on their growth and size. The most beautiful and harmonious flower beds are those that combine mixed plantings. For example, flowering plants and ornamental grass, annual and perennial flowers, etc.

Flowerbed - piano
To create a multi-tiered flower garden, place ground cover and low-growing plants in the foreground, followed by medium-sized flowers, and tall perennials in the last row. It’s good when plants are in harmony with each other in color and shape, or vice versa, they contrast.

Video - Flowerbed from a chair
You can be inspired to create a hand-made flower bed by an old cart wheel, a non-working bicycle, a rusty bucket, a basket, a pot-bellied samovar, a broken clay pot or any other household object.


From items that are unsuitable for normal use, you can create stylish and funny flower beds that will delight you and amuse your guests all season long.


Forms of flower beds and their filling
A regular flower bed implies a strict shape and a clear geometrically correct pattern. But the flowers in such a flowerbed should bloom at the same time, so this is not the best option for a summer residence.

Just like a carpet flower bed, since its pattern requires constant painstaking care.
A flower garden of irregular shape is not limited to a certain perimeter, creating the impression of natural vegetation.

Flowerbed - bicycle
The ideal basis for such flower beds is various frost-resistant perennials planted in a group. They are complemented with seasonal flowers so that the flower garden pleases the eye all season long.

A raised flower bed is well suited for small areas, saving space and making good use of all levels of garden space.
Video - Flowerbed from dead wood
Several small flower beds at different levels will create bright accents in the dacha. Small flowers with bright inflorescences are used for “pendants”.

An option that always looks advantageous is a monoflower. For it, one type of plant is used, shading them with a variety of decorative elements.


A homemade vertical flower bed is secured with a frame and involves complex work to create an original shape.
Herbaceous, climbing, quickly renewing deciduous plants are used.

Arabesque flower garden - flower bed unusual shape(butterfly, animal, etc.) is filled with small annual flowering plants and requires constant attention to maintain its shape.


Video - Flower beds made of stones
An example of creating a flower garden in an old sink

Let's look at an example of creating a flower bed from an old washbasin.
The shape for the flower bed can be any. But the mechanism for creating a “beauty corner” is always approximately the same - reinforcing the lower part of the container or object, arranging drainage, laying the soil, planting flowers, care.
Work progress
We take an old sink (or any other container suitable for planting plants), prepare it for a “new life” (painting, decoupage, stone lining, etc.).

We cut a piece of chain-link mesh to the size of the bottom of the container to reinforce the lower surface, and place it in the sink. The same effect can be achieved using plastic, the surface of which must be drilled to create a strong sieve that will hold the structure suspended.

We form the first layer of the flowerbed from small stones, sand and sifted peat to create drainage to drain excess water. Pour soil mixed with pebbles on top in a ratio of 3 to 1. The soil needs time to shrink. Depending on the type of soil, this takes about a week to a week and a half.

We sow flowers or place teenage seedlings in the ground.
We install a sink on our site. This stage can be carried out first if the container chosen for the flower garden is large.
Caring for a homemade mini-flower bed
A homemade mini-flower bed needs special care. It is smaller than a regular flower garden, and therefore dries faster, so it would be a good idea to provide it with constant watering or set up an automatic water supply system. But, of course, it is better to choose the frequency of watering and the location of the flower garden at the planning stage, so that the light-loving plant does not end up in the shade and vice versa.
Making an original flowerbed with your own hands is very simple, and it will delight you for a long time.

Spare no effort in creating beauty, because fresh flowers and unusual landscapes lift your spirits so much that even the most overwhelming gardening feats will seem pleasant.

Also read the article on our website - do-it-yourself homemade products for your dacha.
Video - Flowerbed made from old jeans
Video - How to make a flowerbed with your own hands
Lush flower beds and elegant flower beds at your favorite dacha require not only physical effort, but also knowledge to create, design and maintain them in proper form.
Flower garden or flower bed
What is the difference between a flower garden and a flower bed? Many novice summer residents are confused about these concepts. This is not surprising, since there is no clear definition.
A flowerbed is most often called a raised or flat piece of land that has a strict shape. Planting plants inside the flowerbed itself is also characterized by clear shapes, including geometric ones. The most common and popular option is a round or rectangular flower bed. This type of planting is a characteristic feature of urban decorative plantings and parks. Their clear shape goes well with straight paths, fountains, well-groomed bushes and trees.
A flower garden can have any shape. It looks more natural and natural, and is often used in natural gardens and parks. A flower garden allows for a freer choice of plants than a flower bed.
Creating beautiful flower beds and flower beds requires correct selection plants not only according to general requirements for growing conditions, but also according to the following parameters:
- Harmonious color combination .
- Correct selection of height and dimensions . When planting plants, you need to take into account the speed at which they grow.
- Flowering time . A flower bed of annuals can consist of plants that bloom at the same time. In this case, after flowering it is replanted. Perennials are usually selected according to a different principle - plants take turns blooming throughout the season.
Advice: Do not create on the site a large number of assorted variegated flower beds. It is enough to create one or two flower beds with your own hands, but carefully thought out and neat.
Types of flower beds
There are several types of flower beds that have specific features:
- Regular or geometric . Such forms of planting were very popular during the time of Versailles. The French park style requires a strict selection of plants according to flowering time and size, as well as color scheme. All plants in such a flowerbed are planted according to a clear pattern and form a specific pattern.
It is quite rare to create such flower beds with your own hands, as they are difficult to care for and troublesome to plant.
- Irregular or natural . In them, plants are planted more freely, most often in groups of at least 3 - 5 pieces to create a spectacular color spot. They actively use perennial plants, selected according to the principle of continuous flowering.
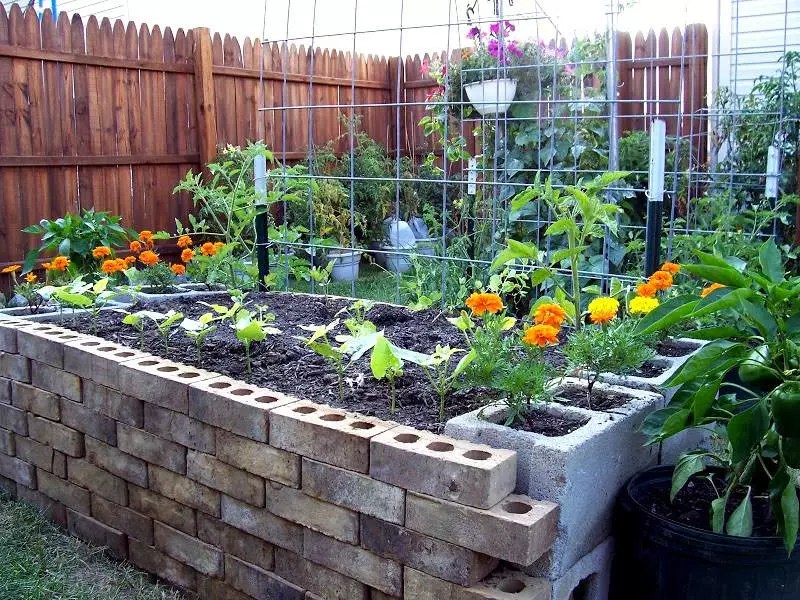
- Elevated or high . They consist of a fence and an internal part covered with fertile soil and planted with plants. The fence can be made of various materials. You can decorate a flowerbed at your dacha using stone, wood, or brick.
A tall flowerbed made of wild stone looks beautiful, with hanging or climbing plants planted in the spaces between it. This type of beautiful flower beds can also be used for growing vegetables, strawberries or spicy and medicinal herbs.
- Monoclumba consists of plants of the same type and color. It creates a spectacular, memorable color spot.
- Vertical design it is constructed from special containers stacked on top of each other and filled with nutrient substrate. In the spaces between the containers, a variety of plants are planted, mostly hanging and climbing plants, with a cascading shape.
A vertical flower bed at the dacha can be supplemented with flowering plants and berries, for example, garden strawberries, which produce beautiful shoots - mustaches.
Recommendation: Decorating flower beds at your dacha will be more beautiful and neat if you limit yourself to a few types of plants. 5 - 6 spectacular and compatible flowering and deciduous perennials or annuals are enough.
How to make a simple flower bed
The easiest way is to create a flower bed in your dacha with a simple geometric shape. A round, slightly raised flower bed in the middle of the lawn or in front of the entrance to the house looks very impressive and does not require much effort to create.
- Choose a suitable location . Water should not stagnate here. Avoid very shady places - most plants love light.
- Mark a round flowerbed extremely simple. You only need two pegs and a rope. One peg is driven into the center of the future structure, and with the second peg, tied to a stretched rope, the contours of the future circle are traced.
- Make sure the soil drains well . If the soil is too dense, remove its surface layer, drain it and add fresh fertile and loose soil. You can make the flower bed round convex shape, pouring a larger layer of earth in the center than at the edges. This way the plants will look more impressive, especially if low-growing or creeping species are chosen.
- Apply complex fertilizer to the surface layer long acting. This will prolong the flowering and attractiveness of the flower bed and make it easier for you to care for the plantings.
- Carefully remove all weeds, rocks and debris.
- Plant such a flower bed from the center. A so-called focal plant is often placed in it. It could be a beautiful colorful flower or an attractive foliage plant such as yucca. Sometimes a garden statue or vase is placed in the center of the flowerbed.
- Place all the plants according to the diagram.
- Water the plantings Loosen the empty spaces to prevent a crust from forming.
- The edge of the flowerbed can be framed with small pebbles, pebbles, wooden rods or a special ready-made low fence for flower beds.
Tip: Making such a flowerbed with your own hands is not at all difficult if you select the right plants in advance and create a clear planting plan.
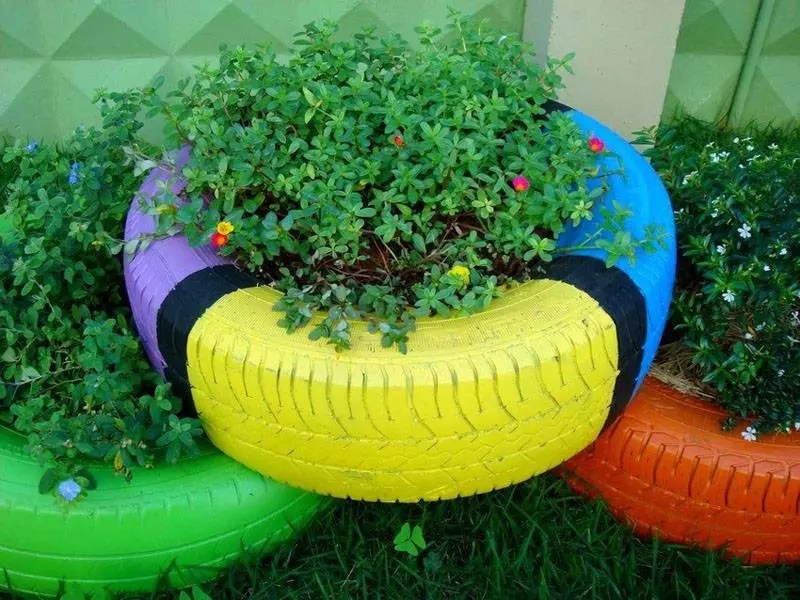
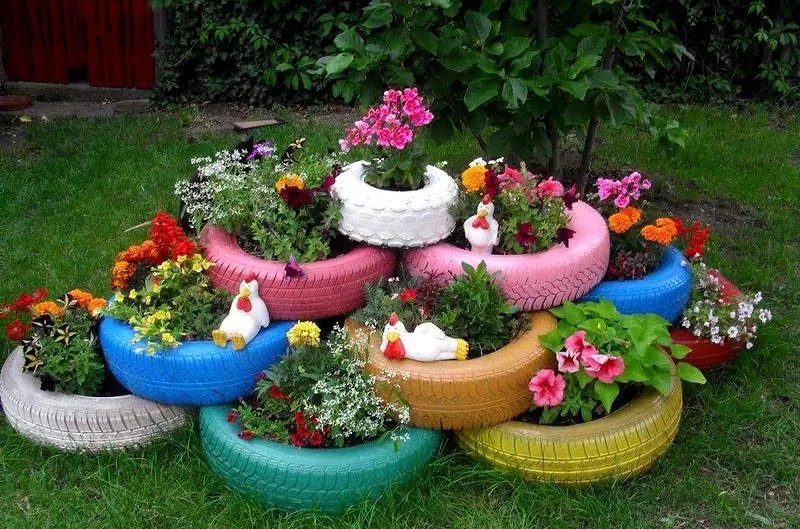
How to make a flowerbed from old tires
The easiest way to make a flowerbed at the dacha from available materials is to use old discarded tires. There are several options for working:
- Just use the tire as a frame for a future flower bed.
- Show your imagination and create not just a flower garden, but a real work of landscape art.

The simplest flower bed is made from an ordinary tire, which is installed in the selected location. If there is dense soil under the future flowerbed, the water will not be absorbed when watering the plants, but will spread unsightly in all directions, washing the substrate out of the tire. To prevent this from happening, dig up the soil under the tire, slightly digging it into the ground. Or make a shallow hole and fill it with crushed stone for drainage. Install the tire, fill it with soil and you can plant the plants.
Several tires placed one on the other will make a beautiful high flower bed. Tires can be painted in different colors or shaped like a flower, a cup, or even a swan. Used tires with soft worn tread can be easily cut into a variety of shapes. By turning out such a tire, you will receive a free and elegant form for a flower bed at the dacha using improvised materials.

How to make a multi-tiered flower bed
Another type of spectacular planting at the dacha is a multi-tiered flower bed for growing hanging plants. You can create it from suitable containers different shapes, ready-made forms, tires, boards, stone, even broken furniture. The main condition is that the plantings should be arranged in tiers, one above the other.
- First, the area for the flower bed is prepared.
- The first tier is being built. It should be the strongest and most stable - it will bear the weight of the entire structure.
- The next tiers are installed one above the other so that there is space left to fill with soil.
- Selected plants are planted in the resulting “pockets” of soil.
- A multi-tiered flower bed is watered in stages, starting from the very top.

Numerous photos of flower beds at the dacha fill the Internet. From there you can get a lot of ideas or come up with your own unique options.
Flower bed made of plastic bottles
If you have a whole collection plastic bottles, don't throw them away. They will become the basis of an original design for your dacha.
How to make a flower bed or flower garden at the dacha from such a strange material? Bottles are used in different ways depending on their size. Large containers can make an original flower bed made from plastic bottles. They are placed on their side and one of the walls is cut out. This will be the top part of the flowerbed, and the container itself will be a container for the soil. From several bottles you can create a decorative composition, for example, an elegant children's train. Or paint the bottles, giving them the appearance of funny little animals. Children will be very happy with such a decorative garden. Plant in containers unpretentious plants, remembering that they have a limited amount of land.

Another option for a flower bed made of plastic bottles is a kind of “high beds”, the frame of which is created from a row of plastic bottles dug in with their necks down. They can be painted in different colors or filled with colored powders. Such fences are very durable and elegant; they can be used not only for flower beds, but also for a convenient and beautiful vegetable garden.
Another type of symbolic planting is an “eternal flowerbed” made from the same bottles of different colors dug into the ground. Their bottoms resemble flowers. Such a decorative detail will greatly decorate the dacha in late autumn or winter.

Plastic bottles can become an inexhaustible source of various design ideas for your site.
Brick flowerbed
A brick flowerbed is a classic option for a summer residence. The simplest design- plantings lined with bricks around the perimeter in any shape. An “advanced” option is bricks laid on top of each other at an angle and half dug into the ground. But a brick flowerbed can be much more interesting and complex.
Such a flower bed is laid out according to a pre-calculated pattern.
- The outline of the future structure is marked.
- A hole is dug and filled with drainage (crushed stone, pebbles and sand).
- Brick walls are being built. The first rows are not held together with mortar. This is done to allow excess moisture to flow freely and eliminate water stagnation, which can lead to plant death.
- The next rows are laid on cement mortar.
- If the flower garden is tall, it is advisable to slightly tilt the masonry inward so that the earth does not “push” it out.
- The finished product is left for about a week to allow the mortar to set and strengthen the masonry.