How to make wiring for a corner bath. Installation of plumbing in the bathroom. Stages of distributing water in an apartment with your own hands
Homeowners usually don’t think about how water gets into their apartment or where it goes. They simply enjoy this benefit of civilization until one day something goes wrong. Correct pipe layout in the bathroom and toilet ensures high-quality and trouble-free operation of the plumbing system and all household appliances installed in this room.
Often the cause of constant blockages, low pressure and equipment malfunctions is “makeshift” pipeline installation, so this task must be taken very seriously. In this article we will talk about the design of the bathroom plumbing system, its composition and wiring.
Bathroom water supply schemes
When starting to install pipes in the bathroom, you need to thoroughly understand the design of the plumbing system so that no problems or accidents arise during its operation. Previously, water was supplied to residential buildings from a well or well, but at the moment water is supplied inside the apartment from a centralized city water supply network, which greatly simplifies the installation and maintenance of the water supply system. The wiring in the bathroom itself consists of 2 types of pipes:

Important! Installing pipes in the bathroom is an important and technically complex process, which is best left to a professional plumber. After all, the slightest mistake made when laying pipes can lead to incorrect operation of the entire system - sewer blockages, wastewater stagnation, and a decrease in pressure.
Calculation of system parameters
When wondering how to properly install pipes in the bathroom, many people miss the fact that it is necessary to first calculate the parameters of the plumbing system. This calculation allows you to determine the required diameter of water supply and sewer lines, their length, the slope at which they should be laid, the number of fittings and clamps. All these parameters are calculated in accordance with the number of plumbing fixtures and the volume of water they consume:

Do-it-yourself sewer pipework in the bathroom is carried out taking into account the following requirements:

Note! If the plumbing in the bathroom is installed in accordance with the correct calculations, the appliances will work normally. However, experienced plumbers recommend that when determining the amount of water consumed and wastewater, take the value with a small margin in case an additional household appliance is installed in the bathroom.
Materials
Do-it-yourself plumbing installation in the bathroom is done using pipes. To conduct water from a common house riser to a consuming device, it is necessary to lay a pipe from it at an angle. Currently, construction stores offer a huge range of plumbing products, so you can choose suitable models with a long service life. Most often, the following materials are used for making water pipes:

Please note! Many homeowners, not knowing how to install pipes, do it themselves, making serious mistakes when choosing materials and installation. Even minor flaws when laying a pipeline can cause leaks and accidents, so it’s still not worth saving on the services of an experienced plumber.
How is the wiring done?
Experienced plumbers believe that directly laying pipes in the bathroom takes only a third of the time spent on designing a plumbing system. After all, the most important thing in this process is to correctly calculate the parameters of the water supply system, draw up a diagram and determine how many meters of pipes, fittings, clamps and seals are needed. To avoid making mistakes in calculations, experienced plumbers use the following method:

Important! In order to properly install a plumbing system, you must not forget about the sealant, fum tape or flax necessary to seal the connections between the pipes.
Installation procedure
Before you begin installation, you need to make sure that the pipe layout in the bathroom and toilet is drawn up correctly. The work is carried out after the water supply to the room is completely shut off. If you plan to replace the riser, you need to obtain permission from the management company to shut off the water and notify your neighbors.

The pipes must be laid in the following order:
- First, ball valves are installed separately on hot and cold water. In addition, experienced craftsmen advise installing autonomous taps to supply water to washing machine and other devices, so that in the event of a breakdown or repair you do not have to immediately shut off all the water supply to the apartment.
- After the taps, water meters and coarse filters are installed, which remove large impurities from the water, extending the service life of the devices, and protect the water supply from blockages.
- Then the pipes are laid out. It is better that the water supply has as few seams as possible to prevent leaks. Metal pipes They are connected to each other by welding, and the plastic ones are soldered with a warm soldering iron. All connections and joints of the pipeline must be sealed with flax or fum tape.
- After finishing work, you need to open the hot and cold water taps, and then leave them on for 15 minutes. If during this time no leaks have formed, you managed to properly install the water supply, then you can use it.
Please note that the distance between the pipes and the electrical conductor should not be less than 34-50 cm, otherwise they will be electrocuted. In addition, do not try to wall up the plumbing in the bathroom and toilet with your own hands inside the wall, since in the event of an accident you will have to break the entire finish of the bathroom.
Video instruction
During renovations in the bathroom, the question of how to route pipes becomes relevant in order to save space and not spoil the design. We'll talk about the most popular pipe routing schemes below.
The basic rule of high-quality pipe installation is to ensure maximum efficiency of the bathroom, both as a whole and individually.

Proper piping in the bathroom can turn it into a favorite place for comfort and relaxation.
Before developing a diagram, you should decide on the location of all plumbing products.
In the case of placing the toilet in a separate room, it should be noted that the pipework in the bathroom is directly connected to the toilet, so it is recommended to do it together.
When installing pipes, you need to take into account the presence of:
- toilet,
- bath or shower stall,
- boiler,
- shells,
- pump, etc.
To carry out pipe routing, in almost all rooms of the bathroom, the wiring diagram is the same. It consists of pipes:
- hot water supply,
- cold water supply,
- sewerage.
The main element of the scheme is the presence of a central pipeline, from which further pipes are laid. All devices to which the water supply is connected require the connection of three main pipes: the supply of hot and cold water, and the disposal of waste water, that is, sewerage. Almost all three types of pipes are installed close to each other, although the points for connecting them are different.

When installing pipes in a private house or in an apartment with hot water supply through water heating devices, the main hot water supply point does not coincide with the cold water supply outlet point.
Main types of pipe layouts in the bathroom
In most cases, to carry out pipe routing in modern conditions, metal-plastic pipes are used. They consist of an aluminum channel that has an inner and outer protective layer.
There are two types of pipe routing in the bathroom:
1. Sequential or tee type - the first pipe is installed at a distance between the water heater and the nearest plumbing fixture. A tee is installed near it, to which a pipe is connected, from one end of the tee the pipe goes to the plumbing, and from the second to the next device, where the tee is also installed. Thus it turns out serial connection water supply Advantages:
- using one pipe line,
- saving of materials.
Flaw:
- you cannot block one area,
- A decrease in pressure is possible if several devices are turned on.
Great for an apartment or house with one bathroom.
2. Collector type wiring - the first pipe goes to the collector device from the water heater. A series of pipes are laid from the collector, which are connected to other plumbing fixtures. Separate collectors are used to supply cold and hot water. Flaws:
- a large number of pipes,
- the cost of such wiring is more expensive and more complicated,
- takes up more space.

Advantages:
- no pressure drops;
- the possibility of separately covering certain areas.
Used when there is more than one bathroom in a house or apartment.
In order to use much fewer pipes, during the implementation of collector wiring, the pipe from the water heater should be brought to a central point located between the bathrooms. Thus, if you connect a collector, immediately next to the water heater you need to run all the pipes to one and subsequent bathrooms from the collector. If the collector is located in the center between the bathrooms, then the length of the pipes will be significantly reduced.
Laying water supply pipes: diameter size
A very common problem that indicates improper pipe routing is a sudden drop in pressure that occurs when using several plumbing fixtures.
This occurs due to the assembly of the water supply system with pipes that have the same diameter.
This problem is not relevant for apartments that are equipped with a central water supply, both cold and hot water. But, if hot water comes from a water heater, then pressure drops cause a number of inconveniences.
For example, while taking a shower, the washing machine begins to fill with water, the pressure drops, and very hot or cold water begins to flow from the tap.
To get rid of this problem, you should install pipes of different diameters.
The diameter of the main pipes is ¾ inch, and the outlet parts to which the plumbing is connected are ½ inch. The greater the number of plumbing fixtures in the house, the thicker the pipes. For pipe installation in apartments, the above parameters are suitable.

Hidden or open pipe routing: which is better?
There are two ways to lay pipes in the bathroom: hidden, which involves hiding the pipes under the finish, and open - when all the pipes are visible. To ensure the aesthetics of the bathroom, it is of course better to choose a hidden wiring method, but for reliability, an open one is suitable.
When using a hidden method of pipe installation, there are several features:
1. High level of reliability - implies the use of high-quality materials that will not lead to leakage over a long service life. The best option is pipes made of copper or polypropylene.
2. The formation of condensate masses inside the wall in which the pipes are located will lead to the formation of mold and mildew, and will also negatively affect the quality of the wall. To prevent this process, the hot pipe should be installed higher than the cold pipe. Use Merilon, a special insulation material, before installing pipes into the wall.
The open method of pipe routing involves saving money on the purchase of insulation and reducing the amount of work. Flaws:
- constant formation of condensation in the winter season;
- unaesthetic appearance.

DIY pipe laying materials
In order to make high-quality pipe routing, just pipes, as required material, will not be enough.
Intake fittings are ball and instrument valves, which are responsible for introducing water into the home and for monitoring each individual water consumer.
In most cases, a water meter is installed in the bathroom, which requires a check valve and a coarse filter. The filter can prolong the operation of the meter, and the valve will not allow the meter to be rewinded.
To normalize the pressure in the system, a reducer is used. Its installation is optional. A reducer is a device that does not allow pressure to rise or fall above normal, and helps to extend the life of devices such as a boiler, boiler, pump.

Instructions for installing pipes in the bathroom
When routing pipes, avoid additional cutting or bending of pipes.
To simplify the task and speed up the installation of pipes, use ready-made frame structures, connectors and fittings.
To avoid pressure drops, there are two ways to lay pipes:
- increasing the size of the supply pipe;
- collector wiring diagram, which assumes the presence of a separate pipe for each device to which water supply is supplied.
To adjust the pressure use:
- a reducer, which is installed after installing coarse filters, and regulates the pressure in the line; together with the reducer, you should purchase a pressure gauge that determines the normal pressure;
- shut-off valves, with the help of which the water supply is shut off at any time.
Piping installation should begin with the installation of a control valve. A mandatory element is the installation of a coarse water filter. It is installed after the valve.
Next, a water meter and a fine filter are installed. For large pressure surges, a reducer and pressure gauge are installed. Then the collectors are installed if a collector wiring diagram is used.

When laying polypropylene pipes, it is necessary to have a special soldering device that heats the parts, and then they are joined.
Advice: You cannot solder pipes and connections from different manufacturers. There is a risk of receiving low-quality connections.
Before wiring, shut off the shut-off valves and check the quality of the existing equipment.
Types of pipes for distribution
The following pipes are used for piping in the bathroom:
- made of plastic,
- made of metal-plastic,
- metal.
Plastic pipes are low cost. Plastic are divided into:
- polypropylene - they are of the highest quality, compared to other plastic pipes, have high heat resistance, and are characterized by a long service life;
- polyethylene pipes - they are elastic, do not burst when water freezes, such pipes are not suitable for hot water supply, as they are not able to withstand high temperatures;
- PVC is the cheapest and most unsafe for use in water supply; such pipes are suitable for sewage, as they emit toxic substances that affect the condition of the water.

Metal-plastic pipes combine a number of advantages plastic pipes, this is durability, heat resistance, high thermal conductivity, but at the same time quite durable, like metal.
Metal pipes are:
- steel - have high strength and thermal conductivity, are difficult to install and are susceptible to corrosion;
- copper - durable, practical, environmentally friendly, not susceptible to chemical substances, have highest cost among all types of pipes.
Plastic pipes are resistant to corrosion and build-up.
1. Cast iron and galvanized pipes are quite difficult to install and become clogged over time. But despite this they have a number of advantages:
- high level of strength,
- low noise performance,
- fire resistance.
2. Metal and steel pipes that can withstand high temperatures are ideal for draining water heaters.
3. The use of metal-plastic pipes is appropriate if there is no large quantity bends and the pipe is laid in one piece.

4. When choosing pipes for a heated towel rail, best option- stainless steel. Such pipes will last for several decades.
5. Plastic sewer pipes are perfect for sewerage or drainage.
Piping in the bathroom video:
Plumbing wiring may be required when implementing overhaul or in the event of a water pipe breakdown. This process can be carried out independently, without the involvement of specialists, the main thing is to have the appropriate tool available and be able to handle it. The work is carried out according to a pre-drawn plan, divided into several main stages. It includes the arrangement of communication elements; the diagram can be drawn up independently, or found on the appropriate resources.
Plumbing installation: preparation for work
First of all, you need to make a list of necessary communications and plumbing fixtures. For example, a washing machine and toilet require a connection to sewerage and cold water supply, and hot water is additionally supplied to the washbasin and shower cabin (bathtub). Plumbing and heating require competent work, since failure to comply with the rules can lead to very unpleasant consequences.
You also need to decide on the number of shut-off valves; such elements must be installed on the supply to the washing machine, cold and hot water. If desired, they can be mounted on the water supply to the toilet; this is especially convenient in the event of a tank breakdown, since there is no need to shut off the tank for repairs. common system water supply
Plumbing work: prices
If all devices and pipes are completely replaced, it may take several days to complete. Many people are interested in the cost of this service; it depends on several factors:
- the complexity of the work and the time allotted for its implementation;
- number of installed devices, nodes and other basic elements;
- type of plumbing.
For example, a shower complex with extensive functionality is more difficult to install than a standard cast-iron bathtub. Also, the cost increases when using additional services.
Prices for plumbing work may vary among different specialists and companies. On average it will cost 1,700 rubles, and installation of a standard mixer will cost 800 rubles. When choosing a company, you should focus not only on the prices of the services provided, but also on the professionalism of the employees; it would also be a good idea to study reviews on specialized resources.
Location rules
After choosing the type of plumbing fixtures and purchasing them, you need to decide on the placement of all devices. In this case, it is advisable to bring at least a few elements into the room and place them in the intended place to make sure that their location is convenient. Next, a plumbing wiring diagram is drawn up on a piece of paper, and some features and rules should be taken into account:
- sewerage outlets can be made in the form of a “tee” without a vertical part;
- the main pipeline is placed above the floor surface, with water outlets running from it through tees;
- the location of the plumbing should provide easy access to the joints of flexible hoses and pipelines;
- sewer and should be as close to each other as possible so that they can be hidden behind a special box;
- crossing pipes is extremely undesirable; plumbing should also be connected as simply as possible;
- Pipe routing should not be complicated, it is necessary to ensure the possibility of independent implementation.

Materials
There are many various materials, they are selected depending on the complexity of installation and type of installation.
Plumbing with polypropylene pipes is installed using a special device called a soldering iron. You can rent it from a store that sells the relevant products, or you can buy it. The first option is more rational if one-time use is necessary. Using the tool is not difficult, the main thing is to remember the strong heat and be careful when working. It is also worth reading the instructions. In some cases, an assistant may be required.
Installation of plumbing requires the use of PVC fittings to connect and rotate pipes at the required angle. They are selected according to the size of the latter. When purchasing, it is worth taking several spare elements; they may be needed in case of uneven soldering.
Peculiarities
When using a soldering iron, the resulting connections become permanent, and if there are any defects, part of the pipeline must be cut off to eliminate them. To extend a pipe that is of insufficient length, couplings are used.
One of the stages of work is connecting special fittings to the end outlets; a flexible hose is connected to them on one side, and a pipe is fixed on the other.
Plumbing in a new building is installed in two main ways:
- Soldering of pipes begins from the riser towards the plumbing fixtures.
- The plumbing element furthest from the riser is connected first.

Hidden installation
If it is necessary to carry out independent work, the scheme should be simplified as much as possible. For example, water supply runs along the floor, and a pipe is pulled to each device in wall structures in a perpendicular arrangement.
Propylene pipes are distinguished by their reliability, durability and ease of use; for their installation, as noted earlier, a heating tool is required; it will ensure a tight and high-quality connection.
The hidden type has become most widespread due to the ease of carrying out repair work and maintaining the appearance of the room. First, you need to make grooves in the floor and walls, and you need to make sure that the dimensions of the recesses correspond to the materials used. The next step is to install a valve and filter with a suitable cleaning level. Do not forget about the water flow meter and pressure sensor, the latter is of particular importance in the absence of stable pressure and frequent exceeding of established standards.

Connecting elements
The collector is a cylinder in which there are several outlet holes and one inlet; its main advantage is that it simplifies the connection to plumbing fixtures. After this, the required number of shut-off valves and adapters is installed. It also ensures an even distribution of fluid, which promotes equal pressure at each point. The formed holes are hidden behind the plaster, onto which the desired decorative coating is applied. Among the disadvantages, it is worth noting the cost of the system, since in addition to the collectors themselves with shut-off valves, a large number of fittings and pipes are required.
Free access must be provided to the connections; it is necessary for periodic and repair of the water supply system. Afterwards, fittings and flexible hoses, used as connections to consumers, are fixed to the elements connected to plumbing fixtures.

Sewerage
The need for a soldering iron does not arise when working with sewer pipes; to assemble, you just need to insert them into each other. Using fittings, you can simplify the task, and if any shortcomings are identified, you can easily eliminate them by disassembling the system.
Wiring plumbing does not cause any particular difficulties and is carried out taking into account several rules:
- the pipes must be connected in such a way that elements with a smaller size are inserted into fittings or pipes with a larger diameter;
- the outlet to the sewer from the toilet should be within 110 mm, while for pipes coming from the washbasin, washing machine and shower this parameter is 50 mm;
- The pipes should go to the main riser with a slight slope.

It is undesirable for the wiring of plumbing in a new building to be complicated by various intersections, since they can lead to “congestion” when two devices are used simultaneously; it is also recommended to connect the devices in series.
In some cases, difficulties arise with clearing the blockage through the drain hole; this task can be simplified during the repair process by installing an additional tee fitting on the sewer pipe. Through its upper hole, which is closed with a special plug, you can quickly. It is worth remembering that if the plumbing installation project involves a hidden type of installation, it should always be possible to access the connections for inspection and repair.
Rubber seals must be present at all joints; they will prevent leakage of waste and the appearance of an unpleasant odor. During installation, it is important to connect all elements as tightly as possible. The organization of a constant slope is carried out using special clamps that fix the necessary sections of pipes on the walls. Among the main elements that must be installed are a shut-off valve and a coarse filter.
Piping in the bathroom involves not only the installation of water supply and sewerage, and in some cases even heating (in private homes). This is not an easy task and requires certain theoretical knowledge and practical skills. If the latter can be mastered as work progresses, as they say, by trial and error, then with theory things are a little different. In this article, together with the website, we will provide all the necessary theoretical knowledge that will help you correctly install pipes in the bathroom.
How to lay pipes in the bathroom photo
Piping in the bathroom: piping diagram
The layout of the pipes in the bathroom remains the same in all situations - the location of the pipes and components of the system may change, but in no case the layout. The focus is on the main pipeline, from which branches extend to connect consumers. As a rule, almost all plumbing fixtures require the presence of cold and hot water for their operation, as well as a channel for discharging waste liquid. Consequently, laying pipes in the bathroom involves the installation of three main channels: cold and hot water supply and sewerage.
All these pipes are usually laid next to each other, despite the fact that they may have different connection points. If we are talking about an apartment with a centralized supply of cold and hot water, then all these lines originate in approximately the same place - as a rule, the risers are mounted in a special niche of the bathroom or bathroom.

Piping in the bathroom: diagram
Things are a little different in apartments in which hot water supply is provided through. Here, the hot water supply pipeline originates directly from the heating unit, which can be either a storage tank, a gas water heater or a double-circuit heating boiler. If we delve deeper into the theory, the difference between the distribution of pipes for centralized and individual water supply (sewage) lies in the direction of water flow along the mains. Externally everything looks almost identical.

Bathroom piping diagram
Correct pipe layout in the bathroom: diameter matters
Many have noticed that when two water consumers work simultaneously, the pressure in them decreases sharply. This is caused by a lack of pressure and insufficient volume of water supplied to the distribution system. To put it simply, this happens in cases where the water supply system is assembled with pipes of the same diameter.
This effect is not observed in apartments with a central supply of cold and hot water. But if only cold water supply is used, and hot water is heated locally, then the lack of pressure already causes some inconvenience.
For example, you are taking a shower, and at this time the water supply to the washing machine is turned on. What happens is that the pressure in the heating device drops (less water passes through it), and the water heats up more. Instead of the set 50˚C, boiling water starts flowing into your shower head. Agree, it’s not very pleasant.
So, you can get rid of this unpleasant effect only by using pipes of the correct diameter. In this regard, the installation of pipes in the bathroom is as follows. Mains are laid using pipes with a diameter of ¾ inches, and bends for connecting plumbing fixtures with a diameter of ½ inches. It should be understood that the greater the water consumption in the house, the thicker the pipes will have to be used - this rule applies to private houses. For apartments, everything works out with the diameters indicated above.

How to lay pipes in the bathroom with your own hands
Hidden or open pipe routing: what to choose
There are two ways to solve the question of how to lay pipes in the bathroom - this is an open and hidden method. If we approach this issue from an aesthetic point of view, then, of course, a hidden pipeline is better. But it must meet some requirements.

If we talk about open pipe routing, then it does not represent anything good - this laying method is used to save money, which is achieved by reducing the cost of purchasing high-quality material and reducing the amount of work performed. After such installation you get a not very successful appearance rooms and constantly condensing pipes during the cold season.
To learn how to properly install pipes in a bathroom, watch the video.
Materials associated with piping in the bathroom
If you think that to solve the problem of how to install pipes in the bathroom, it is enough to purchase elements of one or another plumbing system, you are mistaken - a full-fledged sewerage and water supply system involves the use of a fairly large number of various plumbing products. First of all, these are shut-off valves. In internal wiring, two types of shut-off valves are used - ball valves, which are installed at the water inlet into a house or apartment, and instrument valves, the purpose of which is to control each individual water consumer.
In addition, piping in the bathroom is used, the installation of which is not allowed without the use of a check valve and a mechanical water purification filter. The filter ensures the meter is fully operational for a long time, and the check valve is installed at the request of the water utility and does not allow unscrupulous citizens to unwind it.

How to install pipes in a bathroom
In some cases, a pressure reducer may be installed at the water inlet into the house. Many consumers, such as storage water heaters or modern heating boilers, cannot tolerate prolonged exposure to increased water pressure, which usually appears at night, when water flow is significantly reduced. It is the reducer that allows you to stabilize the water pressure in the internal wiring and extend the service life of expensive units.
In conclusion, I would like to note that the pipework in the bathroom must be carried out in accordance with the installation requirements of a specific pipeline system. What does it mean? For example, one of the requirements for installing a sewerage system is the presence of a slope towards the drain. Or if we are talking about installing polypropylene water pipes, then this means maintaining the pipe soldering regime. In general, you need to learn a lot of information - without it, installing a high-quality water supply system is out of the question.
Plumbing installation in a new building or any apartment important process. Do-it-yourself plumbing installation is quite possible and important correct scheme and knowledge of plumbing installation. This is quite a difficult and very responsible job. The efficiency of the entire plumbing system in the apartment depends on how it is well thought out and carefully executed. The current technologies for construction and installation work in this direction are quite simple and affordable. Therefore, you should not rush here to call plumbers. Many people can safely do the wiring or installation of plumbing equipment themselves with their own hands. In addition, such a formulation of the question will, among other things, save some amount in the family budget.
Of course, before starting work, it is necessary to arm yourself with certain knowledge that will allow you to carefully study, analyze the situation, and then provide the correct step by step execution each subsequent action. To help you perform high-quality wiring with your own hands, we will try to understand the nuances, difficulties, and main stages of this work.
- 1 We plan the placement of plumbing fixtures and basic communication wiring
- 2 Installation method
- 2.1 Outdoor installation of water pipes
- 4 Planning the wiring
- 5 Materials and tools
- 6 Wiring order and technological nuances
- 7 Installation sewer pipes
- 8 Conclusion
We plan the placement of plumbing fixtures and basic communication wiring
Of course, every owner plans in advance the placement of basic plumbing and household appliances in the bathroom, toilet or combined bathroom, these are:
- Bathroom;
- Shower cubicle;
- Toilet;
- Bidet;
- Washing machine;
- Wash basin;
- Hygienic shower;
- Heating boiler.
When this choice is determined and their main dimensions, you need to decide on engineering communications. The bathtub, shower stall, bidet, and washbasin require sewerage pipes, hot and cold water. Cold water must be supplied to the toilet and washing machine and sewage drained away. The hygienic shower and heating boiler will require cold and hot water pipes.
To schematically outline the wiring for plumbing fixtures, let’s first consider the main clarifying aspects.
Installation method
Pipe laying can be done in two main ways: open or closed. In terms of reliability, these installation schemes are approximately the same, but there are certain differences between them.
Outdoor installation of water pipes

With open installation, pipes are installed on top of the floor or walls. If possible, they can be hidden under a false wall or any decorative structure. The advantages of an open installation are:
- Laying any pipes.
- Simple installation, maintenance, repair.
- Easy layout.
- There is no need to tap walls.
- Cost-effective dismantling.
- Constant monitoring of pipe condition.
- The ability to add the necessary new line at any time without spending much time and money on dismantling or repair work.
The disadvantages of open installation include:
- Unsightly appearance.
- Reducing usable area.
The last factor is very critical for small rooms. The lack of extra centimeters will not make it possible to place plumbing fixtures as desired. Because part of the required volumetric space will be occupied by water supply or sewer lines.
This installation is more aesthetically pleasing and involves laying pipes directly into the wall. This installation method makes it possible to arrange furniture and plumbing without losing free space. However, there are significant disadvantages here:
- Limited choice of pipe material.
- Labor intensity of preparatory work.
- Difficulty in installing and connecting pipes.
- Impossibility of carrying out urgent repair work in case of leaks due to preliminary dismantling and destruction of wall finishing.
Choosing hidden wiring, you must always remember its diagram. Otherwise, if it becomes necessary to make a hole to install a mirror, you will not accidentally drill through the pipe, thereby creating an unpleasant situation for yourself and the neighbors living on the floor below.

For our modern apartments, you can choose two options for routing water pipes
- Collector.
- Tee.
The first option is much simpler to install than the second, more practical in operational terms, but more complex in execution. With this installation, each plumbing fixture has its own pipe. This is done so that when water is taken, it is evenly distributed to each installed device. In this scheme you need to use a little large quantity pipes than in tee wiring, but the number of connections here is much less. Therefore, the cost of the manifold version is higher than the tee version.
With a tee system, each new branch must have its own shut-off valve installed. Therefore, in the event of a failure of any plumbing fixture, there will be no need to turn off the entire system. Although, in any case, a shut-off valve at the apartment entrance must always be installed.
We are planning the wiring
Having decided on the installation method and wiring diagram, and knowing the overall dimensions of the plumbing fixtures, you can draw on paper the pipe layout, which you need to do yourself. The diagram identifies the installation locations of all plumbing equipment, which includes:
- Cranes;
- Toilet;
- Bath;
- Sink and so on.
All measurements must be made carefully with the highest possible accuracy. In this case, it is advisable to adhere to the following recommendations in the scheme:
- Try to avoid crossing pipes.
- Water supply and sewerage pipes should be laid side by side as close as possible, so that later they can be covered with one box.
- Don't complicate the wiring. Try to keep everything as simple as possible.
- If the main pipes are located below the floor, water outlets through tees must be routed perpendicularly upward.
- Vertical sewer pipe bends are replaced with flexible hoses that are inserted into tees.
- For wiring, professional experts advise using polypropylene pipes. They work great in cold and hot water supply systems; heating and sewerage. In terms of technical parameters, these products are characterized by high levels of strength, durability, and ease of installation. Moreover, they are available in a price range. They are connected using special welding.
Materials and tools
After studying the diagram, carefully checking, and clarifying the calculated data, you can buy pipes, fittings and the necessary fittings with a margin of 5 - 10% of the planned calculation for doing the work yourself.
In addition, you must have a certain set of tools in the form of:
- Scissors for cutting pipes;
- Soldering iron for welding;
- Markers for marking;
- Pliers;
- Adjustable wrenches;
- Knife;
- Roulettes.
Wiring order and technological nuances
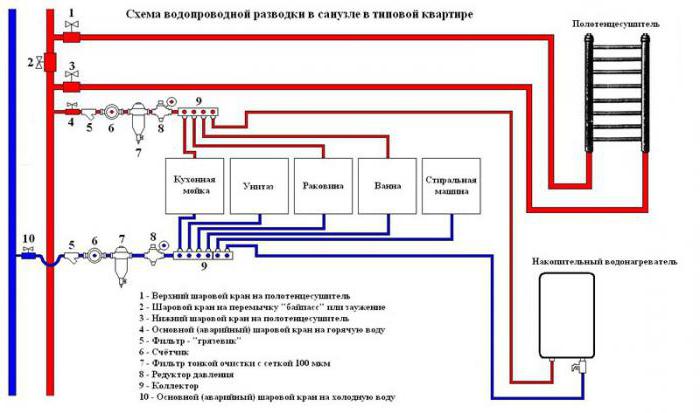
Let's consider the main stages of laying water pipes.
- Initially, inlet valves or ball valves should be installed in the apartment from the main common hot and cold water supply system.
- Then, filters must be installed in the main outlets to the apartment for deep purification of the supplied water.
- After them, meters are installed as metering devices.
- They are followed by installed pressure reducers that regulate the water supply to plumbing fixtures.
- By shutting off the water supply from the common riser, further wiring is carried out according to the proven scheme.
- You can do it yourself, starting from the main riser or soldering pipes from the outermost device to the main riser.
- You need to work with a soldering iron extremely carefully so as not to get burned, while fulfilling all the requirements of the instructions for it.
- The routing of water pipes ends with end outlets in the form of “American women”. On one side they are soldered to the pipe, and the other has a thread for connecting a flexible hose.
Installation of sewer pipes
The assembly of sewer pipes is simple, but very important. When doing this work with your own hands, you must always check that there are special rubber gaskets in all joint spaces of the pipe. This is necessary to ensure a high-quality connection, avoid leaks and the spread of unpleasant odors.
When laying out sewer pipes, it must be taken into account that their slope to the main riser from the plumbing equipment should be within 3 centimeters per meter of pipe.
Conclusion
Careful planning and scrupulous work on installing plumbing in an apartment will allow anyone who is confident in their abilities to do it with their own hands. The main thing in this work is that all locking mechanisms and valves are within easy reach.
When starting work and planning the wiring yourself, it is better to additionally consult and coordinate it with professionals who will be able to notice shortcomings and give practical advice on all issues. Then, of course, having received the approval of specialists, you can save your family’s budget and enjoy the work done.