Installation of two-level ceiling lighting with LED strip. DIY ceiling lighting with LED strip. Ceiling lighting options
Some craftsmen make real masterpiece flowers from paper. Looking at them, it seems that we are unlikely to be able to do something similar. But in fact, there are options for making paper flowers that even children can master. And the option presented below is just that - simple, not requiring much effort, time and patience.
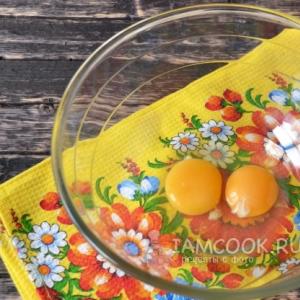
What you need to make a paper flower:
Colored paper (in this case, very convenient colored pieces of paper for notes);
glue stick.
Step 1. Making a petal
We will form a flower petal from a 9x9 square. In this case, blocks with sticky notes are indispensable!

Fold the square in half diagonally.

We combine the corners of the resulting triangle with its vertex.

We get a rhombus.

We wrap the edges of the rhombus towards the central axis.


We straighten the resulting workpiece.

We turn out the “tails” on both sides as shown in the photo.


We get this design.

We bend the “ears” extending beyond the edge of the diamond inward.


We wrap the edges inward along the existing line.


We wrap the petal, connecting the folded edges.


Apply glue to one of the sides to be glued.

Glue it together and get a petal.

Petals can be from 5 to 10-15.

Step 2. Glue the petals together.
Coat the end side of the petal with glue.

Glue the two petals together.

We glue all the petals one by one and get this paper flower.

The final look of the craft. Photo 1.

The final look of the craft. Photo 2.
This flower using the modular origami technique is very easy to make with your own hands. In this case, you can vary the number of petals, glue together the “stamens” inside the flower, and paint them in a contrasting color. If desired, you can add a bead to the center. Such a paper flower can become the basis for making topiary or an original element of gift wrapping. And if you like other flowers, then do not rush to leave our site, because we will show you how to make tulips from paper. In our opinion, the craft turns out very beautiful!
A simple square of colored paper can become anything if you master the art of origami. Some people think it's difficult. However, in practice, you can easily learn how to add both simple and complex ones in just a couple of hours.
Or, you can make something like this out of paper - a flower from origami modules. Absolutely nothing complicated! But how beautiful!
For work we will need the following materials:
- colored paper, colored on both sides,
- ruler,
- glue,
- scissors.
The process of making a flower from origami modules:
1. Colored paper of the desired color must first be cut into squares. A convenient square size is 10*10 cm. You can make it larger or a little smaller, but not much - very small modules are inconvenient to fold. 7 squares are needed.
 2. Fold each square in half diagonally.
 3. Then we connect the corners that are on the fold line together with the third corner.
 4. We lift and open each of the two resulting triangles from above.
 5. Flatten them so that looking at them from above you get diamond shapes.
 6. Turning it over to the reverse side, we will see these protruding triangles that need to be bent towards the center.
 7. Now turn it over again and hide the curved triangles inward on both sides.
 8. We came out with these figures: on both sides, instead of rhombuses, they now have isosceles triangles.
 9. Fold the outer side of each of the two triangles to the other along the midline.
 10. To get one petal for a flower from origami modules, you need to smear glue on the sides of the resulting paper blank.
 11. Glue them together without bending the shape in half, so that the volume necessary for the flower remains.
 12. From seven such petals it turns out very beautiful flower origami - they need to be carefully coated with glue on the side and glued together.
 13. Inside, the folded sides of the triangles make an interesting fluffy core.
 14. At the back, all the petals converge at one point, to which you can glue a wooden skewer, wrapping it with green paper - you get a stem for a flower.
 15. From several of these origami flowers you can make a very nice bouquet as a gift for March 8th. In addition, it is easy to make origami from origami modules in the same way.
As a child, each of us collected paper crafts. Ships, airplanes, frogs are traditional paper toys. However, the resilient Japanese did not stop there. Origami is a whole culture, the art of paper plasticity. In today's article I will introduce you to one of the types of this art - modular origami. For some reason I wanted to remember summer today and I bring to your attention origami flowers daisy. This very beautiful, clean flower will look great in an arrangement on your desktop. After all, the warm rays of the sun emanate from it, looking at it, you always want to go on vacation. At the moment I will offer you chamomile origami scheme - the easiest to work with. When you master such a volume of work, you will definitely create another scheme, a heavier, but charming daisy according to a different scheme.
Already from the name it is clear that these crafts are based on modules, which, when inserted into each other, are assembled like a construction set. Therefore, the first thing we need to master is creating a module. To do this, we need a regular A4 sheet 1. Cut the sheet into 16 equal parts, as shown in the figure.
2. Take one sheet and bend it in half.

3. Once again in half and unfold it back. Turn the fold towards you

4. Follow the lines, fold the edges towards the center.

5. Turn over and fold the bottom flaps up. At the same time, we bend the remaining corners behind the triangle.


6. Unbend, folding small triangles along the marked lines, and again bend the flaps up. Fold in half.

7. The module is ready.

8. On one side it has a pocket, which we will need during assembly.

Don't be afraid of this long description. In fact, the module itself is assembled simply and very quickly. Once you figure it out, your hands will continue to twist the modules by themselves. Further things you need to know before starting assembly - the module has 2 sides: Short:

and long:

This is important because during assembly we will connect the modules along the long or short side. And finally, we move on to the process of creation itself. I'll show you one simple diagram from modular origami. Having mastered it, you will be able to take on more complex models. The “Chamomile” scheme, the first and second rows will be assembled from 20 modules Pink colour. When assembling, the module is placed on the short side, as shown in the picture.


We make the third row of 10 yellow modules, placing the module on the long side. At this stage, be careful that the tails of adjacent modules are connected. That is, we get a staggered connection.


After this, we turn our flower over and the remaining rows will be made in modules on the short side.

Fourth row – 10 yellow modules.

Fifth row – we put 2 elements on each module. Assembly takes place in such a way that the free pocket ends up inside. Thus, we will need 20 white modules.

The last sixth row will consist of 30 white modules. We put 3 elements on 2 modules, again the free pockets should be inside.


The flower itself is ready, all that remains is to make the stem and leaves. To do this, we need a regular straw and green electrical tape.

We wrap the straw with electrical tape, make leaves from colored paper or from the same electrical tape. We insert the stem into the middle of the flower. To do this, we squeeze the chamomile petals a little, and a hole is formed on the back side for the straw. It must be said that there is no need for special fastening; the stem will hold on just fine.

Make a few more of these daisies and you will have a wonderful spring bouquet. This craft can also be a good gift for friends and family.


Modular origami: flowers
In general, there are many types of origami. We suggest trying your hand at volumetric. To create such figures it is used a large number of identical elements - modules that are inserted into each other. The most commonly used is the triangular module. As a rule, it is made up of small pieces of paper, which are then inserted into each other. All module sheets must be the same size. 1/16 or 1/32 of the landscape sheet is most suitable. So, let's move on to creating modules:


As you can see, the module has two bottom corners and two pockets, so they can easily be inserted into each other. This is how origami flowers are created from triangular modules.

However, in addition to the triangular modules, you will need 1 kusudama module for the core of the module flowers.
- Fold a square piece of paper in half with the front side facing inward.

- Having unfolded it, fold it in half again, but in the other direction.

- Unfold the workpiece and fold it in half diagonally, inside out.

- We unfold the part again and fold it diagonally, but in the other direction.
- Having unfolded the workpiece, turn it inside out towards you.

- Using the lines created by folding diagonally, we fold the square.
- Bend the edge of the square and flatten it in the middle.

- Having turned the square over, we do the same with the 3rd edge, as well as 2 and 4.

- We bend 1 edge of the part 180 degrees. We see only its seamy side.

- We bend the edge so that the edge is along the fold line of the workpiece.

- We do the same with the 2nd rib.

- After this, the triangular edge between the bent ribs must be bent towards the top of the module.

- In the same way, in pairs, we add 5 and 6, 3 and 4, 7 and 8 ribs of the workpiece.

- We unfold the entire workpiece.

- We work with the wrong side. We begin to fold and assemble the part, as shown in the photo.
- Fold the remaining three corners of the workpiece in the same way.
- Our module is ready!

Modular origami flowers: master class
Now let’s proceed directly to assembling the cornflower flower. To do this you will need to make 10 blue, 10 green and 70 blue triangular modules and 1 kusudama module of blue color. The assembly diagram for modular origami cornflower flowers is as follows:
1. 3 rows are assembled immediately:
- 1 row - 10 green modules;
- 2nd row – 10 blue modules, put on long side out;
- 3rd row - 10 blue modules, put on the short side outward.

We get a small flower.

2. Turn the flower over to the other side and fold the 4th row of 10 blue modules.

3. In the 5th row you should put on 20 blue modules. This is done in such a way that there are 2 modules on each previous module. Free pockets should be inside.

4. Row 6 uses 30 blue modules. For every previous 2 modules, 3 modules are put on: 1 module is located in the center, and 2 side ones so that the free pockets are inside.

5. A kusudama module is inserted into the core of the flower.
6. Making a cornflower stem. To do this, we cut out the top part of the cocktail tube; we don’t need it.

Wrap the tube in green paper and cut out a leaf.

7. Insert the stem into the lower central part of the flower. Ready!
So, knowing how to make a flower from modules, you can easily create a whole bouquet of cornflowers. It is best to place the bouquet in an origami vase made from modules. This is a completely different story!

From the modules you can make a flower vase and other figures, for example, a hare.
Master class Craft product Origami Chinese modular Modular origami “Lotus” Paper Glue
I have seen a similar lotus on the Internet more than once, but MK and the diagram are nowhere to be found (at least I haven’t found one). Many people are looking for a diagram or a master class, I decided to help))) This is the lotus we will make today )) For him we need: white -271; pink - 1064; green - 780 Module size 1/32.

So, let's begin))


Thus, we collect 2 rows of 8 pieces in each row. We close the chain.

Third row 16 pcs. We dress it this way (shown in a different color in the photo).

Fourth row 16 modules. We dress as usual.

Carefully, holding the edges, turn the workpiece inside out.

Fifth row 32 pcs. Add in the same way as in photo number 5, only with the reverse side.

Sixth, seventh and eighth rows of 32 pcs. in every row. We dress as usual.

The ninth and tenth rows are 32 pcs. but we put it on with the long side out. The ninth row is white, the tenth is pink.

Now we collect the top six leaf (that’s what I call it). We collect 2 rows of 54 pieces. in each row. It is better to place it on glue.

Third row 1 white module, 8 pink, 1 white, 8 pink, etc.

Fourth row: 2 white, 7 pink, etc.

Fifth row: 2 white, 6 pink. We dress this way.

Sixth row: 2 white, 5 pink, etc.

Seventh row: 2 white, 4 pink.

In the eighth row there are 3 pink ones, in the ninth row - 2, in the tenth row - 1.

The eleventh row is 2 white, the twelfth row is 1 white. Our six-sheet is ready.

Now we make the bottom six-sheet. We collect 3 rows of 66 pieces.

Fourth row 1 white, 10 pink, etc.

Fifth row 2 white, 9 pink, etc.

Sixth row: 2 white, 8 pink, etc.


We slightly raise the center of the upper six-leaf leaf and carefully insert the crown of our flower into the hole.

This is what the workpiece looks like from the reverse side.

It is advisable to glue the joint using a heat gun.

Glue the bottom hexagon and bend it into a lotus shape.

And here are our leaves. We collect 6 rows of 39 pieces. in every row.

Seventh row. We put one module on one ray. Thus, there are 78 pieces in the row.

The next row, we put on 12 modules in the usual way, skip 2 rays, put on 12, skip 2, etc.


Then 10,9,8,7, etc. Now the leaves are ready))

We connect all the details and voila))) Our lotus is ready)))

Here it is in red)))

THANK YOU SO MUCH to everyone who looked)) This is my first MK)) I hope I explained everything clearly))
Modular origami is more difficult simple origami for children and requires attention, perseverance, spatial thinking and patience. However, modular origami is not difficult to fold. The main thing is to be careful! Flowers in modular origami take pride of place. Along with thematic figures for the holidays (for example, Easter Egg on a stand using modular origami technique) are created from simple modules. It’s a little more difficult to make volumetric modules. For example, the primrose flower. It turns out beautiful and strict.
For work we will need the following materials:
- square of origami paper with a side of 10 cm.
How to make a primrose flower in modular origami:

1. From origami paper you need to fold the basic shape of a double square.
15 row - 18 white, 2 pink, 16 row - 17 white, 2 pink, 17 row - 16 white, 2 pink,
18 row - 15 white, 2 pink, 19 row - 14 white, 2 pink,
20 row - 13 white, 2 pink,
21 row - 12 white, 2 pink, 22 row - 11 white, 2 pink,
23 row - 10 white, 2 pink, 24 row - 9 white, 2 pink,
25 row - 8 white, 2 pink, 26 row - 7 white, 2 pink,
27 row - 6 white, 2 pink, 28 row - 5 white, 2 pink,
29 row - 4 white, 2 pink, 30 row - 3 white, 2 pink,
31 rows - 2 white, 2 pink,
32 row - 1 white, 2 pink, 33 row - 2 pink, 34 row - 1 pink
crafts from modular origami
Big flower
Modules 1\32 A4 sheets
1-14 rows - 10 white modules, 15-18 rows - 20 white, 19 rows - 19 white, 1 pink,
(we begin to form the flower by reducing the white modules)
20 row - 18 white, 2 pink, 21 row - 17 white, 2 pink, 22 row - 16 white,
2 pink, 23 row-15 white, 2 pink, 24 row-14 white, 2 pink,
25 row - 13 white, 2 pink, 26 row - 12 white, 2 pink,
27 row - 11 white, 2 pink, 28 row - 10 white, 2 pink, 29 row - 9 white, 2 pink,
30 row - 8 white, 2 pink, 31 row - 7 white, 2 pink,
32 row - 6 white, 2 pink, 33 row - 5 white, 2 pink,
34 row - 4 white, 2 pink, 35 row - 3 white, 2 pink, 36 row - 2 white, 2 pink,
37 row - 1 white, 2 pink, 38 row - 2 pink, 39 row - 1 pink

DIY modular origami
Petal
1 row-1 green
2 row-2 green
3 row-3 green
4 row-4 green
5 row-5 green make 2 parts and connect them
6 row-6 green
7 row-7 green
After connecting, we continue to collect the sheet
8 row-13 green modules
9 row-14 green
10 row-13 green
11 row-14 green
12 row-13 green
Reduce around the edges
13 row - 12 green, 14 row - 11 green, 15 row - 10 green, 16 row - 9 green,
17 row - 8 green, 18 row - 7 green, 19 row - 6 green,
20 row - 5 green, 21 row - 4 green, 22 row - 3 green, 23 row - 2 green.
24 row-1 green

Core calla lilies

For the stems, I took wire and wrapped it with green strips of paper.
Modular origami cornflower
Simon Svetlana
I would like to present to your attention a master class guide for breathing development colorful flowers manufacturing in technology « origami» .
It is worth noting that modular diagrams are one of the most interesting in art origami. After all, if you can create great things from one sheet beauty, then imagine what you can do with a few sheets of paper on hand and good lesson origami!

For today's craft you will need 8 square sheets, and a little trickery that is not typical for traditional figurines origami, - glue. But, in this case, this will not play a particularly serious role, because our goal is to create a truly luxurious flower for the development of breathing.


In order to make something like this flowers You will need colored paper, glue, scissors, pencil, ruler.
To make one flower, you will need 5 sheets color paper in the form of squares with a side of 7 cm. One square - one petal flower.

Fold it in half diagonally.

Fold the left and right corners to the center of the resulting triangle.

Bend the top corners of each of the resulting triangles to the side, aligning the outer edge of the fold with the edges that are under them.

Now attention: Unfold both parts completely and fold them into a diamond shape. Fold the protruding corners inward so that the outer edge of the fold is in line with the edge of the underlying layers. Now fold the resulting triangles inward along the fold.

Apply glue to these two folded halves and glue them together. This will be the first petal.

Make 7 more petals in the same way. Glue them together. The flower is ready


And now the most important thing: a lush center and shaggy leaves, with their help we will develop breathing.


Ready flowers insert into decorative candles. The guide is ready.